I recently started using Obsidian and didn’t want to pay for Sync or Working Copy, so I thought I’d try to figure out a way to sync my vault everywhere for free. I saw in the comments of this post by rsteele and this post from ForceBru that people were able to get GitHub to sync with their iOS device using the a-shell app, but the way to do it was not really discussed. I hope that this tutorial will be useful for other non-tech-savvy people like myself who would like to get their vault synced across all their devices without having to pay for it. The overall process for this comes from this post on the Logseq forums. It’s somewhat involved, but has improved my workflow so I think it’s worthwhile.
When the pop-up opens select On my iPhone → Obsidian (hit ‘Done’) choose the entire folder
The working directory should now be the Obsidian files folder. For me, a-shell auto-named the the folder Documents (different from the default /Documents), so run renamemark Documents obsidian to change it
Verify that the obsidian folder is a bookmark by running showmarks
Choose SSH key 1 and enter its password (just hit enter if you didn’t add a password)
Your vault should be downloaded from GitHub! Now is a good time to go into the Obsidian app and check to make sure everything looks okay. The Obsidian Git plugin throws a bunch of errors on startup, so go to Settings → Community Plugins → Obsidian Git settings and turn on ‘Disable on this device’
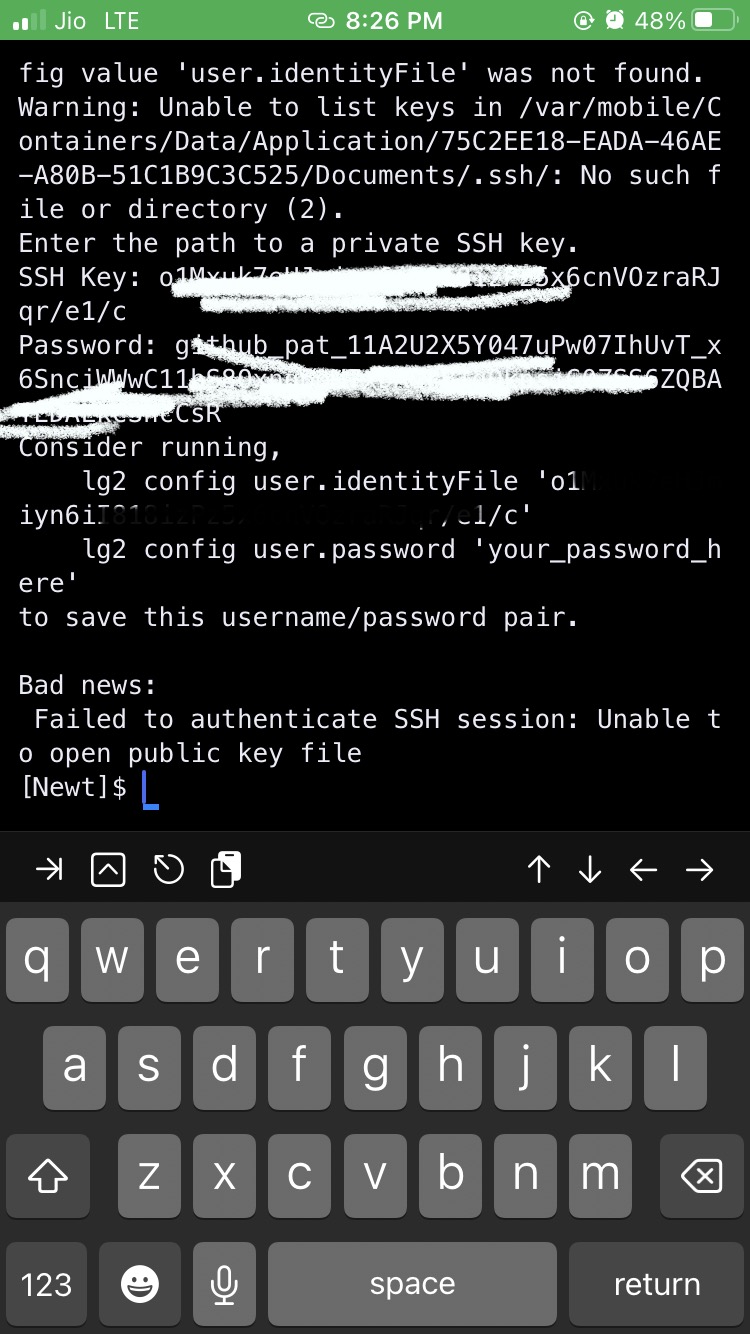
Back in a-shell, at the beginning of the last output a-shell says Consider running.... Copy and run the two commands its suggests to store the SSH key and its password in user.identityFile and user.password, respectively
Then store the name and email used for commits with the commands
lg2 config user.name "NAME"
lg2 config user.email "EMAIL"
Define Shortcuts to push and pull:
Both Shortcuts execute shell scripts through the a-shell Shortcut command ‘Execute command’. Links to my Shortcuts are below; all they do is execute the following commands inside a-shell:
To automate pulling from GitHub on startup, I created another Shortcut (link) that would call the ‘Obsidian pull’ shortcut (created in the last step) and then open the Obsidian app
Add this Shortcut to the home screen to replace Obsidian (app icon link)
Optionally, disable Obsidian from appearing in the search menu (Settings → Obsidian → Siri & Search → Show App in Search) so that this shortcut is the only way to launch it
For pushing:
This one is a little more tricky. I created Shortcut Automations that trigger whenever the Obsidian app is open or closed, then waits two minutes before pushing. If the app is closed and re-opened within two minutes the push doesn’t go through. A link to the Shortcut that triggers when Obsidian is closed is here, and a link to the Shortcut that triggers when Obsidian is opened is here. (If the Shortcuts folder doesn’t exist in Files, you’ll have to create it.) A downside to this method is that locking the phone with Obsidian still running doesn’t trigger a push, as iOS still considers the app ‘open’. Additionally, while working in the app for a long time, a push is never triggered. If anyone has any better ideas about how best how/when to push please let me know.
Other notes
I started learning how to use the shell and git about two weeks ago (and just to start synchronising my vault across devices), so I apologise if some of the steps are clunky or inefficient.
I’m pretty new to Obsidian as well and my vault is pretty small. The pushing/pulling might be too slow to be used reliably on larger vaults.
I tried using Automations to run the push/pull Shortcuts directly when Obsidian is open or closed, but they run whenever the app is minimised or un-minimised, which became cumbersome quickly.
Opening the app through a Shortcut that pulls from GitHub then launches Obsidian has worked pretty well so far for me, but I would like to have a better way to push.
I have had to put in my own 2-3 weeks worth of learning about Git.
A couple of remarks to your post, if I may:
An lg2 pull is always a good idea and a good habit to have before add + commit + push as any merges must happen locally rather than on the host.
The command lg2 add . was a welcome introduction because it will handle adding all untracked files (any deletions and additions of files not yet on the repo) as well. It is superior to lg2 add -u.
With pickFolder I bookmarked my repository folder thus there is no need for the cd (change directory) command (which if I remember right, did not even work for me when run from the shortcut).
Instead of your echo command I run lg2 status to see if everything was done correctly. If you are on branch, you are good to go.
On my larger repo I need to put in the commands one by one in the A-Shell terminal and wait it all out. The cloning process has no problems though. There is no memory or timeout issues, fortunately.
In case I might have any issues, I have set up an automated zip archive shortcut that copies the zips to my iCloud folder (from its browser website only compressed files can be downloaded in a batch, not folders, hence the idea).
(For me, the reason to leave iCloud for Git was not handling the myriad small files correctly [as I need to edit them with Notepad++ from time to time], but larger files are uploaded instantly, though.)
On my smaller repo, the Obsidian Git plugin runs smoothly (on iPad as well). As discussed elsewhere, there one needs to use the https protocol instead of git with the ssh keys.
What I do is open the config file in the .git folder in the Taio app (which sees the hidden folders that the iOS Files app doesn’t show) and edit from Taio (e.g. if I need to make any changes in the URL format or delete the superfluous keychain password).
The whole reason I did this was because I thought the Obsidian Git plugin was incompatible with iOS. I searched around to see if anyone had a workaround, but all I saw were the posts I linked above about using different apps to interface between Obsidian and GitHub. Could you share how you got Obsidian Git to work on your iPad in more detail (or link to the ‘elsewhere’ you mention)?
Unfortunately, I don’t remember which link I should give you to go on. (I may have garnered extra info from here, though.)
I can safely recommend you just go ahead and install the Obsidian Git plugin and in the upper right hand corner follow the messages the plugin gives you.
At some point it will ask you for the GitHub user name and the password (I use the token string instead).
(If the dialog disappears in the meantime, you just go into the plugin settings and put in your details; once you enter your password, it will remember it so don’t worry about the empty record there.)
If you have authentication issues (which probably you will), you go into your repo folder, then in the .git folder find the config file. I recommend not using Linux commands but using the GUI of Taio, as I mentioned.
In there, you need to change
That is you need to change git@ to https:// and the colon to a slash in the URL. Username and repo-name are self-explanatory.
Because now you have two kinds of auth methods (passwords) (one created for SSH from A-Shell and one given for Obsidian Git), you need to delete the last two lines from your config file (because Obsidian Git doesn’t use the SSH protocol). These two:
identityFile = id_ecdsa
password = “somepassword”
I recommend copying these lines somewhere for future reference (I use AnyBuffer).
After that, Obsidian Git should work properly on the iPad, provided it is not a huge repo/vault (otherwise you’ll likely run out of memory).
Should you want to go back to A-Shell now to pull or push, LibGit2 will conduct its business through the https protocol and thus ask for your password/token (which you either put in as you go or have it cached in but I did not manage to do that).
If your repo is relatively small, you wouldn’t need to go back to A-Shell to fiddle with pull/add/commit/push or any passwords. I am not so lucky.
Thanks for the great tutorial, but I’m running into some snags here regarding For pushing. I’m not quite sure how to configure the Shortcut you gave me to trigger when obsidian is started or closed, can you provide me with an example of how to trigger it? And what does the directory Shortcuts stand for? Can you tell me more about it?
The starting cd was just to get back to the root/default Documents folder. I thought at the time that it was necessary to jump from root to wherever, but that’s not the case. It shouldn’t break anything, but it’s not necessary either.
I glossed over how I set up the automated part because I wasn’t (and still am not) entirely satisfied with its smoothness. Hopefully the below points can answer your questions:
For the push Automations to work, a Shortcuts folder must exist within the Files app under ‘On my iPhone’. To create it, I used a-shell and pickFolder-ed the entire ‘On my iPhone’ directory, then ran mkdir Shortcuts to create it. There might be an easier/more graphical way, but that’s how I did it. Inside this folder, the automation Shortcuts store a boolean ‘variable’, needToPush.txt, that each one can read/write. (I already had this folder made and am using it for other Automations so it felt natural to use it here; sorry if it caused any confusion.)
There are two Automations: one that triggers ‘When “Obsidian” is closed’, and one that triggers ‘When “Obsidian” is opened’. For both I disabled ‘ask before running’ and ‘notify when run’.
Inside the Automation that runs when Obsidian is opened, the only action is ‘Run Shortcut’ noPushNeeded
Inside the Automation that runs when Obsidian is closed, the only action is ‘Run Shortcut’ pushIfNeeded (poor naming convention on my part)
the pushIfNeeded shortcut’s wait time can be adjusted by changing the number of times the repeat runs or directly decreasing the wait command’s time. I found that if I waited too long, though, the automation would fail to trigger. Decreasing the wait time may be useful in testing if the Automation is set up correctly
I’m not sure what the issue would be without knowing what error message you’re getting. Googling the message would probably turn up a better answer than I could give, but if that doesn’t work post here and we can try to figure it out.
Running help in a-shell lists a bunch of commands. Some of them can change the appearance of the terminal (different colour, font size, etc.)
Seems like lg2’s default branch is named ‘master’, and since mine is as well I didn’t consider people who call theirs ‘main’. To create a local ‘main’ branch, try running lg2 checkout -b main and then lg2 checkout main. You might have to redo pull steps. I haven’t tested this as well, so let me know if it works out.
Alternatively (and what I probably should have written in my original post), a more elegant method may be to use lg2 clone [email protected]:USERNAME/REPO-NAME.git in the obsidian folder instead of running lg2 init . inside obsidian/VAULT-NAME. I haven’t tested that, though, so let me what you do and what ends up working.
i merged the branches in github website .
can we push directly to main branch ?
it would make the workflow frictionless
any way to directly push to main branch
@siris thanks so much, this guide worked great for me, after trying and failing at a few other methods (including just using Obsidian Git on the iOS app. no dice.).
@arnx.3 thanks for having the same problem I did at first! I got stuck with the pushing and pulling steps. Not shortcuts/automation, just running the push/pull manually in a-shell did not seem to work at first. Thanks to you comment, I realized that the branch in my existing Github repo was ‘main’, while lg2 was trying to push/pull to/from ‘master’
To solve this, I ended up deleting Obsidian and all the data, so as to clear the repo from my phone, and run the whole tutorial over again. But this time, I followed @siris instruction from the comment above:
a more elegant method may be to use lg2 clone [email protected]:USERNAME/REPO-NAME.git in the obsidian folder instead of running lg2 init . inside obsidian/VAULT-NAME.
Thank you very much.
In the beginning, I used password instead of token, which led to an error.
According to git-password-authentication-is-shutting-down, only token can take effect.
@arnx.3 After 1 month you are still at it? Are you still having Git issues?
Then why don’t you use GitViewer (the Demo version will be fine/*) instead? Just use the GitViewer authentification (register it on GitHub) and you can push for free (which Working Copy doesn’t allow).
With GitViewer, you can also pick any folder, including Obsidian’s local folder.
Downside is that add+commit will be slow using GitViewer.
/* Unfortunately, you need to pick your Obsidian folder every time you use the app since the Demo version doesn’t save your private repo, but at least the SSH key provided by GitViewer is constant (I reckon it will be different for each user but since it’s a demo version, I have no way of knowing).
I ran into this issue a few days ago after updating a-shell. I think they re-structured some stuff behind-the-scenes. I fixed it by running the following:
cd
cd .ssh
pwd -P
The last command outputs the full path to the .ssh folder. Copy it, then jump obsidian back to your vault and run lg2 config user.identityFile NEW_PATH, where NEW_PATH is the path you copied (ending in /.ssh) + /id_ed25519.pub