Intro
(Skip this if you want to go straight to the good part)
I have a confession to make:
I’ve never figured out the whole Zettlekasten thing. I know Obsidian is suppose to be God’s gift to second brains, but my ‘zettle’ notes have never gone beyond the following:
“The key to fixing the problem is knowing what it is.”
(Seriously, that’s the entire content of a note I just pulled from my Zettle folder. A real profound world-changer.)
Since I have little desire to share my philosophizing with anyone else, I haven’t seen the point in writing down these soundbites for myself. Perhaps that will change one day, but for now, my main use case for Obsidian is as a life-management tool, not an idea management tool.
A particular area Obsidian shines is as a recipe manager and shopping list. This tutorial/showcase is about setting it up for yourself.
Even though Dataview is used, don’t let that scare you off: you can copy and paste the needed Dataview snippets directly, and no coding skills are needed.
Goals:
Show how to use Obsidian as friction-less shopping list.
Show how to use Obsidian as a recipe manager/digital cookbook.
The Good Part (Tutorial starts here)
Plugins:
Checklist (Required for Shopping list functionality)
And/Or
Dataview (Required for Cookbook functionality)
Themes:
A theme or CSS snippet with a checkmark that doesn’t apply strikethrough to text when checked.
The pictured theme is the Minimal theme.
Part 1: Shopping List
Frictionless, integrated.
Step 1
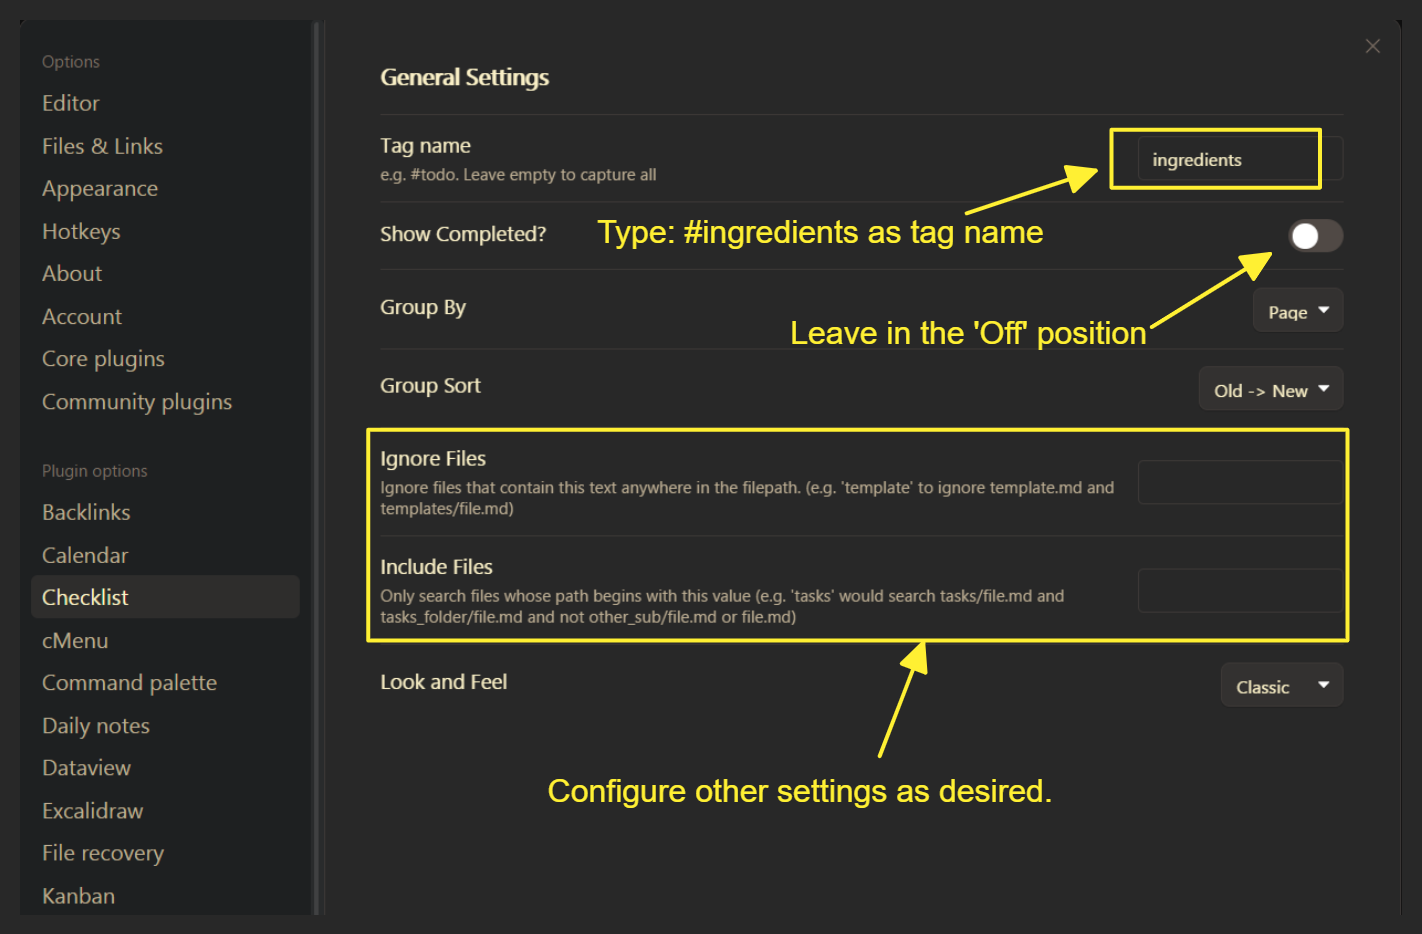
Download and install the Checklist plugin.
Step 2
Configure the Checklist plugin as follows:
Step 3.
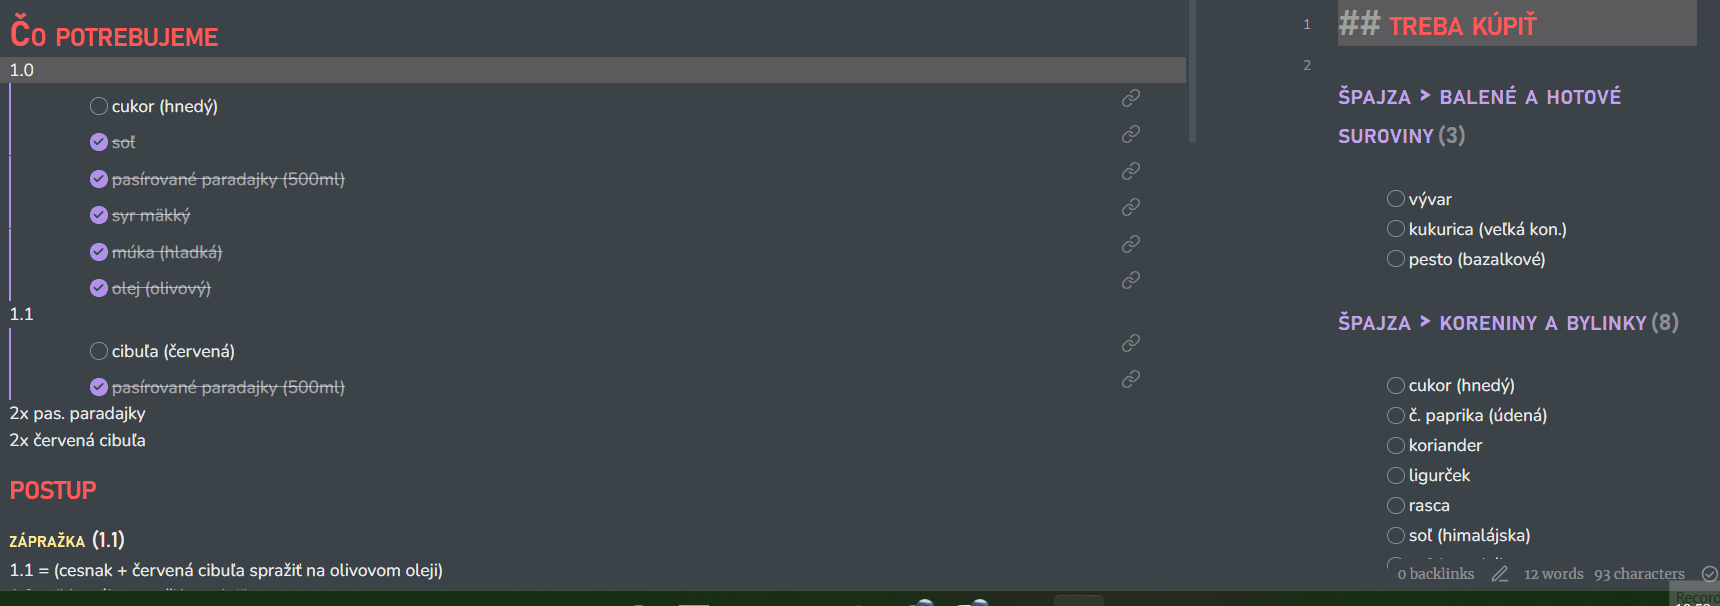
Setup your recipes with the ingredients as checkmark items with the tag #ingredients directly above the list.
NOTE: Make sure no line-breaks exist between the items in your ingredients list. After a line break, you will need to add another #ingredients tag in order for the list to show up correctly.
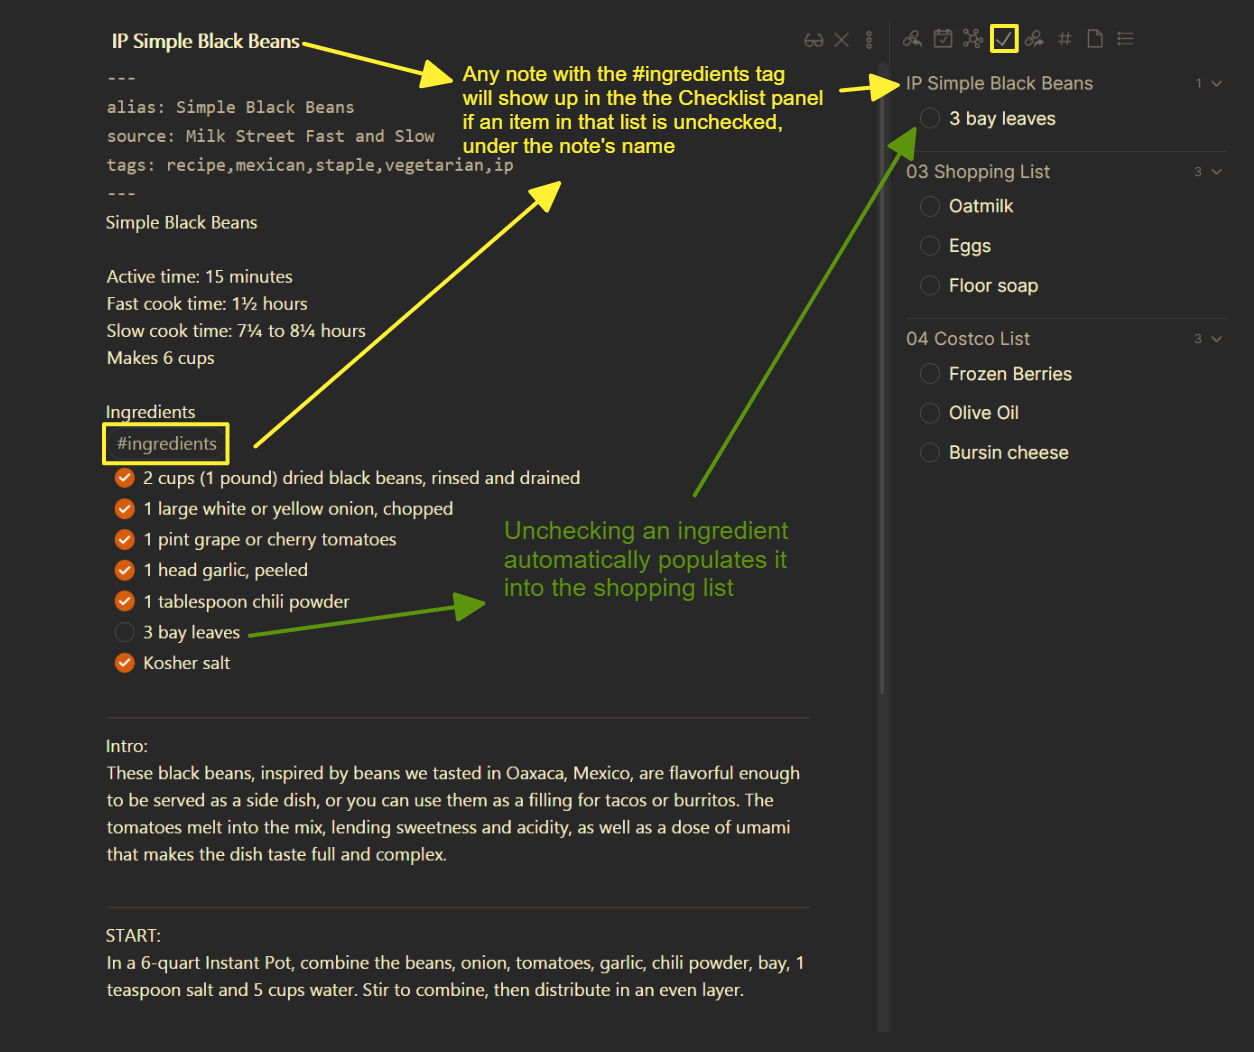
Each week prior to grocery shopping, I go through the recipes I plan to make that week, review the pantry, and simply uncheck the checkbox next any of the ingredients that I don’t have in each recipe file.
They are automatically populated into the Checklist ‘Shopping list’ sidebar, which I can refer to at the store.
As I shop in the grocery store, I check off the items in the Checklist sidebar, and this checks the checkbox in the individual recipe file. This means I don’t need to open each recipe file to check off items I’ve purchased.
Another way to use this: As you are cooking a recipe and you use up a staple ingredient (like flour or sugar), you simply uncheck the box next to it so that it populates into your shopping list for the next time you go to the store.
It really sucks to use up your Coriander, and then forget you ran out of it the next time you cook Indian food. This way you continually track and replenish your staple pantry items as they are depleted.
In addition to each recipe having it’s own ingredients, I have a separate ‘Shopping List’ file with pantry staples, and other shopping items which would never be found in a recipe, like dish soap and paper towels.
It looks like this:
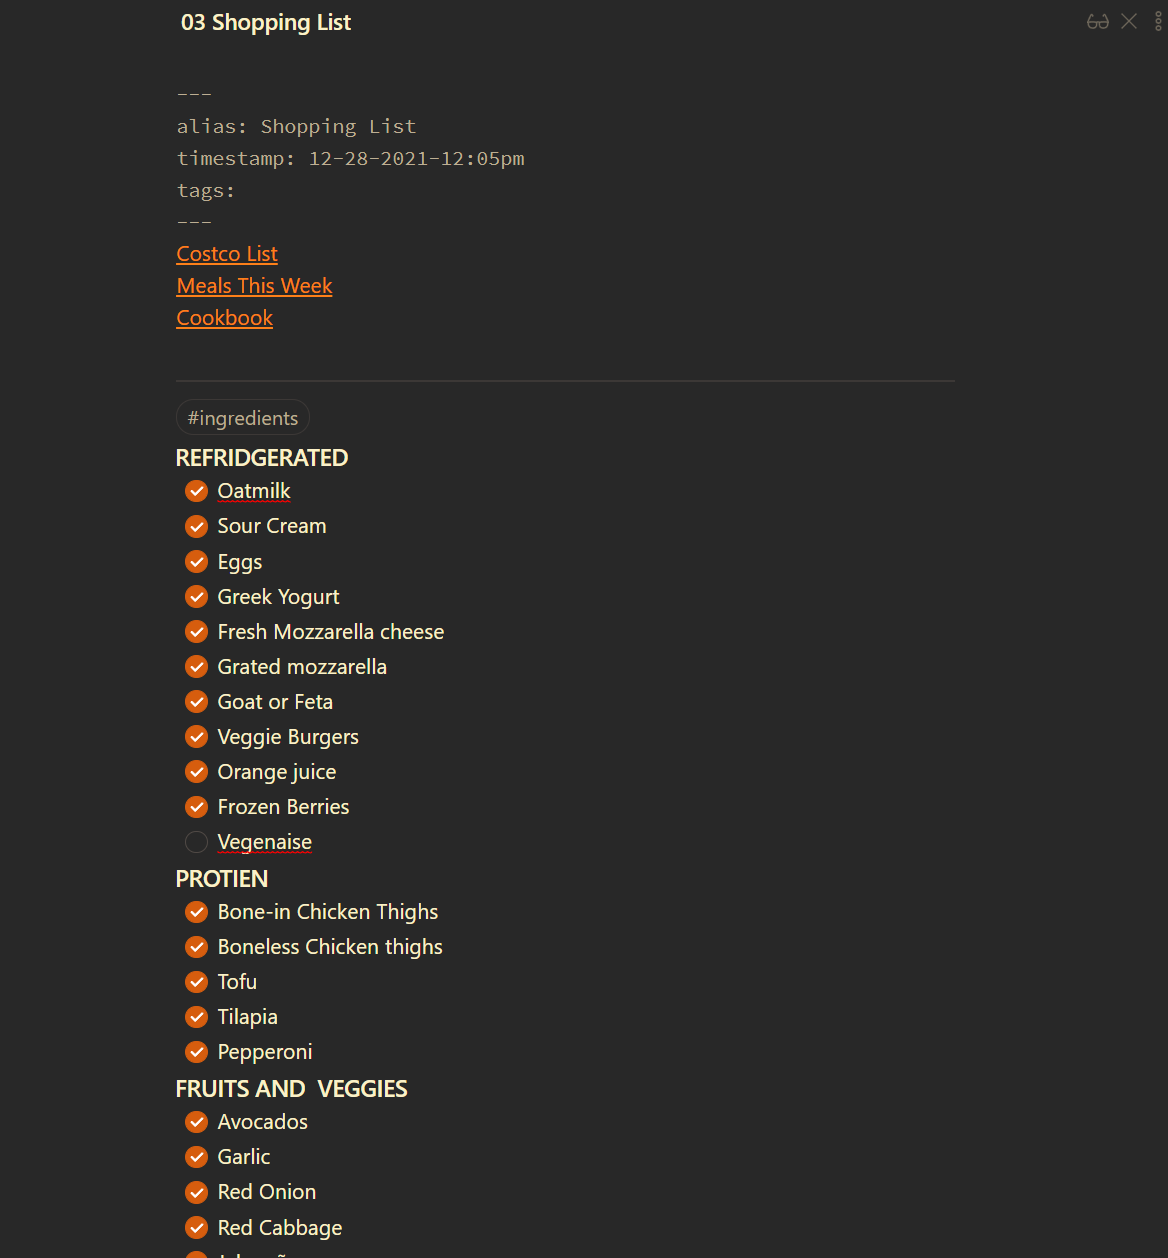
Because of the #ingredients hashtag at the top, the items on this list are pulled into the Checklist shopping list just like items in the recipes.
Part 2: Cookbook
Plaintext, Auto-Populating, Interlinked.
Download and install the Dataview plugin for the following to work.
I don’t import a ton of recipes from places. In fact, I only put a recipe into Obsidian after I’ve tried it and know that I want to make it again. This tutorial is not about easily grabbing and dumping tons of recipes into your vault. There may be other plugins or guides for that. Instead, this is about organizing recipes that you use regularly; recipes which is worth keeping and evolving over time as needed.
Inputting a recipe usually takes a me few minutes. If it’s digital, then copy-pasting is fairly easy. If it’s from a physical cookbook, I may use an OCR app on my phone to get text, or type it in by hand.
Regardless of the source, I manually format each recipe to fit into my template. Since I may only add three or four recipes a month, this is not a burden for me, and ensures that I only have the highest quality recipes in Obsidian.
Here’s a normal recipe for the Instant Pot, with a breakdown explaining it.
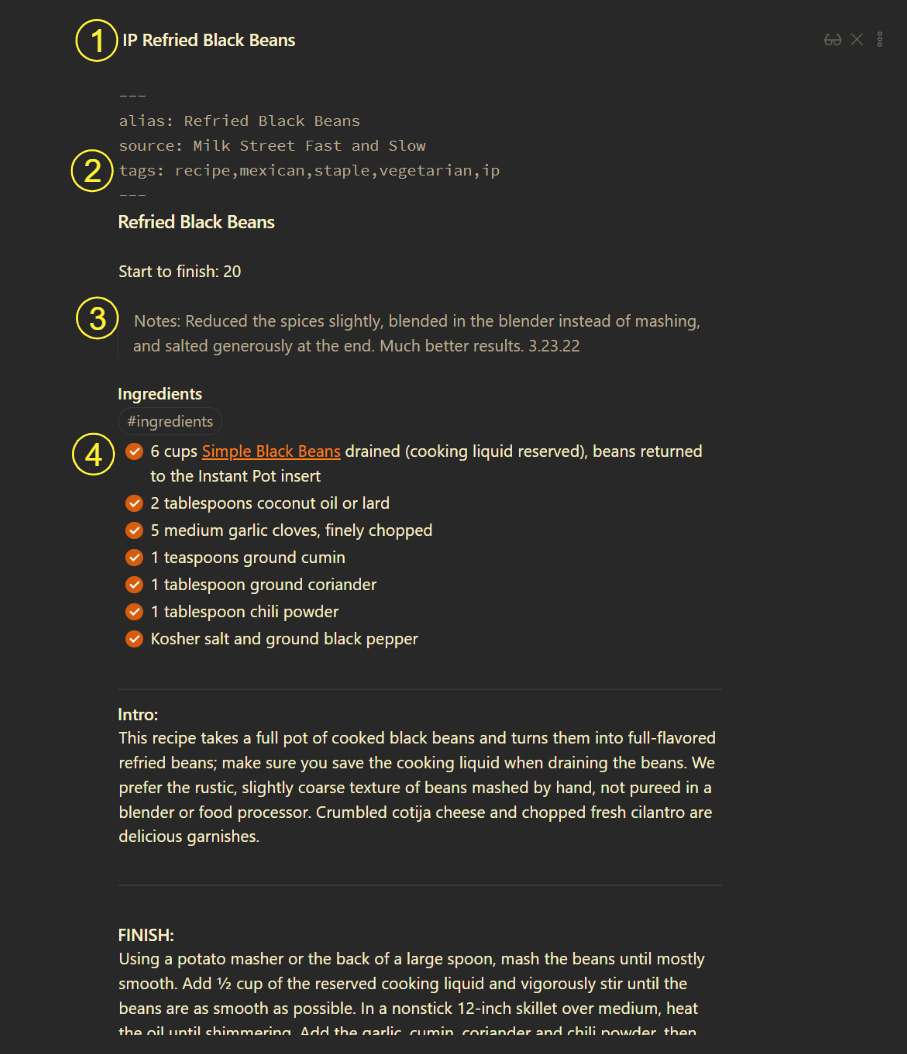
- The file name is ‘IP Refried Black Beans’, so that it’s obvious it’s an Instant pot recipe. This is so that if Obsidian goes away, I can still use this text file and know that it only works with an Instant Pot. I have an alias for this which removes the IP prefix, which looks for nicer internal linking.
- Tags. My rule for tags is us the absolute minimum possible, and each tag performs a specific, clear task. These are used for Dataview reference.
- Notes: This is one of the hidden gems of Obsidian as a cookbook. I often write cooking notes and edit the recipes as I go. In this case, I tweaked the spices and blending method from what the original recipe called for. Then wrote in the note what I changed and why it was successful. Sometimes I will use a footnote [^1] to to show what the original recipe called for.
One reason I dislike Paprika and other recipe managers is that editing recipes usually involves multiple clicks and different screens. With Obsidian, I edit things on the fly, which means my recipes steadily improve and evolve over time. This is also one huge benefit of Digital recipes over paper. With a paper recipe, you can only fit so many scrawled notes into the margins.
- Ingredients can be linked! This recipe is based on the Simple Black Beans recipe seen in the images above. A simple link takes me there, while not breaking the Shopping list functionality.
Here is the recipe template file I use. Feel free copy and paste this as a template file, and modify it to suit your own needs. The only YAML required for this tutorial to work is “tags:”. The Recipe sorting in this tutorial is done via Dataview with tags. The rest can be changed to suit your needs.
---
aliases:
source:
tags: recipe
---
### Recipe Name

 >Notes:

### Ingredients
#ingredients
- [x]

---
#### Intro:


---
#### Directions


#### FINISH:
Part 3: Putting it all together
When I create a new recipe, I add tags to it. These tags allow the recipe to automatically categorize and be added into my ‘Cookbook’ file, based on how I have that file setup. No manual adding required.
For example, if I add a new Vegetarian meal that also makes enough left-overs to use for lunches, I add the following tags to the YAML of the recipe: #recipe #vegetarian #meal #lunches
Then the Dataview query looks like this:
LIST FROM #recipe AND #lunches AND #meal AND #vegetarian
sort desc
Here is a screenshot of my ‘Cookbook’ file.
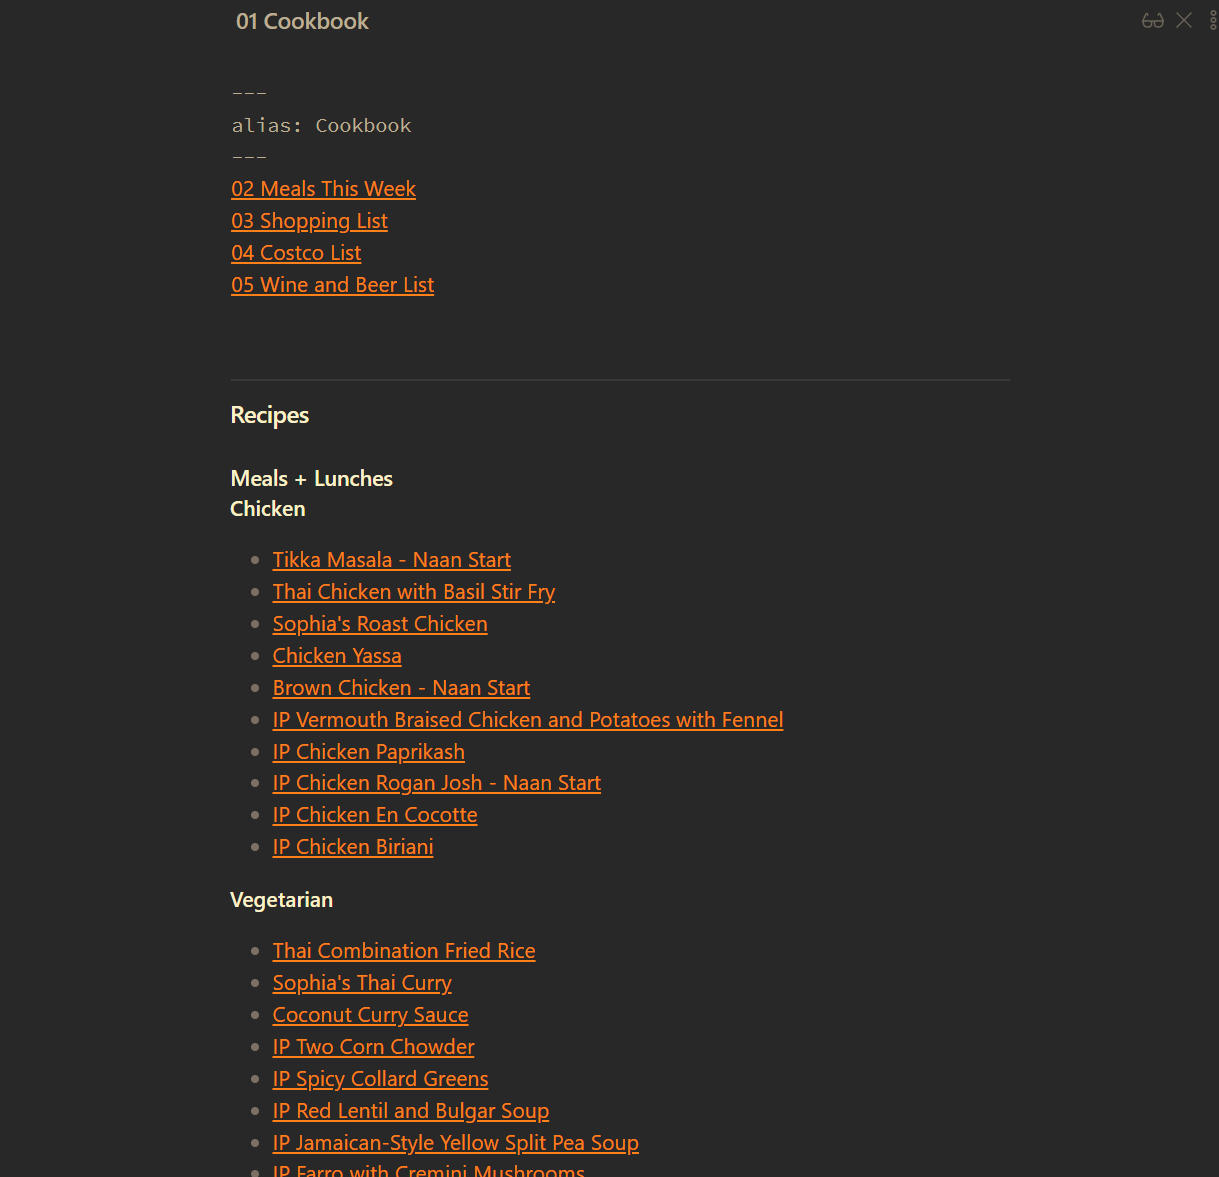
You can create any kind of list or categorization you want - all you need to do is change which tags you call out in the Dataview snippet.
For instance, I have a set of Thanksgiving recipes. Near the end of my Cookbook file, I used this Dataview snippet to create a small list with ONLY those Thanksgiving recipes for easy reference come November.
LIST FROM #recipe AND #thanksgiving
sort desc
Notice how there are only 2 tags used to create this particular list: #recipe and #thanksgiving Simple. Efficient.
NOTE: In the Cookbook screenshot above, I have several commonly used files with permanent links at the top of my Cookbook file. This is for ease of navigation. I want access to these files without having to use the Folder structure, so these links live there.
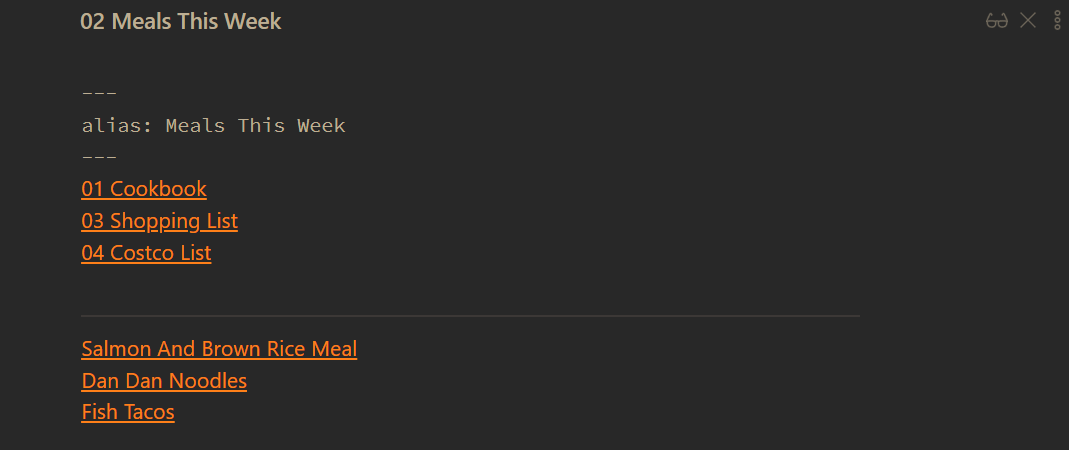
Speaking of which, the [[02 Meals This Week]] file is a very short MOC-type file (map of content) which I change every week. It’s extremely basic, but allows me to navigate quickly to the recipes I’m making this week.
Here’s a screenshot:
That’s it.
I hope this is helpful, and that it opens up a new use for Obsidian for you.