my css posted above should fix that
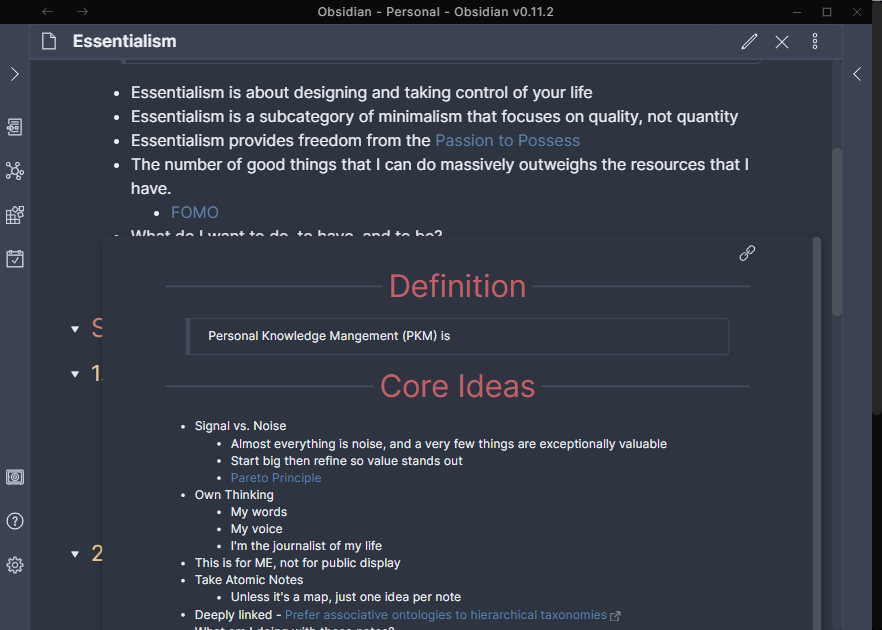
That’s the snippet I’m using. See the pic below - I shrank down the window to show everything. There’s a scrollbar on the popover, a scrollbar on the note, and a new darker scrollbar that appears for the entire Obsidian window.
You are SO awesome. Thanks for the tip! 
Only the popover and app scrollbar can be interacted with. The original scrollbar for current note isn’t interactable without closing all popovers.
That said the darker outside scrollbar for the entire app is desirable. Basically what happens is if you open a popover that doesn’t fit within the obsidian app window then any portion of that note that doesn’t fit in the obsidian widow will be cut off. However, when that happens the obsidian app itself creates a scroll bar for the entire app (the black bar in your image)
So for example with my code a popover can be up to 800px tall. It will be smaller if the entirety of the note can fit in a smaller space. But if you have a really long note then the popover will be 800px tall.
But if you have your obsidian app window really small or you open a popover close to the bottom of the screen then you might only see the first 400px of the popover, the rest will be hidden below the obsidian app window. You can still scroll inside this popover to see most of it’s content but lets say you wanted to click something at the very bottom of the popover. Well you’ll be able to scroll to the bottom but that last 400px will still be cut off.
But since the obsidian app scrollbar exists what actually happens is first you scroll to the bottom of the popover and then when you hit the bottom if you try to scroll again then it will scroll the entire obsidian app down so that you can see the entire popover and reveal that hidden 400px.
moving your mouse outside the popover closes it tho so you can only do this via scrolling with the mouse wheel.
If your still confused make to really long notes and make them each have a page link to each other. Then continuously open an infinite number of popovers between them and see how it works.
Hi Klaas, thanks for your kind offer to help. Since having cataract surgery, my light sensitivity had become more severe. I would prefer to have high contrast with larger fonts on everything. What would you suggest? I have Kepanos Minimal theme with Andy Mode. I have a 27 inch retina iMac.
Once those basics are done, I will Go through your snippets in Github and learn to fine tune it. Even though I build sites with Oxygen, there are so many tools to help with CSS without having to learn it, but those days are over for me now. Time to learn CSS, and even though I have a snippet library in Obsidian. That’s actually why I started using it, but I to store snippets. If you can point me in the right direction with high contrast, I would sure appreciate it.
@oxysmart: I believe that contrast can be modified with CSS, but I don’t know how. In my Github repository there is no snippet for that. If you ask in the Discord #css-themes channel somebody will show you the code.
As for font size, that can definitely be modified with CSS. I don’t use Minimal myself, but I did try it and, if I remember correctly, Kepano has also provided a plug-in which allows you to adjust font size from the interface. If I am wrong, you can use this to set the Preview font size for the whole vault:
body {
  font-size: 16px; /* change that to a value that suits you */
}
If you want to change the font size for Edit mode:
.CodeMirror pre.CodeMirror-line {
  font-size: 16px;
}
I hope this helps. If you need anything else let me know, even via a DM if you prefer.
Meanwhile, I wish you a steady health with your eyes.
Problem: Bullet Point Relationship Lines doesn’t show correctly in edit mode. It seems the Lines all aligned to the left.

Basic settings:
- Obsidian v0.11.3 using the default dark style.
- I added a snippet with the following code:
.cm-hmd-list-indent .cm-tab,
ul ul,
ol ul,
ul ol,
ol ol {
position: relative;
}
.cm-hmd-list-indent .cm-tab::before,
ul ul::before,
ol ul::before,
ul ol::before,
ol ol::before {
content:‘’;
border-left: 2px solid rgba(0, 122, 255, 0.25);
position: absolute;
}
.cm-hmd-list-indent .cm-tab::before { left: 0px; top: -5px; bottom: -4px;
}
ul ul::before,
ol ul::before,
ul ol::before,
ol ol::before{ left: -11px; top: 0; bottom: 0;
}
I’ve tried the original code @death.au shared, the problem remains in the edit mode.
Anybody can help?
Thanks!
I really appreciate your advice and will try it out once I meet some looming deadlines.
I modified this a bit to make it support both light- and dark-mode themes a bit better. The color scheme for light mode wasn’t really working with the line focus color.
UPDATED: Meta Post - Common CSS Hacks - #543 by Christian
VIM Light + Dark mode line focus
/* Modified by Christian (Chhrriissyy#6548). Original by MooddooM */
/* This version sets the line focus for both edit and insert mode. */
/* If you want to make it edit mode only, add the `.cm-fat-cursor` CSS class selector to both light & dark mode. /*

/* Cursor color in normal vim mode and opacity */
.cm-fat-cursor .CodeMirror-cursor, .cm-animate-fat-cursor {
    width: 0.5em;
    background: #d65d0e;
    opacity: 60% !important;
}

/* LIGHT MODE */
/*if you want the highlight to present in both normal and insert mode of vim*/
.theme-light /* .cm-fat-cursor */ .CodeMirror-activeline .CodeMirror-linebackground{
    background-color: #2f2f2f;
    opacity: 10%
}

/* DARK MODE */
.theme-dark /* .cm-fat-cursor */ .CodeMirror-activeline .CodeMirror-linebackground {
    background-color: #f1f1f1;
    opacity: 30%;
}
3 Likes
Hi, I like to find my tags easily within a page so I set up this css hack to have tags displayed on the right of my paragraph texts, with just a hashtag as marker within the paragraph.
The tag itself is hidden, what is displayed is a ::before pseudo-element (as marker) and a ::after pseudo-element (as tag text in the right gutter). If you hover one of them the hovering is also applied to the other one.
You can adjust as you like. I attach screenshots of this minimal code and of further decoration I use in my own set up (with tag pills etc.), with preview on the left and editor on the right.
p > a.tag {
    font-size: 0;
    width: 0;
    padding: 0;
    margin: 0;
    background: none;
    text-decoration: none;
    border: none;
}
p > a.tag::before {
    content: '#';
    font-size: 16px;
}
p > a.tag::after {
    content: attr(href);
    float: right;
    min-width: 3ch;
    max-width: 25%;
    margin-right: calc(-25% - 1.5em);
    margin-left: calc(-25% - 1.5em);
    position: relative;
    clear: right;
    white-space: nowrap;
    text-overflow: ellipsis;
    overflow: hidden;
    font-size: 16px;
}

p > a.tag:hover::after {
    max-width: fit-content !important;
}


17 Likes
@cmjn that’s pretty cool! Could you post an example of how to make only some tags go to the right? e.g. I would like to have only #check-later or #needs-research on the gutter, but all the other tags inline.
3 Likes
Hi @argentum you’d need to add an attribute selector i.e. replace by p > a.tag[href='#check-later'] each time p > a.tag appears in the snippet.
And so on for each tag you want to send in the gutter, which can become quite heavy …
But I haven’t tried to optimize the css, there may be a smarter way to do it.
1 Like
h3y, I liked your font too!
Thanks for the snippet. I just tested this. It works with href='#check-later'.
Could someone tell me the way to make the tags in the gutter align left, but stay on the right side?
Yes sorry I forgot the ‘#’
corrected, thanks
Is there a way to deactivate this in the page preview popover, since here it doesn’t work well?
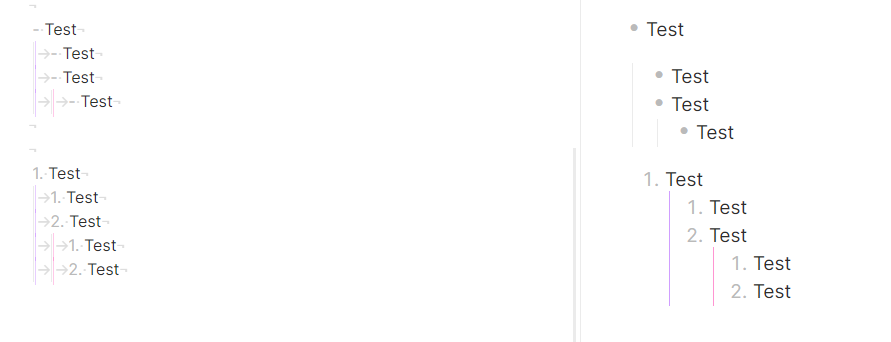
I did a CSS code to have color outlines like this.
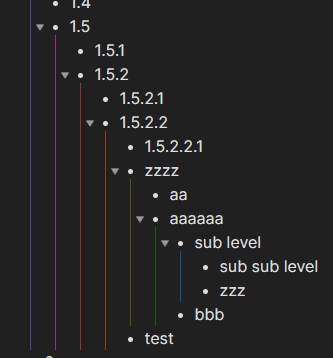
It’s still a work in progress, but it does the job.
bullet-point-relationship-lines.css (3.8 KB)
5 Likes
Nice, thanks!
In my Obsidian, it only works number list but not in bullet list as yours.
How to make it also works for bullet list?
Settings, Appearance, CSS snippets, open the folder at the right of the name, copy the css file in the folder, go back and enable it. It work for number list and bullet list !
1 Like