Meta Post - Common CSS Hacks

Enlarge image on hover

.markdown-preview-view img {
  display: block;
  margin-top: 20pt;
  margin-bottom: 20pt;
  margin-left: auto;
  margin-right: auto;
  width: 50%;  /* experiment with values */
  transition:transform 0.25s ease;
}

.markdown-preview-view img:hover {
    -webkit-transform:scale(1.8); /* experiment with values */
    transform:scale(2);
    
}

13 Likes

In script I posted above: When I hover on picture then images is enlarged. But I would like to add strong blur to all elements in behind the image, kind of focus mode for images. Does somebody have idea how to make it?

Thank you.

Hi, i found a useful small hack to support RTL (for Hebrew and arabic) by @dorongol
may be you can add it to the list.

Current version: v0.7.3

.view-header{
direction: rtl;
text-align: right;
}
.view-content{
text-align: right;
direction: rtl;
}

1 Like

Put country flags when you are using hashtag of ISO language code. You need to do it manually for each language.

Examples:

Czech language

.tag[href="#cze"]{

background: #b5fbac;
text-shadow:  20px 20px 60px #9ad592, 
             -20px -20px 60px #d0ffc6;
color: black;

}

.tag[href="#cze"]:before {
  
  color: white;
  content: "🇨🇿";
  padding: -20pt -20pt 15pt 5pt;
  margin: 0pt;
  font-size: 15pt;

}

.tag[href="#cze"]:hover {

border-radius: 14px;
background: #b5fbac;
box-shadow:  20px 20px 60px #9ad592, 
             -20px -20px 60px #d0ffc6;

}

English language

.tag[href="#eng"]{

  color: black;
  background: #b5fbac;
  text-shadow:  20px 20px 60px #9ad592, 
             -20px -20px 60px #d0ffc6;
}

.tag[href="#eng"]:before {
  
  color: white;
  content: "🇺🇸";
  padding: -20pt -20pt 15pt 5pt;
  margin: 0pt;
  font-size: 15pt;
}

.tag[href="#eng"]:hover {

border-radius: 14px;
background: #b5fbac;
box-shadow:  20px 20px 60px #9ad592, 
             -20px -20px 60px #d0ffc6;
}

:pray:t3: Somebody should make native plugin where user can define many replacements of the specific text tag into “icon tag” or combination of both.

7 Likes

Nicer checkboxes in preview by @kepano

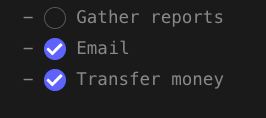
And here is my remix, nicer checkboxes in Editor:

/* Round checkbxes in preview and editor */
input[type=checkbox], .cm-formatting-task {
    -webkit-appearance: none;
    appearance: none;
    border-radius: 50%;
    border: 1px solid var(--text-faint);
    padding: 0;
    vertical-align: middle;    
}

.cm-s-obsidian span.cm-formatting-task {
    color: transparent;
    width: 1.25em !important;
    height: 1.25em;
    display: inline-block;
}

input[type=checkbox]:focus{
  outline:0;
}
input[type=checkbox]:checked, .cm-formatting-task.cm-property {
    background-color: var(--text-accent-hover);
    border: 1px solid var(--text-accent-hover);
    background-position: center;
    background-size: 70%;
    background-repeat: no-repeat;
    background-image: url('data:image/svg+xml; utf8, <svg width="12px" height="10px" viewBox="0 0 12 8" version="1.1" xmlns="http://www.w3.org/2000/svg" xmlns:xlink="http://www.w3.org/1999/xlink"><g stroke="none" stroke-width="1" fill="none" fill-rule="evenodd"><g transform="translate(-4.000000, -6.000000)" fill="%23ffffff"><path d="M8.1043257,14.0367999 L4.52468714,10.5420499 C4.32525014,10.3497722 4.32525014,10.0368095 4.52468714,9.8424863 L5.24777413,9.1439454 C5.44721114,8.95166768 5.77142411,8.95166768 5.97086112,9.1439454 L8.46638057,11.5903727 L14.0291389,6.1442083 C14.2285759,5.95193057 14.5527889,5.95193057 14.7522259,6.1442083 L15.4753129,6.84377194 C15.6747499,7.03604967 15.6747499,7.35003511 15.4753129,7.54129009 L8.82741268,14.0367999 C8.62797568,14.2290777 8.3037627,14.2290777 8.1043257,14.0367999"></path></g></g></svg>');
}

Looks like this:
image

Since the contents of the element are transparent, to check/uncheck a checkbox, place your cursor right after it:
image
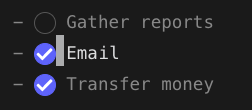
Press left arrow once, then press backspace.

To check an item:
Press your cursor behind the checkbox, press left arrow once, press backspace, type ‘x’ and it will turn into a checkbox.

Here is how it works in practice
ezgif-1-1cb6fc8b02cf

This makes long checklists in Edit more way more understandable and reduces my need to switch to Preview!

15 Likes

Nice. Nevertheless, the procedure

Press your cursor behind the checkbox, press left arrow once, press backspace, type ‘x’ and it will turn into a checkbox.

I like the idea of not having to switch to Preview, but to implement it is not practical if you don’t use checkboxes regularly. If I go back 1 week from now I’ll have to look it up how to do it. Nahh.

1 Like

The procedure is the same one you would use with a normal todo item in edit mode. I’m just listing it out step by step, as it isn’t visually obvious with the new styling.

Maybe I misunderstand you, but the normal step to create a checkbox:

  1. type -, then space;
  2. type [, then space, then ], then space again;
  3. still on the same line type a text for the checkbox.

Now, to place a checkmark, click once on the checkbox when in Preview. This is the normal step when one encounters a checkbox on a webpage.

That’s all there is to it, and it is intuitive. TBH, I don’t find your procedure intuitive.

Minimalistic Red / Green checkboxes

Screenshot 2020-07-03 at 19.43.24

/* CHECKBOX: Green / Red color */

.markdown-preview-view .task-list-item-checkbox{
    -webkit-appearance: none;
  box-sizing: border-box;
  border: 1px solid var(--text-muted);
  border-radius: 2px;
  position: relative;
  width: 1.3em;
  height: 1.3em;
  margin: 0;
  outline: none;
  margin-right: 4px;
  margin-bottom: 2px;
  cursor: pointer;
  vertical-align: baseline;

  background-color: #d068688f;
}

.markdown-preview-view .task-list-item-checkbox:checked {
  background-color: #68d0688f;
}
4 Likes

Stylish blockquotes

0.7.6 / 0.8.4 / 0.8.5 Compatible

Add quotation mark before quote

/* Add quotation character before quote */
blockquote:before {
  font: 14px/20px italic Times, serif;
  content: "“";
  font-size: 3em;
  line-height: 0.1em;
  vertical-align: -0.4em;
}
blockquote p { display: inline; }

Remove left margin

/* Remove blockquote left margin */
blockquote {
  margin-inline-start: 0;
}
19 Likes

Does not work for me.

Remove Yaml Front Matter from embeds

I had to write a new version for obsidian version 0.8.5, If you are on obsidian 0.8.4 or below, please use the other version!

0.8.5+ Compatible

Please note that Obsidian did add an option to hide the yaml frontmatter in Editor > Show frontmatter. If you turn that option off, you can’t see the yaml in preview mode and for previewed content.

This CSS tweak is still relevant if you have this option turned on but you still don’t want to see the frontmatter for previewed content (when you hover the mouse on a note) but still see it in preview mode.

/* Remove embed yaml front matter */
.markdown-embed-content > .language-yaml { display: none; }

0.7.6 / 0.8.4 Compatible

Since obsidian version 0.8.5, the yaml header is understood by obsidian so you don’t need to use that version if you have Obsidian version 0.8.5+.

Code

v1
/* Remove embed yaml first separator */
.markdown-embed-content > hr:first-child { display: none; }
/* Remove embed yaml content */
.markdown-embed-content > hr:first-child + p { display: none; }
/* Remove embed yaml second separator (if empty) */
.markdown-embed-content > hr:first-child + hr { display: none; }
/* Remove embed yaml second separator */
.markdown-embed-content > hr:first-child + p + hr { display: none; }
v2 (works with longer yaml frontmatter blocks)
/* Remove first hr */
.markdown-embed-content > hr:first-child { display: none; }
/* Remove blocks after first hr (max 5 blocks - repeat the pattern for more...) */
.markdown-embed-content > hr:first-child + :not(hr) { display: none; }
.markdown-embed-content > hr:first-child + :not(hr) + :not(hr) { display: none; }
.markdown-embed-content > hr:first-child + :not(hr) + :not(hr) + :not(hr) { display: none; }
.markdown-embed-content > hr:first-child + :not(hr) + :not(hr) + :not(hr) + :not(hr) { display: none; }
.markdown-embed-content > hr:first-child + :not(hr) + :not(hr) + :not(hr) + :not(hr) + :not(hr) { display: none; }
/* Remove second hr (max after 5 blocks - repeat the pattern for more...) */
.markdown-embed-content > hr:first-child + :not(hr) + hr { display: none; }
.markdown-embed-content > hr:first-child + :not(hr) + :not(hr) + hr { display: none; }
.markdown-embed-content > hr:first-child + :not(hr) + :not(hr) + :not(hr) + hr { display: none; }
.markdown-embed-content > hr:first-child + :not(hr) + :not(hr) + :not(hr) + :not(hr) + hr { display: none; }
.markdown-embed-content > hr:first-child + :not(hr) + :not(hr) + :not(hr) + :not(hr) + :not(hr) + hr { display: none; }

Comparison

Before

After

Works also with Naked embed

4 Likes

Pasting the code into my css gave me this in Editor
Screen Shot 2020-07-08 at 6.56.01 pm

hi, I’m new to CSS. This indent looks awesome and I figure I just need to paste them into the body section of my CSS file and that’s all done?

2 Likes

Replace the above line (Located in the second block of code) with

color: transparent !important;

2 Likes

Adding all kinds of embedded lists:

.cm-hmd-list-indent .cm-tab,
ul ul,
ol ul,
ul ol,
ol ol {
  position: relative;
}

.cm-hmd-list-indent .cm-tab::before,
ul ul::before,
ol ul::before,
ul ol::before,
ol ol::before {
  content:'';
  border-left: 1px solid var(--background-modifier-border);
  position: absolute;
}

.cm-hmd-list-indent .cm-tab::before { left: 0; top: -5px; bottom: -4px; }

ul ul::before,
ol ul::before,
ul ol::before,
ol ol::before {
  left: -11px;
  top: 0;
  bottom: 0;
} 
3 Likes

Is there a way to apply formatting to the filenames in the File Explorer? I would love to be able to apply colored Tag Pills to filenames, so that if I have notes related to a #podcast or #meeting or #PKM, they would stand out when browsing files.

1 Like

Can you clarify what this is supposed to mean?

1 Like

The original version only supports bullet points nested in bullet points, so I added all four combinations of bullet points and numbered points :wink: