University setup with lecture notes, progress bar and more using Templater, Dataview and Buttons

updated with more details on Excalidraw and problems databse section

Expanding and implementing a relational database from my previous post, I have created some more nifty trinkets to automate some processes of taking lecture notes, and various other notes for a university student.

  • Requirements: latest version of
    • Dataview plugin
    • Templater plugin
    • Buttons plugin

Semester page

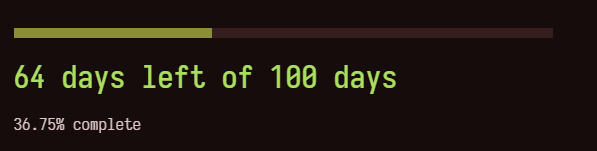
Progress-bar for the semester

  • add the date of starting of semester in the first line and the ending of the semester in the second line


## Semester

```dataviewjs
var a = moment("2022-01-01");
var b = moment("2022-12-25");

var n = moment()
var t = moment().startOf('day');

let q =  b.diff(a, 'days');
let p =  b.diff(t, 'days');
let r =  t.diff(a, 'days');

let h = n.diff(a, 'hours');
let i = b.diff(a, 'hours');

let html = `<progress style="height:10px;width:80%" value="`+h+`" max="`+i+`"></progress>`

if (r>0 && r<q) {
	html += `\n#### `+p+` days left of `+q+` days\n`
	html += (h/i*100).toFixed(2)+`% complete`
} else if (r==0) {
	html += `\nstars today`
} else if (r==q) {
	html += `\nends today`
} else if (r>q) {
	html += `\nended `+-p+` days ago`
}else {
	html += `\n#### `+-r+` days to go`
}

dv.paragraph(html)
```

gallery-type (css) courses query

I made this using the css snippet here: Obsidian Snippets - Dataview Table as Cards

Course pages

  • Dynamically create lecture note number with proper numbering.
  • The format for lecture note name is “OMD101.L01”
  • The lecture note is created under a sub-folder “Lectures”, which needs to be created before hand
  • Add the name template for lectures notes in this line: action: "% lecture-note", in place of of % lecture-note. This template must be kept in the templates folder of Templater plugin, as Buttons plugin takes the template from there.

# OMD101


## Lectures
```dataviewjs
const {createButton} = app.plugins.plugins["buttons"]

let h = dv.current().file.folder.toString();
h = h+"/Lectures"

var j = 	dv.pages()
	.where(k => k.file.folder == h)
	.sort(k => k.lecture, 'asc').lecture.last();

if (j) {
	j=j+1;
} else {
	j=1
}
const r = ('0' + j.toString()).slice(-2);
const fname = h+"/"+dv.current().file.name+".L"+r

dv.paragraph(createButton({
	app, 
	el: this.container, 
	args: {
		name: "Next lecture: "+j, 
		type: "note("+fname+", split) template", 
		action: "% lecture-note", 
		color: "yellow",
	}
}))
```

```dataview
table WITHOUT ID "[["+file.name+"|Lecture "+lecture+"]]" as lecture, date,   topics, rec, coursenotes
sort lecture
where course = this.file.link and (lecture or lecture = 0)
```

Lecture notes

Why write in Obsidian

There are drawbacks to writing in Obsidian for taking notes in Mathematics, Physics and Chemistry. But still, taking notes in full-on latex is not for everyone, and definitely not same as taking them in Obsidian.

Obsidian gives the following benefits over making notes in LaTeX or handwriting them digitally completely and keeping them as PDFs:

  • Obsidian notes and the entire vault is dynamic. Between lectures, one can directly link to previously written notes, to specific pages in documents in the vault, and one can embed them too! Live preview has made this even better!
  • Obsidian notes are plaintext. That definitely has benefits over storing them as PDFs.
  • Dataview queries can help create a dynamic table of lecture note details, anything you want to display. I used a parameter “topic” to list all topics discussed in the lecture.
  • Excalidraw plugin is a highly active in development plugin to draw figures, flowcharts and also can be used to handwrite notes! (More about how to use this latter on in the post.)

Lecture notes template

  • Takes in the name “OMD101.L01” and fills in the course as “OMD101” and lecture number as “1”
---
created: <% tp.file.creation_date("YYYY-MM-DDTHH:mm:ss") %>
modified: <% tp.file.last_modified_date("YYYY-MM-DDTHH:mm:ss") %>
tags: [lecture]
topics:
 - <% tp.file.cursor(2) %>
---
<%*
  let title = tp.file.title;
  var course = title.slice(0,-4);
  var lecture = title.slice(-2);
  lecture = Number(lecture);
%>
# <%* tR += `${course}` %> Lecture <%* tR += `${lecture}` %>
- [i] course:: [[<%* tR += `${course}` %>]]
- [i] date:: <% tp.file.creation_date("YYYY-MM-DDTHH:mm:ss") %>
- [i] lecture:: <%* tR += `${lecture}` %>
- [i] rec:: 

# <% tp.file.cursor(1) %>


---
- [i] CourseNotes::

Making Excalidraw play nice

This is how mixing Excalidraw with general notes look for me:

  • Quickly “create a new drawing and embed it and open it in a new pane” by setting this specific command into a hotkey.
  • Create a Excalidraw drawing with transparent background and blank canvas. Set it as the Excalidraw template.
  • For repetitive diagrams like aromatic rings in organic chemistry, coordinate axes, etc. you can add the ring and some common compounds into the Excalidraw library, from where you can bring them again and again.
  • Increase the default width of the embedded drawing in excalidraw settings. I set it to 700, where my leaf width is 750 in Sliding panes plugin.

Problems database

Keeping a database of all cool problems one has solved would be a desirable habit. I made it using tags, and not hierarchical, divided up by semesters because that is how I wanted the database to be.

This is for querying the list of problems, and making a button to add a new problem. The Dataview query groups the problems by the tags in the note. Again add the template for problems in the line action: "% problem",

## *problems database*

```dataviewjs
const {createButton} = app.plugins.plugins["buttons"]
let h = dv.current().file.folder.toString();

dv.paragraph(createButton({
	app, 
	el: this.container, 
	args: {
		name: "New problem", 
		type: "note("+h+"/Untitled, split) template", 
		action: "% problem",
	}
}))
```

```dataview
table rows.file.link as name
from #problem  OR #Problem
group by file.tags
flatten file.tags
``` 

Problem template

  • Asks for a title of the problem and creates a note with date as a prefix. This way we don’t have to be too specific in the note title and can have a short enough title.
  • The input title is put in the title: variable in the frontmatter which can be changed by adding the specifics if required.
  • Then it asks for the subject. This is added as a tag in the note like #problem #math
    • My array contains:
      • “math”
      • “physics”
      • “chemistry”
      • “biology”
      • “cs” - Computer Sciences
      • “programming” - Computer Programming, coding
      • “astronomy”
      • "earth-sci - Earth Sciences
---
created: <% tp.file.creation_date("YYYY-MM-DDTHH:mm:ss") %>
modified: <% tp.file.last_modified_date("YYYY-MM-DDTHH:mm:ss") %>
<%*
	let title = tp.file.title;
    const name = await tp.system.prompt("Problem Name");
	if (name) {
	title = "PROB."+tp.file.creation_date("YYYY-MM-DD-")+name
	} else {
	title = "PROB."+tp.file.creation_date("YYYY-MM-DD-HHmmss")
	}
	await tp.file.rename(title);
	const sbjo = ["math", "physics", "chemistry",  "biology", "cs", "programming", "astronomy", "earth-sci"];
	const subject = await tp.system.suggester(sbjo, sbjo)
%>tags: [problem, <%* tR += `${subject}` %>]
title: <%* tR += `${name}` %>
alias: [<%* tR += `${name}` %>]
---
# <%* tR += `${name}` %>
<% tp.file.cursor() %>
17 Likes

Dum question, I know – but what should the template be called? I have tried lecture-note but the djs is not finding it

Oh actually I should have specified, Buttons takes the templates from the templates folder of Templater plugin as far as I think, and the my template name is % lecture-note (I use % for templates yea, haha).

You can add the template name in this line in the course page: action: "% lecture-note",. As I said, it will take in from the file with that name under the templates folder.

1 Like

Many good ideas. Like it. Thank you for sharing.

1 Like

I can’t dynamically create lecture note number with proper numbering. I find that I can’t get the value of the j that result in this question.

Well only things you need to do is

  1. Create a folder and a folder note with the course code, say OMD101 as their names
  2. Create a subfolder Lectures under that folder
  3. Keep the lecture template in the folder for Templater plugin templates. The name must match with the one given in action: "% lecture-note", button dataviewjs.

Then the button should show Next lecture: 1, clicking that should create the first lecture note OMD101.L01 and open in a new pane. Now the button should show Next lecture: 2.

j just queries the maximum lecture note number, if there isn’t any it takes in 1. Its working for me, and I made them with my minimal coding knowledge :sweat_smile: I would recommend updating Dataview, Buttons, and Templater plugins.

2 Likes

Hello, I just wanted by this message thank Riddyrayes for sharing theses codes.

I was searching a way to have a life progress bar like notion, and your code “progress-bar for this semester” above was perfect ! :smiley:

I am posting below the code with some slight adaptations to make it usable as a progress life bar and a picture of how it looks like if it could be useful for someone else :

• YEAR COUNTER

```dataviewjs
var a = moment().startOf('year');
var b = moment().endOf('year');

var n = moment()
var t = moment().startOf('day');

let q =  b.diff(a, 'days');
let p =  b.diff(t, 'days');
let r =  t.diff(a, 'days');

let h = n.diff(a, 'hours');
let i = b.diff(a, 'hours');

let html = `**THIS YEAR**         <progress style="height:10px;width:20%" value="`+h+`" max="`+i+`"></progress>`

if (r>0 && r<q) {
	html +=  `    ** ` +(h/i*100).toFixed(0)+`%** | `
	html +=  +p+` days remaining, `+ (p/7).toFixed(1)+ ` weeks remaining`
} else if (r==0) {
	html += `    **YEAR : ` +(h/i*100).toFixed(0)+`%** | `+ p + ` days remaining`
} else if (r==q) {
	html += `   Ends today`
} else if (r>q) {
	html += `   Ended `+-p+` days ago`
}else {
	html +=  `   `+-r+` days remaining`
}
dv.paragraph(html)
**• MONTH COUNTER**


var a = moment().startOf('month');
var b = moment().endOf('month');


var n = moment()
var t = moment().startOf('day');

let q =  b.diff(a, 'days');
let p =  b.diff(t, 'days');
let r =  t.diff(a, 'days');

let h = n.diff(a, 'hours');
let i = b.diff(a, 'hours');

let html = `**THIS MONTH**     <progress style="height:10px;width:20%" value="`+h+`" max="`+i+`"></progress>`

if (r>0 && r<q) {
	html +=  `    **` +(h/i*100).toFixed(0)+`%** | `
	html += +p+` days remaining` 
} else if (r==0) {
	html += `    **` +(h/i*100).toFixed(0)+`%** | `+ p + ` days remaining`
} else if (r==q) {
	html += `   Ends today`
} else if (r>q) {
	html += `   Ended `+-p+` days ago`
}else {
	html += `   `+-r+` days remaining`
}

dv.paragraph(html)
**• WEEK COUNTER**


var a = moment().startOf('week');
var b = moment().endOf('week');

var n = moment()
var t = moment().startOf('day');

let q =  b.diff(a, 'days');
let p =  b.diff(t, 'days');
let r =  t.diff(a, 'days');

let h = n.diff(a, 'hours');
let i = b.diff(a, 'hours');

let html = `**THIS WEEK**        <progress style="height:10px;width:20%" value="`+h+`" max="`+i+`"></progress>`

if (r>0 && r<q) {
	html +=  `    **` +(h/i*100).toFixed(2)+`%** | `
	html += +p+` days remaining  ` 
} else if (r==0) {
	html += `    **` +(h/i*100).toFixed(0)+`%** | `+ p + ` days remaining`
} else if (r==q) {
	html += `   Ends today `
} else if (r>q) {
	html += `   Ended `+-p+` days ago`
}else {
	html += `   `+-r+` days remaining`
}

dv.paragraph(html)

**• DAY COUNTER**

var a = moment().startOf('day');
var b = moment().endOf('day');

var n = moment()
var t = moment().startOf('day');

let q =  b.diff(a, 'days');
let p =  b.diff(t, 'days');
let r =  t.diff(a, 'days');

let h = n.diff(a, 'hours');
let i = b.diff(a, 'hours');
let j =  b.diff(t, 'hours');

let html = `**THIS DAY**           <progress style="height:10px;width:20%" value="`+h+`" max="`+i+`"></progress>`

if (r>0 && r<q) {
	html +=  `    **` +(h/i*100).toFixed(0)+`%** | `
	html += +p+` days remaining  ` 
} else if (r==0) {
	html += `    **` +(h/i*100).toFixed(0)+`%**`
} else if (r==q) {
	html += `   Ends today `
} else if (r>q) {
	html += `   Ended `+-j+` hours ago`
}else {
	html += `   `+-r+` days remaining`
}

dv.paragraph(html)
11 Likes

Thank you for sharing this. Could you show me how to have a countdown of days to a specific date in the future, please?

I am not a developper and do not know a lot about Dataviewjs syntax to perform any customization, but you can obtain a countdown by just replacing the first two lines of the code of Riddyrayes by these one :

var a = moment().startOf(‘month’); → To start from today
var b = moment(“2022-12-25”); → Just specify here the date of the end of the countdown

Here is below a variant with some additionnal changes to have the same presentation and text of the progress bar than the example I posted (I set August 25th as the end of the countdown as an example).

Just copy this code below and paste it in an osbidian page with CTRL+SHIFT+V.

```dataviewjs

var a = moment().startOf('month');
var b = moment("2022-08-25");


var n = moment()
var t = moment().startOf('day');

let q =  b.diff(a, 'days');
let p =  b.diff(t, 'days');
let r =  t.diff(a, 'days');

let h = n.diff(a, 'hours');
let i = b.diff(a, 'hours');

let html = `**COUNTDOWN**     <progress style="height:10px;width:20%" value="`+h+`" max="`+i+`"></progress>`

if (r>0 && r<q) {
	html +=  `    **` +(h/i*100).toFixed(0)+`%** | `
	html += +p+` days remaining` 
} else if (r==0) {
	html += `    **` +(h/i*100).toFixed(0)+`%** | `+ p + ` days remaining`
} else if (r==q) {
	html += `   Ends today`
} else if (r>q) {
	html += `   Ended `+-p+` days ago`
}else {
	html += `   `+-r+` days remaining`
}

dv.paragraph(html)
8 Likes

Hi I got it to work by changing the code below:

var j = dv.pages()
.where(k => k.file.folder == h)
.sort(k => k.lecture, ‘asc’).lecture.last();

TO

var j = dv.pages()
.where(k => k.file.folder == h)
.length
2 Likes

Building on your progress bar for the semester, I’ve changed it for book reading. You can change the font color, size, and style to your liking.


var totalPages = 527; // total number of pages of the book
var pagesRead = 26; // number of pages read

var bookName = "Moral Choices: an introduction to Ethics";
var authorName = "Scott B. Rae";

let html = `<div id="reading-progress-container" style="font-family: Arial, sans-serif; font-size: 1em; color: #444; font-family:Crimson Pro S;">
  <progress id="reading-progress" style="height:10px;width:80%" value="`+pagesRead+`" max="`+totalPages+`"></progress>
  <div id="reading-progress-info">
<div id="percentage-read" style="font-size: 1em; color: #444; font-family:Crimson Pro S;">`+ (pagesRead/totalPages*100).toFixed(2) + `% of the book has been read.</div>
<div id="pages-left" style="font-size: 1em; color: #444; font-family:Crimson Pro S;">`+ (totalPages - pagesRead) + ` pages left to read.</div>
  </div>
  <div id="book-info" style="font-size: 1em; color: #444; font-family:Crimson Pro S;">
 <div id="book-title" style="font-size: 1em; color: #444; font-family:Crimson Pro S;">`+ bookName +`</div>
  <div id="author-name" style="font-size: 1em; color: #444; font-family:Crimson Pro S;">by `+ authorName +`</div>
  </div>
</div>
`
dv.paragraph(html);
console.log(html);


1 Like

Hi, I would love to implement your Idea into my study vault.
However, I cannot get the lecture Button and the creation of a new lecture note working.
Could you help me with this?

My Module folder looks like this:
Folder:OMD101
Subfolder: Lectures
Note: OMD101

And my Template like this:
Folder:Templates
Note: % lecture-note
Note: test (Note with your code in it)

If I press the button, it says, that there’s a problem and I should check if the file already exists.

1 Like

Bonjour Arborle, j’ai eu le même problème mais la solution proposée par Dsean a été très efficace.Merci à vous pour les partages.

1 Like

I’ve nothing to ask except how do you learn these things? Any reference materials that are similar to this? I learn through video courses but the videos in this case are very not my type.