In addition to Templater, this setup refers to the plugins QuickAdd and Advanced URI.
The general idea
I wanted to make a quick way to add to a log of personal notes, with each log file containing notes recorded over the course of one month (I just like how a month’s collection of notes feels less fragmented to me, easier to scan as an overview).
This sounded to me like it was going to be a piece of cake. And… it might have been, had I been somewhat less fussy about the result. But I was, and consequently learned some things (which in no way will discourage me from continuing to be fussy), and so here you go.
An aside on Periodic Notes
Initially I figured I would use the Periodic Notes plugin to handle all of this, but once I got acquainted with QuickAdd, I grew attached to the idea of automatically including the date and time as a heading for each log entry, and that required a template fragment rather than one for an entire file.
I haven’t dispensed with Periodic Notes. It’s a handy way of summoning a daily/weekly/monthly note in combination with the Advanced URI plugin, for one thing. I like using Hammerspoon on macOS for these kinds of things, and have hotkeys in its config set up for the purpose, such as:
obs_monthly_note = function()
  hs.applescript([[
    open location "obsidian://advanced-uri?vault=[YOUR_VAULT_NAME_HERE]&commandid=periodic-notes%3Aopen-monthly-note"
  ]])
end

hs.hotkey.bind({"ctrl", "alt", "cmd"}, "m", obs_monthly_note)
The QuickAdd macro
In broad strokes, here’s what the macro does:
- QuickAdd capture: outputs a heading with the current time, and uses Templater’s
<% tp.file.cursor() %>to make the cursor active on the next line, immediately ready for writing. - Obsidian command: runs
Templater: Jump to next cursor locationto, well, actually jump to the next cursor location. I found LandonSchropp’s explanation of this cursor-jumping trick to be incredibly helpful.
If you don’t need any more detail than that and just want to look at the capture’s format, skip on ahead. The following three steps go into more detail, mainly because figuring out QuickAdd’s interface took me a hot minute.
1. Create the capture
In the “Name” field under QuickAdd Settings, put in capture personal log, choose Capture from the selection field next to it, and hit “Add Choice”.
Side note: I prefer naming new stuff in QuickAdd by beginning with the type of choice it is (unless it’s the command I ultimately make available to Obsidian’s command palette with QuickAdd’s little lightning toggle, whatever the terminology is for that). For example, I named this capture capture personal log, which makes it a lot easier to distinguish from macro create personal log while configuring all this.
Capture settings
File Name: [path to vault’s logs folder]/{{DATE:GGGG-MM}} (The file name format and path here should match Periodic Notes’ monthly note settings, if you’re using both plugins like I am.)
Enable:
- Create file if it doesn’t exist
I also enabled Create file with given template. and added my personal log template’s path, because there’s frontmatter I want to consistently include in all monthly files.
Enable:
- Open
- Focus new pane
- Capture format
In the Capture format textarea, I put in:
## {{DATE:dddd}} the ```js quickadd
const dateDay = window.moment().format('D')
const ordinal = dateDay === '1' ? 'st' : (dateDay === '2' ? 'nd' : 'th')
return `${dateDay}<sup>${ordinal}</sup>`
```, {{TIME:HH:mm}}
<% tp.file.cursor(1) %>
\n
What is going on in this capture format, you ask? Read on to Inline scripting for QuickAdd captures.
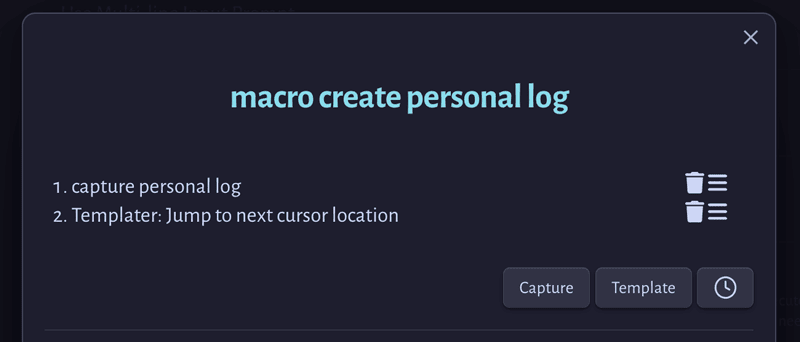
2. Configure the macro
Macro name: macro create personal log
- Use the “Choices” field to select
capture personal log - Use the “Obsidian command” field to select
Templater: Jump to next cursor location
The top of the macro dialog should then look something like this:
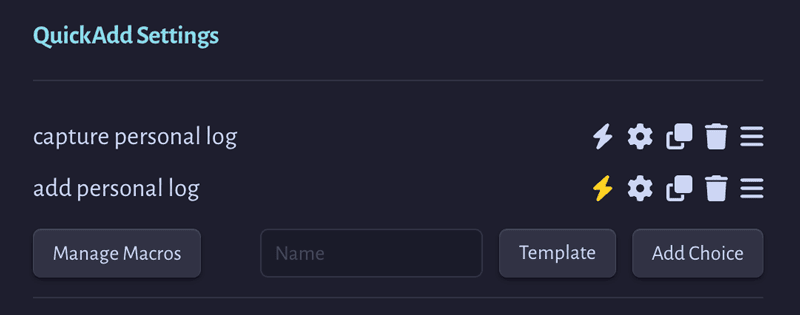
3. Make the command that points to the macro
Under QuickAdd Settings, put in add personal log, choose Macro from the selection field next to it, and hit “Add Choice”. Select its settings icon and pick macro create personal log. Select its lightning icon to make it available to Obsidian’s command palette.
And you’re done! You should now be able to find QuickAdd: add personal log in Obsidian’s command palette.
Inline scripting for QuickAdd captures
Or, how I made things slightly harder on myself by wanting nice date formatting with ordinals.
What I tried that didn’t work
I could have settled for headings with the date and time formatted as YYYY-MM-DD HH:mm. I really could have. In that case I would’ve used this for the capture format:
## {{DATE:YYYY-MM-DD}} {{TIME:HH:mm}}
<% tp.file.cursor(1) %>
\n
But no, I wanted a nice date format with ordinals and everything, like:
January the 4th, 14:18
At first, I thought I could possibly make a variable of my own to use in the capture’s formatting, so I tried:
```js quickadd
const dateDay = window.moment().format('D')
const ordinal = dateDay === '1' ? 'st' : (dateDay === '2' ? 'nd' : 'th')
```
## {{DATE:dddd}} the {{DATE:D}}{{ordinal}}, {{TIME:HH:mm}}
Failure! This format put out:
January the 4{{ordinal}}, 14:18
Fortunately, I remembered to RTFM. QuickAdd’s documentation does mention inline scripts, even if very briefly. Realizing that I could just make the script return a string brought me the rest of the way.
## {{DATE:dddd}} the ```js quickadd
const dateDay = window.moment().format('D')
const ordinal = dateDay === '1' ? 'st' : (dateDay === '2' ? 'nd' : 'th')
return `${dateDay}<sup>${ordinal}</sup>`
```, {{TIME:HH:mm}}
<% tp.file.cursor(1) %>
\n
Trigger with a hotkey or shortcut
To run the macro from outside Obsidian with a hotkey manager, or perhaps by using an app like Automate or Tasker to make a shortcut for it on an Android phone, you’ll need to make an Advanced URI that includes the macro’s ID:
- Get the QuickAdd macro’s ID as chhoumann explains here, first by opening Obsidian’s developer tools with CTRL+SHIFT+i, or CMD+SHIFT+i on a Mac, then entering
console.table(app.commands.listCommands().filter(c => c.id.includes('choice')))into the console and finding the correct entry. - Replace the colons in the macro ID with
%3Ato URI-encode it, e.g.:- from
quickadd:choice:c2960d652d-a0c6-4884-b06a-f1d89d1c0764 - to
quickadd%3Achoice%3Ac2960d652d-a0c6-4884-b06a-f1d89d1c0764
- from
- Append the URI-encoded macro ID to an Advanced URI command:
obsidian://advanced-uri?vault=[YOUR_VAULT_NAME_HERE]&commandid=quickadd%3Achoice%3Ac2960d652d-a0c6-4884-b06a-f1d89d1c0764 - Set up hotkeys/programming of your choice to launch this URI. Hammerspoon, for one, can open it like this:
hs.applescript([[
	open location "obsidian://advanced-uri?vault=[YOUR_VAULT_NAME_HERE]&commandid=quickadd%3Achoice%3Ac2960d652d-a0c6-4884-b06a-f1d89d1c0764"
]])