This is the initial release of the plugin… I will be addressing any issues found and/or requests actively. Please don’t hesitate to leave feedback and/or suggestions; I will do my best to address them!
This plugin for Obsidian allows you to fetch bookmarks from your Raindrop account and create notes in your vault based on a customizable template. Bring your web clippings, articles, and references directly into your knowledge base!
Features
Fetch on Demand: Import Raindrops using a command palette action.
Flexible Filtering: Choose which bookmarks to fetch per-session using the interactive modal:
Filter by specific Raindrop Collection IDs (comma-separated).
Filter by specific Raindrop Tags (comma-separated, matches items with ALL specified tags).
Optionally include items from subcollections when filtering by Collection ID.
Generated notes include:
YAML Frontmatter:title, description (from Raindrop excerpt), source (original URL), tags (combining Raindrop tags and optionally appended tags), banner (using Raindrop cover image URL for plugins like Banner).
Note Body: Cover image (if available), H1 Title, H2 section for your Raindrop Note/Annotation, the Raindrop Excerpt, and a list of Highlights (including any notes on highlights).
Configurable Filenames:
Choose whether to use the Raindrop title (processed via template) or the Raindrop ID for filenames.
Customize the filename format using a template with placeholders.
Tag Management: Automatically append custom tags to the frontmatter of every imported note.
Safe Import: Checks if a note with the target filename already exists in the specified destination within your vault and skips it to prevent overwriting.
Handles Pagination: Fetches all matching bookmarks from Raindrop, respecting API limits.
Persistent Settings: Configure your API key, default save location, and filename template preferences.
Installation
Manual Installation
Download the main.js, manifest.json, and styles.css files from the latest Release on GitHub.
In your Obsidian vault, navigate to plugins directory.
Create a new folder named make-it-rain.
Copy the downloaded main.js, manifest.json, and styles.css into this new folder.
Restart Obsidian.
Go to Settings → Community Plugins, find “Make It Rain”, and enable it.
Configure the required API Token in the plugin settings.
Using BRAT (Recommended for pre-release versions)
Install BRAT (Beta Reviewer’s Auto-update Tester) plugin via the Community Plugins browser.
Enable BRAT in Obsidian’s settings.
Go to BRAT’s settings, click “Add Beta plugin”, and enter the URL of the GitHub repository.
Enable the “Make It Rain” plugin in Settings → Community Plugins.
Configure the required API Token in the plugin settings.
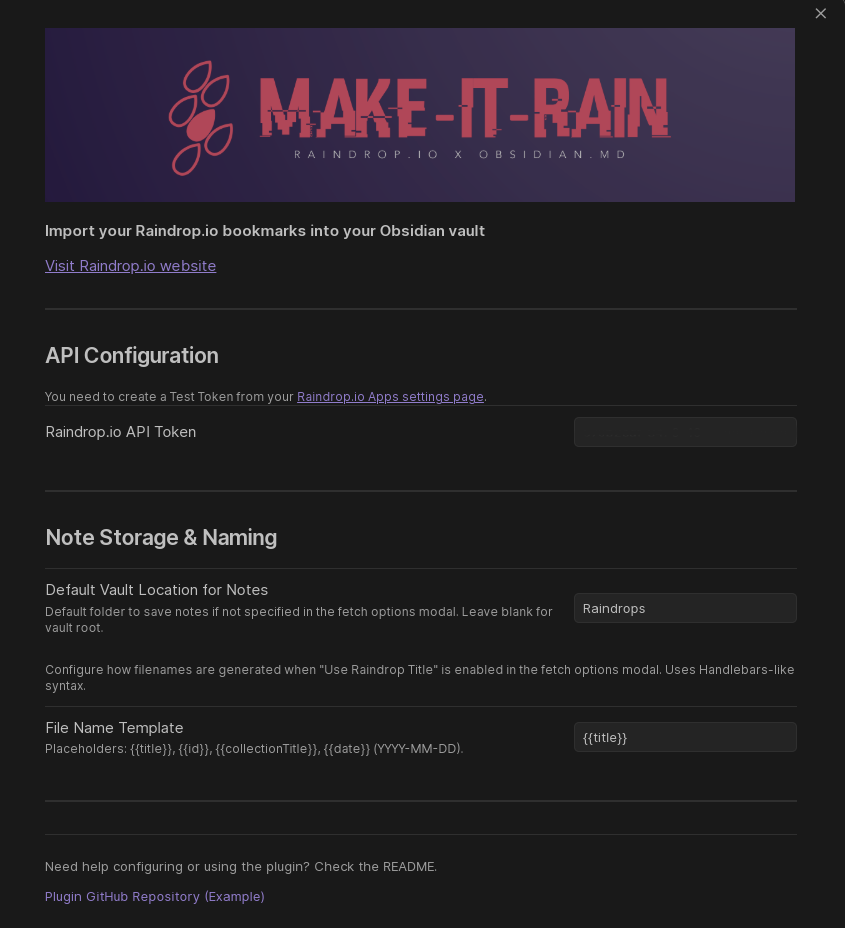
Configuration
Before first use, you need to configure the plugin via Obsidian’s settings panel (Settings → Community Plugins → Make It Rain → Options (cog icon)).
Raindrop API Token (Required):
You must provide a “Test Token” from Raindrop integration settings.
Generate one by going to your Raindrop Apps settings page, clicking “+ Create new app”, giving it a name (e.g., “Obsidian Importer”), clicking the created app, and then clicking “Create test token”.
Copy this token and paste it into the settings field.
Default Vault Location for Notes:
Specify a default folder path within your vault where imported notes should be saved (e.g., Raindrops).
Leave this blank to save notes directly in the root of your vault.
This can be overridden each time you fetch using the modal.
File Name Template:
Define the structure for filenames when the “Use Raindrop Title for File Name” option is enabled in the fetch modal.
Uses Handlebars-like syntax with double curly braces.
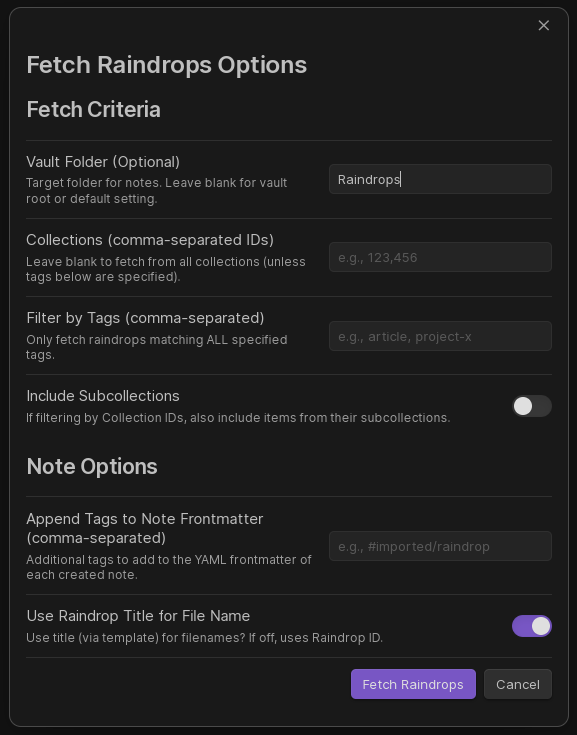
Usage
Open the Command Palette (usually Ctrl+P or Cmd+P).
Search for and select the command: “Fetch Raindrops”.
An options modal will appear, allowing you to configure this specific fetch operation:
Vault Folder (Optional): Override the default save location for this fetch.
Collections: Enter comma-separated Raindrop Collection IDs if you only want to fetch from specific collections. Find the ID in the URL when viewing a collection on Raindrop (e.g. collection address / 123456). Leave blank to fetch from all (unless filtered by tags).
Filter by Tags: Enter comma-separated Raindrop tag names. The plugin will only fetch bookmarks that contain ALL the tags listed here. Leave blank to not filter by tags (unless filtered by collections).
Include Subcollections: If filtering by Collection IDs, toggle this on to also fetch from any collections nested inside the specified ones.
Append Tags to Note Frontmatter: Enter comma-separated tags that will be added to the tags: list in the YAML frontmatter of every note created during this fetch.
Use Raindrop Title for File Name: Toggle this on (default) to use the File Name Template defined in settings. If off, the Raindrop bookmark ID will be used as the filename.
Click the “Fetch Raindrops” button in the modal.
The plugin will show notices indicating progress (“Fetching…”, “Processing…”, final summary). Check the Obsidian Developer Console (Ctrl+Shift+I or Cmd+Option+I) for detailed logs and potential errors.
Fix YAML/JSON render issues in front matter of templates.
Easy Template System… Curly bracket style customizable templates, defined per raindrop type. Will look into making this feature compatible with existing Obsidian or Templater template functions for easy integration into existing workflows.
Selectable raindrop collections by name or ID from multi select or drop-down in import modal, whatever works best.
Streamlined versioning workflow… probably bi-directional with Raindrop, as that seems to make the most sense…
Improved highlight/raindrop specific note handling and UI within Obsidian notes / import templates
Potential extended optional content scraping options … similar to Raindrop’s archive link content copy functionality, because I don’t see a way to pass that feature through the API into Obsidian, so will probably have to implement similar functionality on the plugin/obsidian side of the API … Or just integrate Obsidian’s own web scraper into import workflow, optionally, and make it all happen in one go…? We’ll see what works best/makes sense/is most efficient/reasonable.
Demo videos / tutorials / use-case examples of plugin workflow and features
Quick Import of specific raindrop by ID / Link, for when you just want to pull a specific bookmark/book/PDF/image/etc into a specific location within the vault
Undo last operation feature, for those moments when things just don’t go as planned and vault structure is compromised in some way
Preserve last successful fetch settings until user specifies different options in fetch modal… or maybe just user configurable fetch setting saves? so you can save fetch options you frequently use and easily apply them in the future when the fetch modal is conjured…?
API / Rate Limiting / Error Handling optimizations
Large Raindrop collection import optimizations / better handling / improved UX … Keep you informed of potential hiccups or performance issues
Aiming for completion on mooooost of these within the next week… pending acquisition of sufficient caffeine and cinnamon toast crunch/cow juice ,
Added comprehensive documentation to the GitHub repo Wiki, including examples and usage for template system currently in testing/preparation for next release… It’s all working, but I’m really trying to break it and/or streamline the config to make it as lightweight and easy to use as possible.
Also, researching viability of making it compatible with / leveraging existing functionality of existing template workflows like Templater and Obsidian’s native template feature… that would be optimal for me and I’m sure everyone else that already integrates those functions in their existing workflows…
Enhanced Fetch Modal & Collection Selection: Easily select collections from a dynamic, filterable list populated from your Raindrop.io account, in addition to manual ID/name entry.
Improved Template Editing: Reset your main and content-type specific templates to their defaults with new “Reset to Default” buttons in the settings.
Better UI Layout: Input fields in modals and template editing areas are now stacked below their descriptions for more space and better readability.
Contextual Help Links: Look for new (?) help icons next to complex settings, linking directly to documentation.
Quick Import Enhancements: The “Quick Import Raindrop by URL/ID” command now more reliably parses item IDs and provides clearer instructions.
CI Build Fix: Resolved a build failure related to ignored scripts.
v1.7.0 (2025-05-26)
All-New Template System: Major new feature! Gain complete control over note creation with a powerful and flexible template system.
Includes a default template and pre-filled, customizable templates for each Raindrop type (Link, Article, Image, Video, Document, Audio).
Configure templates via Settings: enable/disable the system, edit the default, and manage content-type specific templates with individual toggles.
Override global template settings per-fetch using new modal options.
Default Templates Updated: All built-in templates now use the new variables, a flattened collection data structure, and consistent field names.
Improved Fallback Note Generation: Better formatting for notes created when the template system is disabled.
Fixes: Addressed type filtering in the modal, ensured correct replication of collection hierarchy as folders, resolved a frontmatter rendering issue, and fixed template helper rendering and fallback note body formatting.
For a complete list of changes, see the CHANGELOG.md.