Download the Vault here:
If you have any questions, please feel free to ask!
Philosophy
Have a clean and instant overview over all your open projects with the most important information displayed (this is the landing page).

Each project has a dedicated page, displaying all your pertinent information, and linking to all relevant daily notes. Every open To-Do in these daily notes are displayed in the blue Todo section.

How it works
Project Note
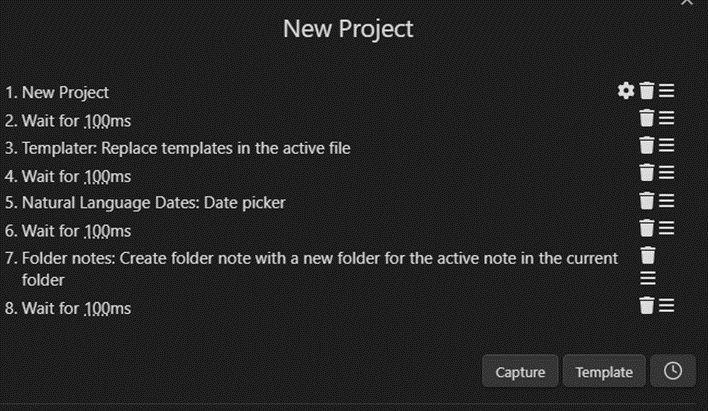
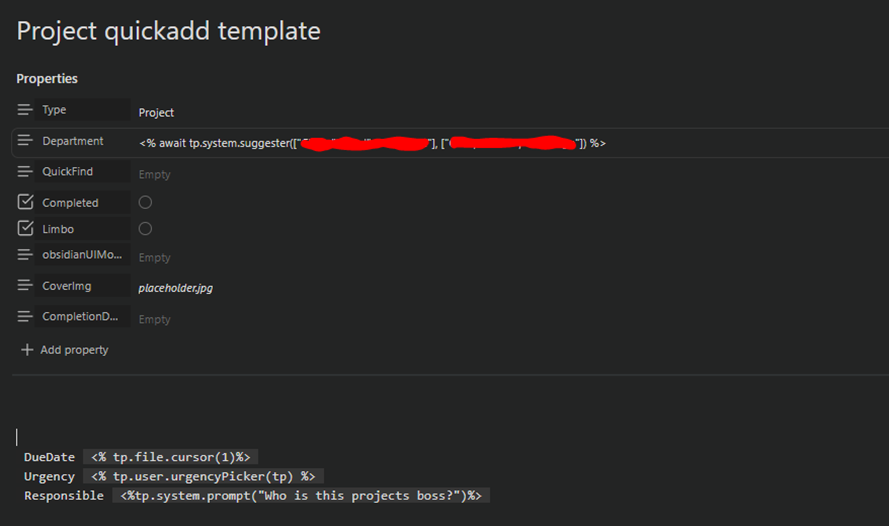
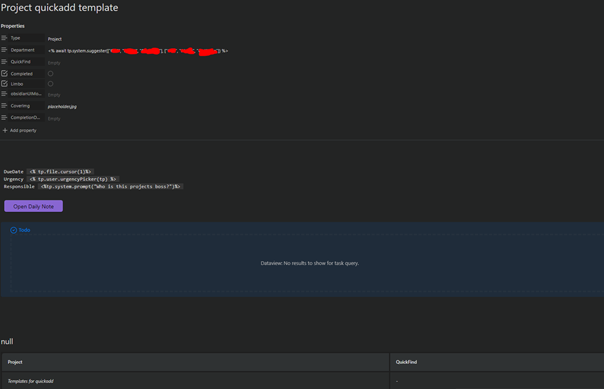
You add a new project by clicking the “New Project” button on the landing page. This will run you through a couple of Templater prompts, by using QuickAdd. You can change the template by going to:

If you know what you are doing, feel free to also change the Quickadd settings, but they are quite delicate and break easily.
Each project is it’s own thing. You can create links between them manually, but they are designed to be separate things.
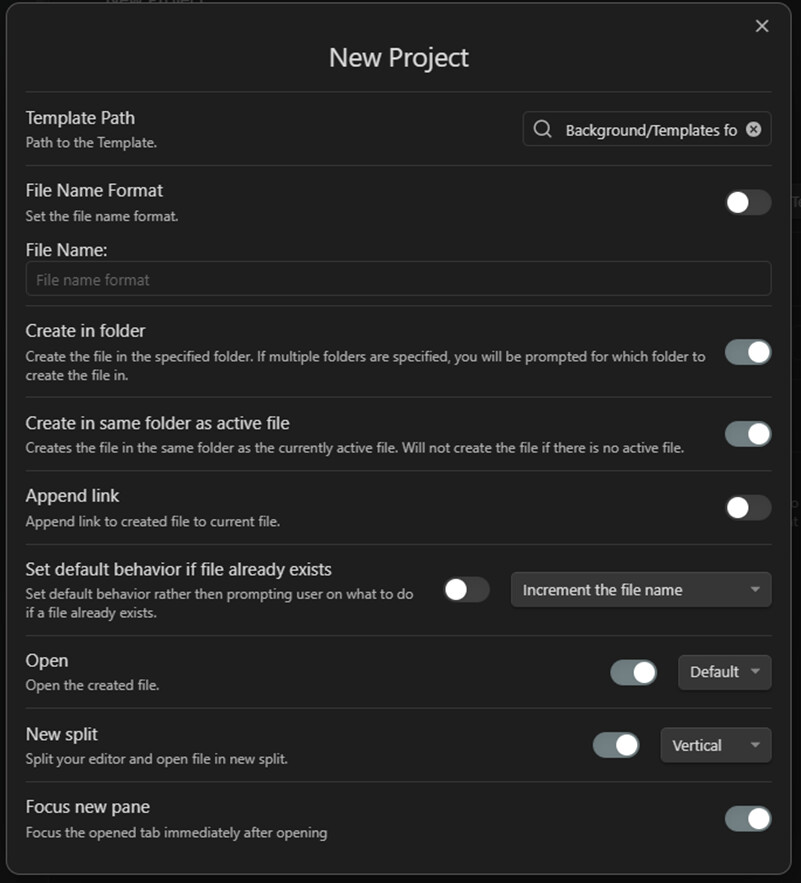
There are quite a few properties:

- Type and Department is just to group them.
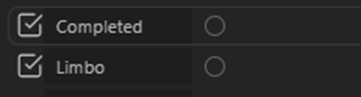
- Complete and Limbo is to sort the projects on your landing page.
- ObsidianUIMode is very handy. It makes it so you can define the viewing mode for each individual note. Keep it empty if you still have to edit the project page, add preview if you are finished.
- CoverImg is very important. It shows you an image of the project you are working on, on your landing page. You must have an image added, that’s why there is a default one (see first picture of the OP). If you remove it without replacing it with another one, the Project is NOT DISPLAYED on the landing page.
- Constructfinished and Completiondate are just important milesones for me.
- notetoolbar adds the buttons on top of your project note
Daily Notes:
If you have multiple projects you work on, on the same day, you generate multiple daily notes, one for each project. You generate those notes my clicking those buttons on the top of the project note:
![]()
When creating them they automatically include a backlink to the project note from where you have clicked the button.
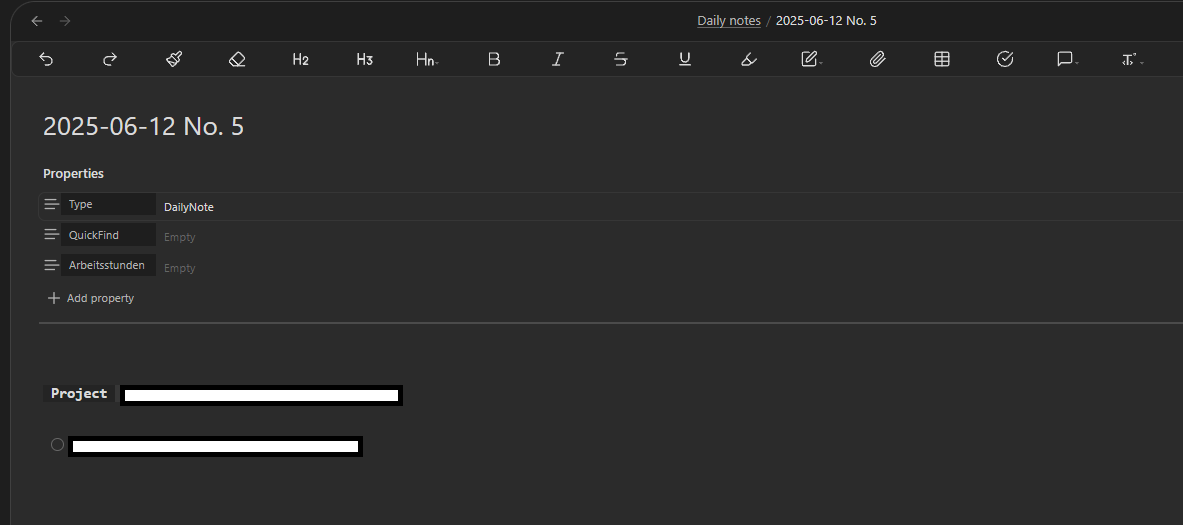
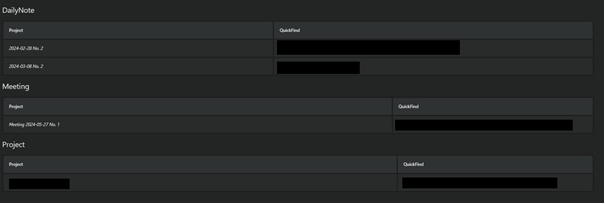
Every daily note you created through that project page is displayed here (same goes when clicking the “Meeting” button):

You can now put everything and anything into the daily notes you want. I mainly use them for Todo’s and pasting in e-mails or other important information. The Quickfind column is a thing I added to find relevant information faster. Very handy when having projects with 20+ Daily notes. It’s just a textfield in each Daily Note property where you can highlight that something important is included in this Note, like an order confirmation.
Arbeitsstunden (the last column) is workhours in German which is another property I added in the Daily Note.
Same as with the Project Note, feel free to edit and change it, as you see fit!
Old OP with a lot of detail how things work
I was asked by @WintersMischief to share my workflow. I have been working with it now for some time and managed to iron out most of the kinks in the process.
My vault is separated into two parts. One part is to collect knowledge, processes, etc. that I use for work and the other one is to manage projects I get assigned.
I will talk about my Project Management Workflow. I currently use it to manage projects assigned to me but I am sure you can also use it to manage the work of other people.
Broadly speaking my Project management can be broken down to 3 main components. The Landing Page, Individual Project Pages and Associated Daily Notes.
Landing Page
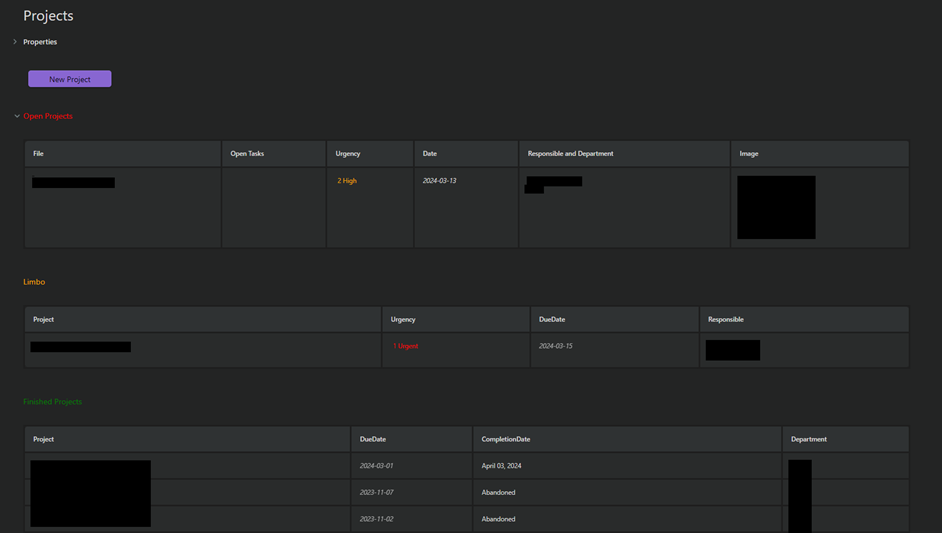
The Landing Page is split up into the segments Open Projects, Limbo (This is used for Projects that depend on others to progress; this way Open Projects doesn’t overflow) and Finished Projects.
Each project I create will be automatically displayed in one of these Dataview-Tables. I have these two checkbox properties in each Project Page.
The three Tables on the Landing Page use
where statements to display the Projects with the correct checkbox states.In Open Projects that would be the following:
WHERE Completed = False and Limbo = False
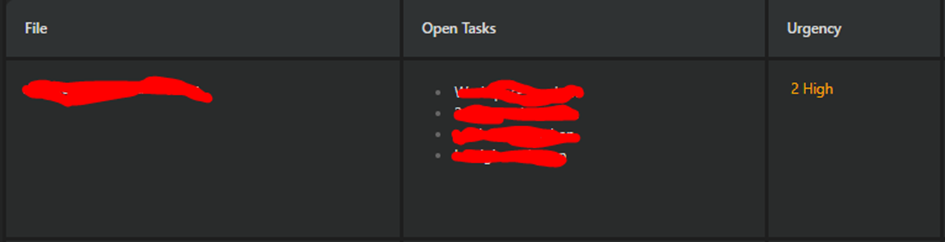
Urgency, Date and Responsible and Department should be self-explanatory. They are just simply queried form the Project Page. I’ll talk about Open Tasks and Image a bit later.
New Project Creation:
To create a new project, I have to click on “New Project”. Templater and QuickAdd are used to automate the process.
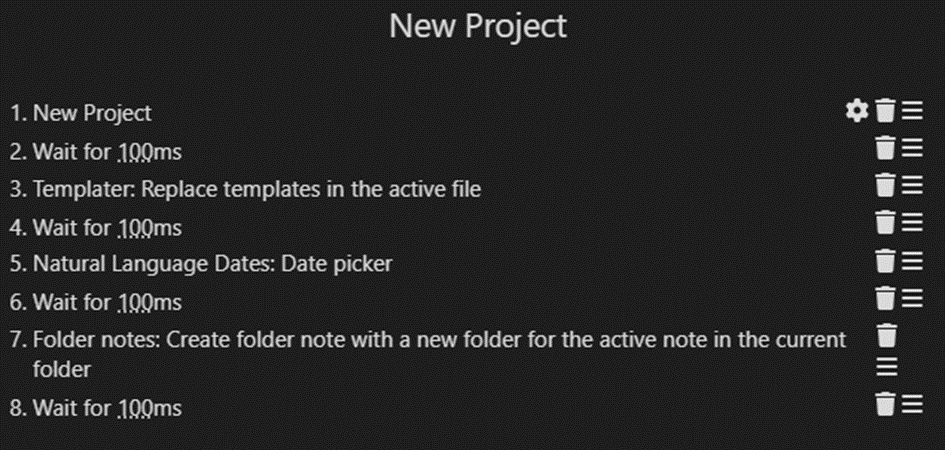
Step by step:
-
A new note is created with my projects template in it. It prompts me to add a name.
-
The template is “activated” through “Replace templates in the active file”, meaning the template commands get activated. This prompts me to fill out the department, indicate who takes the lead on the project, and how urgent it is.
-
In the next step I use Natural Language Date’s Date Picker to select the due date. This will be appended to Due Date, because I used tp.file.cursor(1). (I had a lot of problems getting this to work properly.)
-
In the last step I use folder notes (A plugin) to make a folder out of the note. This might seem unnecessary at first, but it is needed to correctly create and link the Daily notes when I create them. I could also use it to store important PDFs, images or other files associated with the project, although I prefer to keep the folder empty, and link to them in the Project Page itself.
-
This will create a folder in my Projects folder. The only manual thing I still have to do is pull the newly generated folder into one of the Department folders. This just keeps the Projects folder clean and can prevent problems with Dataview down the line. It’s just good practice.
I tried to automate this part to, but failed. It’s a small detail, so I didn’t pursue it further.
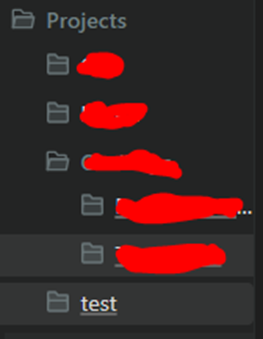
Image:
I mentioned the Image on the Landing page. This is where the property “CoverImg” comes into play. With each new project it automatically adds the link placeholder.jpg to CoverImg. If there is no placeholder image, the row of that project will not be displayed. Just don’t delete it, I guess?

Once you have an actual image of your project you can just replace placeholder.jpg with it.
This has been extremely helpful. Sometimes I have quite a few projects open at the same time and having a visual representation of your projects makes it easy to open the correct Project Page. No more clicking through it, until you find the correct one.
This is done with the following line in Dataview:
embed(link(meta(CoverImg).path, "125")) as "Image"
Most of the other stuff in my Project template is done to accommodate my specific needs.
One thing that I have that might differ from other setups is how I handle my Daily Notes.
Daily Notes and Task
I wanted to have a Daily note for every project I was working on that day. So, that would mean that I’d need three Daily Notes when I worked on three projects that day.
I tried just using only one but was really unhappy with it. It was messy, the tasks were not well separated and was all around a bad experience in this particular setup.
I handle all my task in the Daily Notes to keep the Project Page as clean and overview-able as possible.
When I use the “Open Daily Note” Button I have custom code in a Templater template that does a bunch of stuff:
On top of that I use QuickAdd to create the new Daily Note and call the “Daily Note Template” (Points 1 and 2) and then move it to the desired Folder (3)
-
The note is created inside the Project Page’s folder and I immediately link to it using tp.file.folder(). This is the most important step, so this note is associated with this project and you can place it wherever you want in your vault.
-
The next step is giving the note a unique name. I kept the naming format of adding the date of creation, but because I can have multiple Daily Notes for different projects on the same day, I appended No. “number”. This was quite a struggle and someone over at Github helped me with this immensely. (I don’t remember who it was, but thank you so much, if you read this.)
What it does is checking the Daily Notes Folder and checks if the Note: {{Date}} No.1 already exists. If so, it changes the new Daily Note’s name to No.2, and so on. -
This needs to be done, because I throw every Daily Note into the same folder. I do this by appending another Templater function at the bottom of the Daily Note. This is done after note creation and renaming. I append it by using QuickAdd’s capture feature.
(await tp.file.move("/Daily notes/" + tp.file.title)
Because of the link to the Project Page it is always associated with it. I can now add tasks to the Daily Note, and display them dynamically with Dataview-Task on the project page. When they are done and I tick them off, they disappear, keeping my Project page clean.

In another Dataview table I list all the files that are associated with this Project. They are grouped by type and with some Dataview code I found, nicely separated. If there are, for example, no Meetings associated with this Project, there will be no “Meeting” group displayed.
When linking to other Projects though, they must be in the same department, otherwise they will not be displayed.
Next to the file name I added QuickFind, which is a simple property that allows me to add the most important infos of what I have done that day. Things like: Client accepted, Concept finished, etc. It helps to quickly find information, even if I haven’t worked on a project for a couple of months.
I know exactly where a copy of an important E-Mail is for example. I use the daily notes that way too. I save every important information I get or gather on that day in the corresponding Daily Note. I’ll also add the really important stuff at the bottom of the Project Page too.
I also have the ability to add a daily note for the following day (tomorrow), but did not manage to create something like a Date-Picker to create Daily Notes that are further in the future. This isn’t really necessary for my case, because all the open Task are displayed anyways, but it would have been a “nice to have”.
Displaying Open Tasks on Landing Page:
I really wanted to see my open tasks on my Landing Page as well, but I am not a pro like @holroy, who helped me a ton to get this working. It gets all the tasks from the Daily Notes that are linked to the project, lists them and filters them to display only the ones that are not completed. This also dynamically updates and removes the ones that were completed.
Holroy came up with this monstrosity, and it works like a charm!:
FLATTEN list(flat(file.inlinks.file.tasks)) as AllProjectTasksFLATTEN list(filter(AllProjectTasks, (task) => !task.completed)) as OpenTasks
This more or less concludes my Workflow! It’s quite a long OP, but it’s necessary to explain how it works (At least I hope so!).
If you have any questions, suggestions or anything else, feel free to post. If someone is interested in the Templater and Dataview Code, I can post that too.
I always like reading these kinds of posts here and hope you enjoyed or found it informative as well.
All the best!