This guide will let you create a personal movie database in Obsidian by importing your Letterboxd or IMDb watchlist and watched movies (or any list you want). The result will be a markdown table for each list. You can then fairly automatically add new movies to the markdown tables obtained.
Screenshot:
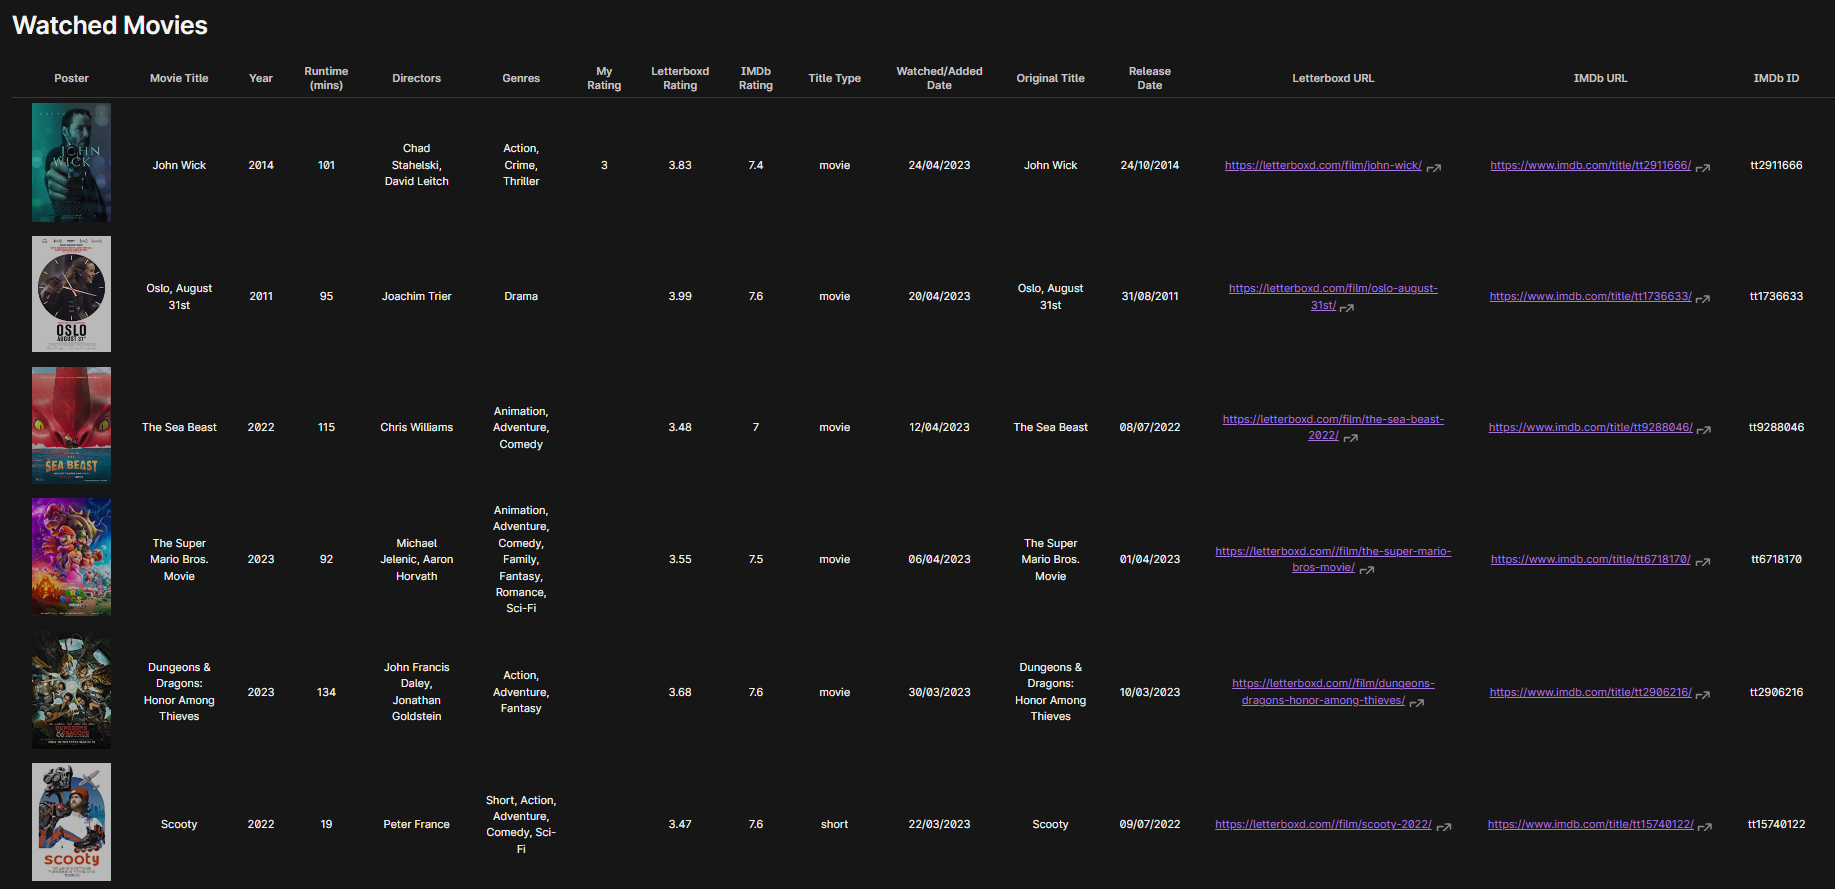
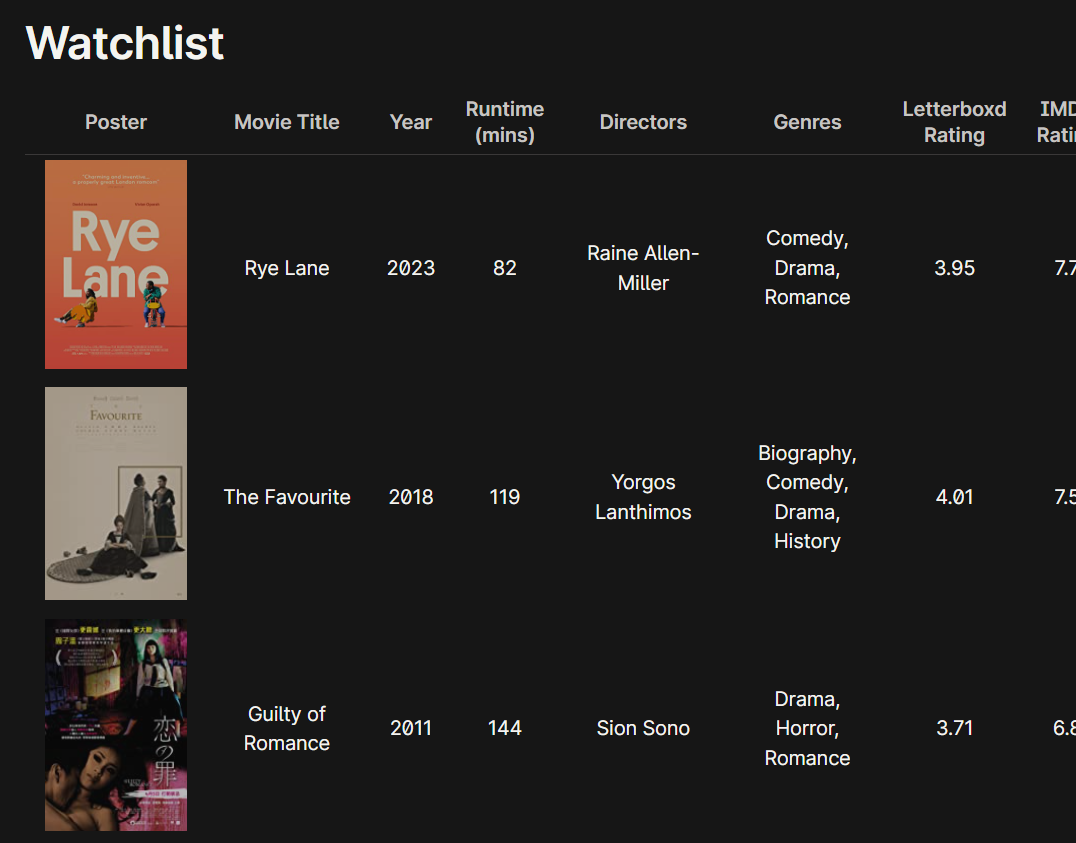
(Screenshot of the Watchlist Table with the default zoom. While using the reading view, you can scroll horizontally to see the other columns)
- Problem: The movie database that @kepano shared used DataView, so you needed to have a note for each single movie. Having more than 1000 movies between my watched movies and watchlist, I didn’t want to have that many notes. Also, I don’t take notes on movies I watch, so that didn’t seem very efficient for my needs.
- What I wanted to do: I wanted to have a movie database that used just markdown tables. I wanted to import all of my Letterboxd Watched Movies and Watchlist. Finally, I wanted to automate as much as possible adding new movies to the “Watched Movies” and “Watchlist” tables.
- What I did: I managed to import my Letterboxd catalogue using IMDb to create a movie database using just 4 notes: one for watched movies, one for my watchlist, and two other tables for the casts of the watched movies and the watchlist. Using QuickAdd I managed also to automate adding new movies as much as I can.
- What could be improved: Adding movies could be improved by writing two scripts to automate the whole process. And a third script could be written to automatically delete entries from the watchlist table when a movie from the watchlist is being added to the watched movies table. I currently do this last step manually using the advanced tables plugin. Ideally, one could create a plugin that let’s you do all of these steps automatically and the only input would be either the URL of a Letterboxd or IMDb list and the plugin creates the table automatically. Even better, this plugin could update the table every time a new movie is added to the list on Letterboxd or IMDb, but at the same time letting you add manually the movies (as it is explained in the last two steps of this guide for example) to be more flexible and not rely solely on those websites.
Requirements
List Of Obsidian Plugins Needed
- Excel to Markdown Table
- Advanced Tables
- QuickAdd
- Media DB Plugin
- Linter
Optional
- Sanctum (Theme)
- Style Settings
Software/Websites that will be used
- Letterboxd
- IMDb
- Microsoft Excel
- Google Colab
In this guide I will use Excel, but you could maybe use LibreOffice as well (I don’t know though if the Excel to Markdown Table plugin would be compatible). Lastly, I didn’t want to download Python and Visual Studio, that is why I used Google Colab.
Tutorial
Skip steps 1 and 6 if you don’t use Letterboxd.
When text is in bold, look at the “Resources” below for the section with the corresponding title
- Import Letterboxd watchlist, ratings and watched movies into IMDb with Letterboxd to IMDb.
- Export the Rated movies from IMDb. You will obtain a .csv file.
- Create new IMDb list called “Watched”. Using the add-on Greasemonkey in Mozilla Firefox, and the script IMDb list importer, import the .csv file with the rated movies obtained in the previous step. The movies will be added automatically. Google Chrome could also be used I think. Look at Firefox Resources for the script’s link.
- Export “Watchlist” list from IMDb as a .csv file as we did in step 2. From these 2 IMDb exports we will get most of the metadata needed.
- Run the Python Script to obtain the poster of the movies in the “Watched” and “Watchlist” lists (you will export the poster, the name, and the IMDb id “const” that will be needed to align in Excel the various lists of movies if needed). When using the script, make sure that the lists in IMDb are in “Detail list” mode when copying the URL.
- Run Letterboxd List Scraper to obtain complete cast and Letterboxd average rating. Look below for a detailed guide.
- At this point we should have a number of .csv files obtained in the previous steps. Now we need to create a single Excel table and align if needed the different entries.
- To correctly import special characters (e.g., é, ì), open a new .xlsx file and go into the data tab. Select “Import from CSV”, and Excel will correctly import the data. If the Letterboxd ratings aren’t imported correctly you could separate the various columns in the .csv file using “text to columns” in the data tab in Excel.
- Use the Excel Function to align the movies.
- If the two IMDb lists (IMDb export and Web scraped IMDb) are already aligned, skip this step. Copy the wanted columns obtained from the different files in an Excel file. I suggest to first merge the IMDb files first using the “const” column, but check afterward because there may be some blanks for “TVepisodes” for example.
- Then, you should have to align only the exported data from IMDb with the data obtained from Letterboxd, unless they are already aligned.
- Some movie titles from IMDb won’t align correctly with the Letterboxd ones. So, you will have to manually check the titles and either edit the title of the IMDb database, or the one of the Letterboxd one in order for them to match, and then the function will work automatically.
- Create a new and final excel file importing just the needed columns.
- For the Poster column, add at the start
. This way the image will appear automatically in Obsidian. You can do this in Excel by using the “Search and Replace” function. - To load bigger images for the posters in the Obsidian table, add at least one URL from Letterboxd with the link ending with “?v=c8b3ba689e 2x”. I don’t know why, but it works. You can find the URL for a Letterboxd poster by going to Letterboxd and searching for a movie and then inspecting with the console the poster (F12). For example:
srcset="https://a.ltrbxd.com/resized/sm/upload/z9/j9/kx/ve/l3r5MgeN0UUySPbf6aWeUyKGdb2-0-460-0-690-crop.jpg?v=0185077fb6 2x", the link to copy is the one between the quotation marks. - Again with the “Search and Replace” function in Excel you can remove the square brackets and the quotation marks in the “cast” column.
- If you want to sort the movies chronologically (either by the date you added or watched the movie, or by the release date), do it now in Excel. That is because in Obsidian with the Advanced Tables plugin you can only sort the columns alphabetically.
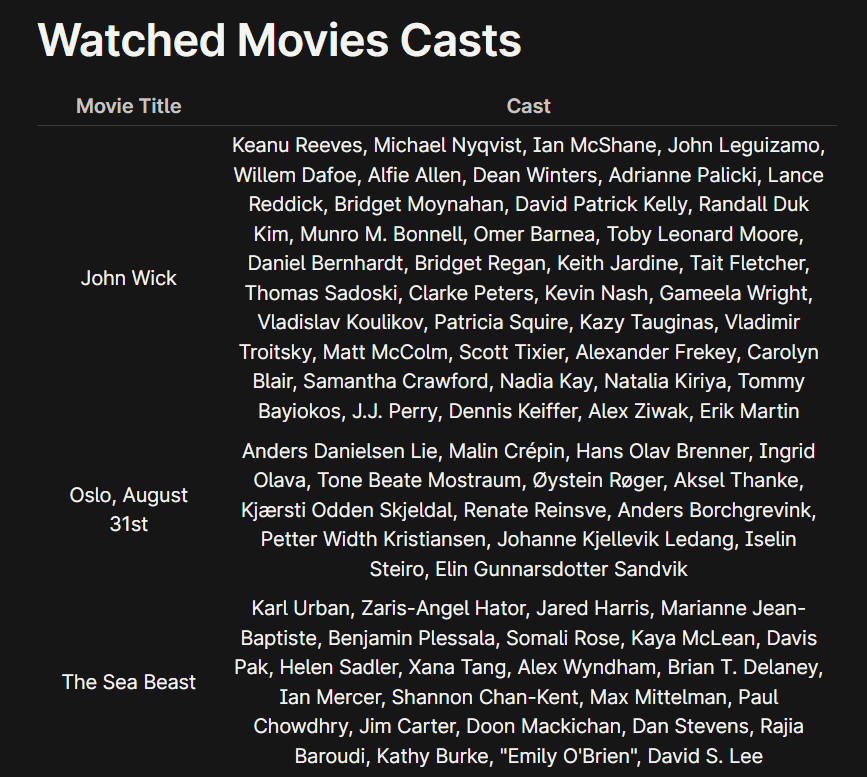
- Copy the data from this last excel file and paste it into obsidian using the Excel to Markdown Table plugin. I suggest creating 2 different tables in 2 notes: one for all the info without the cast, and the other with only the movie title and the cast. This will result in a cleaner look. So, we would get 4 tables in total, 2 for the “Watched” movies and 2 for the “Watchlist”.
- With the Advanced Tables plugin you can center align all the columns of the table.
- Use QuickAdd to add new movies to the two tables. Media DB Plugin and Linter plugins are needed. In QuickAdd we need to create 2 Captures, one for each table (it will be 4 in the end because there is also the watchlist table and also the cast for that). And then, we need to create two macros, one for the watched tables and the other for the watchlist tables. In the section Add New Movie you can find a detailed guide with screenshots that will help you set up the 3 plugins required for this step.
- Finally, use the Sanctum theme if you want the same look. With the “Style Settings” plugin you can set your preferred accent color and adjust many other settings to your linking.
- Once you have setup the QuickAdd Macros, you can add new movies. To do so, just select the macro from the command palette. From this moment you have 15 seconds (or whatever wait time you set) to type the title of the movie, select the right one, click ok twice, open the note that will be created, and select “editing” as the current view if it wasn’t already selected. I recommend opening a New Tab when adding a new movie just in case you don’t manage to do all those steps in the set time. Then, the Linter plugin will automatically lint the note, and the two captures will activate. Finally the note that was created will be deleted. For a more detailed explanation of the macro look at the QuickAdd section.
- If you have to delete movies from the Watchlist tables, I currently do this manually. I search for the movie title in the note, place my cursor on the movie title I want, and then delete the row with the Advanced Tables plugin.
I apologize for any scripting errors or profanities, but I’m not a developer and I have never used Python before this project ![]()
Also, I’m sorry if there are any mistakes in the tutorial, but I did the best I could writing it with the time I had. I know this is a very long guide, but I tried to explain every single step as clearly as possible so that hopefully everyone can manage to easily follow it. Many steps are probably superfluous and could be optimized, but this was all the time I had to work on this project.
Finally, apologies not to have included more links or images, but being a new user I could only add 5 images and 5 links so I had to delete most of them.
Resources
Letterboxd to IMDb
Letterboxd to IMDb (GitHub)
Follow the guide on GitHub.
I used Google Colab for all the python scripts. In the code below “/content/Letterboxd-to-IMDb-master/requirements.txt” is the location of the file in Google Colab. And this is the location where i placed the zip of the letterboxd export “/content/Letterboxd-to-IMDb-master/letterboxd-USERNAME-2023-04-06-22-48-utc.zip”.
#Place the master folder from GitHub into Google Colab and install
pip install -r /content/Letterboxd-to-IMDb-master/requirements.txt

#Exports all the movies that were rated in Letterboxd to IMDb
#Exclamation mark ("!") at the start is needed when working in Google Colab
!python letterboxd2imdb.py -f /content/Letterboxd-to-IMDb-master/letterboxd-USERNAME-2023-04-06-22-48-utc.zip

#Exports to IMDb the non-rated movies and assigns the same rating (1 in this case)
!python letterboxd2imdb.py -f /content/Letterboxd-to-IMDb-master/letterboxd-USERNAME-2023-04-06-22-48-utc.zip -r 1


#Exports to IMDb the Letterboxd watchlist
!python letterboxd2imdb.py -f /content/Letterboxd-to-IMDb-master/letterboxd-USERNAME-2023-04-06-22-48-utc.zip -w
Firefox Resources
Greasemonkey (Mozilla Firefox Add-on)
IMDb List Importer (Greasy Fork Script)
You could also use Google Chrome using the Tampermonkey extension I guess.
Python Script
This is basically a web scraping python script with which we can obtain the name of the movie, the poster and the IMDb ID.
I used Google Colab also for this script that I wrote. I recommend creating a new Google Colab Notebook for each new script. This script isn’t perfect, a for loop could be written to automate the whole process, but this is what I managed to do. Because of this you have to manually change the URL and the file name at the bottom (this is because IMDb displays only 100 movies per page). You will have then several .xlsx files that you can then merge together by copying and pasting in Excel.
#Install BeautifulSoup4
pip install bs4
pip install requests
from bs4 import BeautifulSoup
import requests, openpyxl
#Paste The URL of the list, and you will change the number of the page in the URL because IMDb shows 100 movies per page. The list has to be in the mode "Detail list". A for loop could be built to automate this process
url = "https://www.imdb.com/list/CODEOFTHELIST/?sort=list_order,asc&st_dt=&mode=detail&page=1&ref_=ttls_vm_dtl"
response = requests.get(url, timeout=5)
content = BeautifulSoup(response.content, "html.parser")
#Here titles of the Excel Columns are set
excel = openpyxl.Workbook()
sheet = excel.active
sheet.append(['Poster', Name', 'Const'])
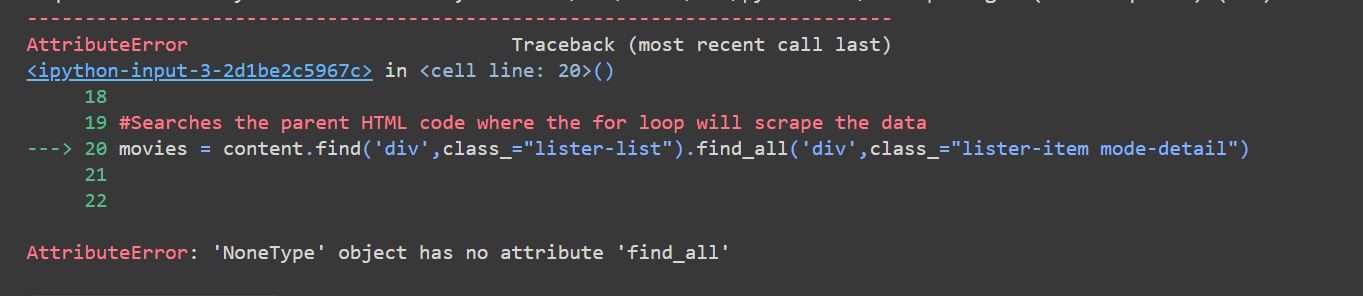
#Searches the parent HTML code where the for loop will scrape the data
movies = content.find('div', class_="lister-list").find_all('div', class_="lister-item mode-detail")
#for loop that searches poster, name and cost. It works also for the other listed and commented lines. The only one that shouldn't work is the actor one. Of course you will need to add to the excel column titles and to the print and sheet.append below all the lines that you will loop. However, you will already have those information, so there is not need, just run the script as is
for movie in movies:
poster = movie.find('div', class_="lister-item-image ribbonize").a.img['loadlate']
name = movie.find('h3', class_="lister-item-header").a.text
const = movie.find('h3', class_="lister-item-header").a['href'].split('/')[2]
#runtime = movie.find('p', class_="text-muted text-small").find('span', class_="runtime").text
#genre = movie.find('p', class_="text-muted text-small").find('span', class_="genre").text
#director = movie.find_all('p', class_="text-muted text-small")[1].get_text(strip=True).split('|')[0].split(':')[1]
#actors = movie.find_all('p', class_="text-muted text-small")[1].get_text(strip=True).split('|')[1].split(':')[1]
#averagerating = movie.find('div', class_="lister-item-content").find('span', class_="ipl-rating-star__rating").text
print(poster, name, const)
sheet.append([poster, name, const])
#Save the excel file. Change the name of the file when changing the URL above
excel.save('IMDB Watched Movies_1.xlsx')
Letterboxd List Scraper
Letterboxd List Scraper (GitHub)
I used Google Colab once again. First though, I had to create two lists in Letterboxd, one with the Watched movies and the other with my Watchlist. Just create two lists, and using the .csv files from the Letterboxd Export .zip file, you can automatically add the movies. Then, run the code below.
pip install bs4
pip install numpy
pip install tqdm
pip install requests


from bs4 import BeautifulSoup
import requests

#Upload the folder found on GitHub on Google Colab as done previously in step 1. This is to tell Colab to use this folder when running scripts
%cd /content/Letterboxd-list-scraper-master

#When running this, it will ask you to paste the URL of a list. Paste the URL of the list created
!python main.py
Excel Function
Once we have all the .xlsx files (obtained from the .csv files in step 8), merge everything in a single Excel file. Obviously create an Excel file for the watched movies, and one for the watchlist (or simply two different sheets). We now have many different columns, some are repeated, others aren’t. We need to align the movies if they aren’t already aligned.
Let’s take a look at the function. In the first “MATCH”, “A2” in my case was the English name of the first movie from Letterboxd, then, “$AO$2” was the English name of the first movie from IMDb. In “INDEX”, we can select the columns that will be copied (“AY” in my case). Write this function in the second row of an empty column (second row because my first movie was in the “A2” cell), then you can copy this function horizontally (to copy all the columns, so all the attributes of the movie), and vertically (to align every movie).
Some movies may not align because of the titles not matching, you will have to manually check and change the movie title in one of the two cells to make them match.
I recommend to first align the movies from IMDb separately using the IMDb ID (still using this function below) if needed, and then align the IMDb and Letterboxd exports together.
English:
=IF(ISNA(MATCH(A2,$AO$2:$AO$750,0)),"",INDEX(AY$2:AY$750,MATCH(A2,$AO$2:$AO$750,0)))

Italian:
=SE(VAL.NON.DISP(CONFRONTA($A2;$AO$2:$AO$750;0));"";INDICE(AY$2:AY$750;CONFRONTA($A2;$AO$2:$AO$750;0)))
Add New Movie
Media DB Plugin
Get your OMDb API key here. Select “FREE!” and fill the required fields. You will receive an email with the key. Copy the key in the “Settings” page of the “Media DB Plugin”.
In the settings, disable the “YAML formatter” setting. Then, select the “Movie Folder” you want to use in the “New File Location” section of the settings.
The cast you will get using this plugin when adding new movies will be limited to just the three main stars. The cast obtained previously from Letterboxd will be the complete cast.
QuickAdd
In order to manage 4 different tables (watched movies, watched movies cast, watchlist, watchlist casts) we have to create 2 macros (the ones with the yellow lightning bolt), and 4 captures.

Let’s start with the captures first.
Movie to Watched Table (Capture)
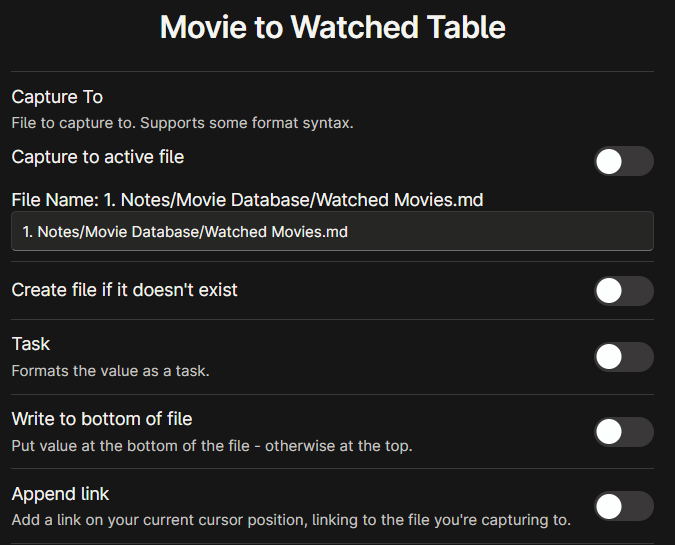
Capture format:
|  | {{FIELD:englishTitle}} | {{FIELD:year}} | {{FIELD:duration}} | {{FIELD:producer}} | {{FIELD:genres}} | {{VALUE:<My Rating>}} | {{VALUE:<Letterboxd Rating>}} |{{FIELD:onlineRating}} | {{FIELD:type}} | {{DATE:DD/MM/YYYY}} | {{FIELD:title}} | {{FIELD:premiere}} | {{VALUE:<Letterboxd URL>}} | {{FIELD:url}} | {{FIELD:id}} |
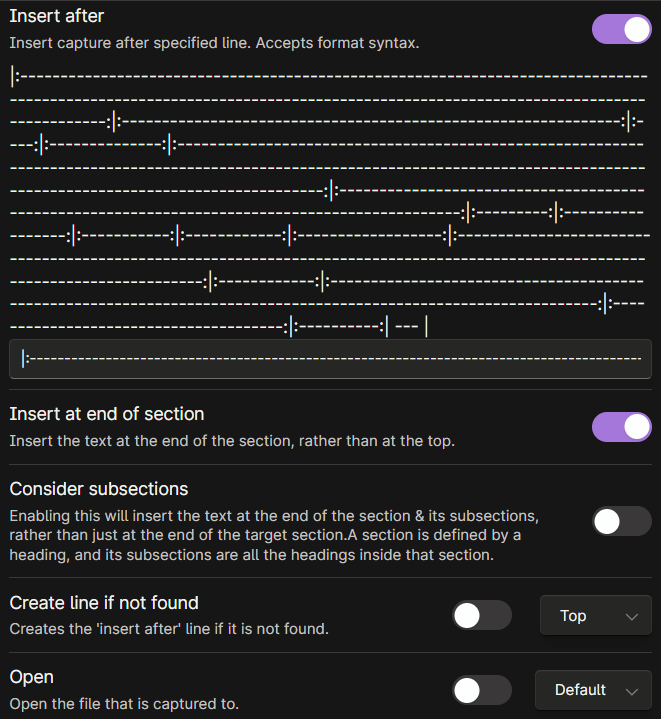
Just copy the settings. In the “Insert after” setting you have to paste the second row of the markdown table if you want the new movie to be added at the top. I ordered my movies from the most recent ones I watched/added to the oldest. This is why I made sure that the new movie added would be added at the top. In the “Capture format” setting you have to match the order of the columns in your markdown table. For reference look at my screenshot at the top of this guide and compare it to my capture format. Look at the QuickAdd format syntax guide to tweak this to your liking.
Basically, the “FIELD” entries will be the YAML headers that will be created by the Media DB Plugin. While, the “VALUE” entries are values that have to be entered manually (My rating, Letterboxd Rating, and Letterboxd URL in my case). When entering a new movie, a suggester will appear and you will have to click enter to select the value for each FIELD, and then input the value for each of the VALUE added in the capture format. Because we will delete each new note created by Media DB Plugin at the end of the process, you can just spam the enter key for the various FIELDs, since just a single option will be present.
Movie to Watched Table - Cast (Capture)
The settings here are the same as previously. You will just have to paste the second row of the other markdown table, and you will change the capture format. Below is the one I used.
| {{FIELD:englishTitle}} | {{FIELD:actors}} |
Repeat the same process for the two “Watchlist” tables.
Add Movie to Watched (Macro)
This macro will automatically add a new movie to both of the Watched movie tables (the main one and the “cast” one), and then delete the newly created note by the Media DB Plugin.
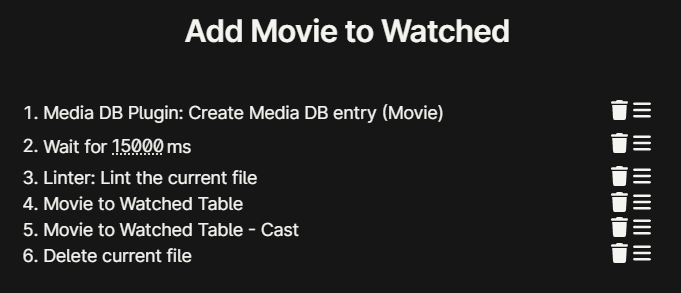
Here we can see the settings for the macro. The second step is to wait for 15000ms, tweak this to your liking. Consider that in that period of time you will have to perform the following actions starting from when you select this macro from the command palette: type the name of the movie with the Media DB Plugin, select the one you want, select ok, open the new note that will be created, and finally switch the current view to editing if you are in reading mode. In order to avoid “Linting” (step 3 of this macro) the wrong file if you happen to be not fast enough, I recommend you to open a New Tab before activating the macro.
The rest will be straightforward. The settings for the “Linter” plugin will be explained in the Linter section. Once the two captures will have ended, the current active file will be deleted. And this should be the new note created by the Media DB Plugin because we opened it in the previous step.
Then, repeat this process for the second macro that will add a new movie to the two watchlist tables.
As I have written at the top of this guide, a few scripts could be written to improve this process. The first script would replace the current step 2 (wait for 15000ms) and what it needs to do is wait until the previous process is completed and then automatically open the last created note. It should be quite easy to write, but I am not a developer so I find that difficult. A second script could be written to automatically select the value for the FIELD, if there is only one value available. We should always have just one value since we delete every new note created by the Media DB Plugin. Finally, a third script could be implemented just for the “Add Movie to Watched” macro, and this would automatically delete the movie, that you just added to the watched tables, from the two watchlist tables. I currently do this last step by searching for the movie title in the watchlist table, place my cursor on the found title, and then with the advanced tables plugin, delete the row.
Linter
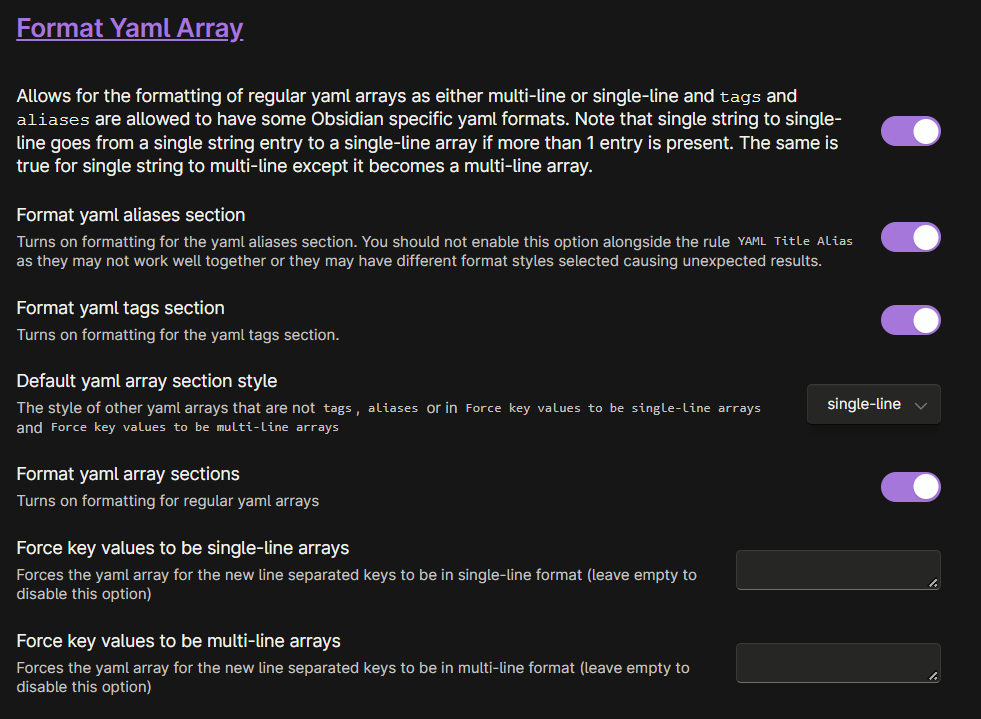
Finally, let’s setup Linter. We need to “Lint” the note that Media DB creates because the stars, genres and sometimes directors will appear as a bullet point list, while we want the value for these entries just to be separated by commas. I left the default settings in most of the fields. The important settings are those in the YAML tab under the “Format YAML Array” section. Make sure that “Format yaml array sections” is on, and that the “Default yaml array section style” is set onto “single-line”. I think that just these two settings are the important ones in that section.
And, finally, in the “Custom” section do the following. These custom regex replacements will further improve the note created by Media DB. Respectively, they will remove the square brackets present, will remove the " min" in the runtime field, and will format the dates. This last one command will transform dates like this 1/1/2023 to this 01/01/2023.
Below you can find the strings to copy. Beware that the space before “min” is needed.
CUSTOM REGEX REPLACEMENT:


Search:
\[

Replace: leave blank


Search:
\]

Replace: leave blank


Search:
 min

Replace: leave blank


Search:
\b(\d)(?=/)

Replace:
0$1