How to create a general-purpose clipper that will send highlighted text to your Obsidian vault
How to create a site-specific clipper that will extract key information from a particular website (e.g. actor names from IMDb) and send it to your vault using a custom layout (“template”).
The start of the article has GIFs demonstrating these capabilities.
The clipper can be triggered by a keyboard shortcut, clicking an Obsidian logo that you insert into the page, or from a “right-click” context menu.
Armed with this knowledge you can create your own!
Happy clipping!
EDIT (by the Forum Moderators): The official Obsidian Web Clipper is now available and can be downloaded for all major browsers:
Thanks for posting this. Always wanted to play around with Tampermonkey. I installed it a couple of years ago to use a script I had come across then over time forgot I even had it installed. I have been thinking of writing my own web clipper myself. I’m currently using Markdownload which works great, but I would like to see a couple of features it does not currently have available so writing my own clipper has been on my todo list for a while. Your article will help out a lot, Thank you!
If anyone is curious, it works in Brave browser as well.
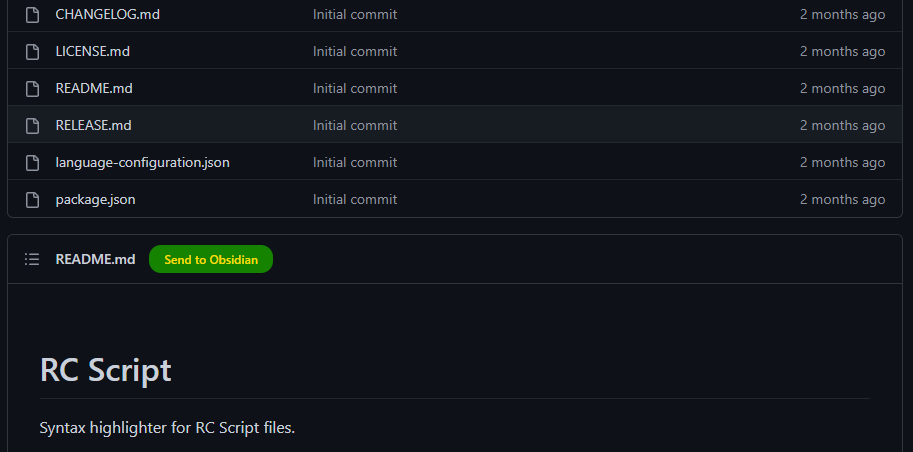
Had some time to play around with this over the holidays and came up with a script I wanted. Markdownload fails to download actual markdown pages from Github, in particular I like to grab the README.md file from repos as that usually contains all the needed documentation. The script I wrote adds a button Send to Obsidian beside the README.md file title. It accounts for relative paths to image files and converts them to absolute paths as well. If anyone wants to use this, just set the name to the vault you wants to use, and optionally, the folder you want to save to (Defaults to “Github/”. The template is defined in the variable content and can be edited to suit your needs. If it does not appear for some reason just reload the page…
// ==UserScript==
// @name         Get Github Readme
// @match        https://github.com/*/*
// @version      0.0.1
// @description  Send Github README.md to Obsidian
// @icon         https://www.google.com/s2/favicons?sz=64&domain=obsidian.md
// @require      https://code.jquery.com/jquery-3.6.3.min.js
// @run-at       document-end
// @author       William McKeever
// @grant        GM_setClipboard
// @require      file:C://programming\code\my_code\TamperMonkey\Get%20Github%20Readme\Get%20Github%20Readme.user.js
// ==/UserScript==
    'use strict';

    // ----------- Define Vault to Use & Folder to Save to -----------
    const vault = "VAULT_NAME";
    const saveToFolder = "Github/"; // Empty string "" for root folder
    // ---------------------------------------------------------------

    // --- Wait for page to load
    window.addEventListener('load', async function() {

    // ---------------------=== Add Stylesheet ===--------------------
    let styleSheet = `
.sendBtn {
    background-color: green;
    padding: 5px 15px 5px 15px;
    margin-left: 10px;
    border-radius: 12px;
    border: none;
    font-size: 12px;
}

.aTag {
    color: gold;
    text-decoration: none;
}
`;

    let s = document.createElement('style');
    s.innerHTML = styleSheet;
    (document.head || document.documentElement).appendChild(s);

// --- Create Filename from Page Title and Remove Unwanted Characters ---
function createFilename() {
    let pageTitle = document.title
    let filename = pageTitle
    let cn1 = filename.replace(/GitHub - /, '');
    let cn2 = cn1.replace(/:/g, ' -');
    let cleanName = cn2.replace(/[\(\)\[\]\\/?%*'|"<>!\.]/g, '-');
    return cleanName;
}

// --- Add 'Send to Obsidian' Button after README.md ---
function addSendBtn(vault) {
    let filename = saveToFolder + createFilename();
    let obsidianLink = `obsidian://advanced-uri?vault=${vault}&filepath=${filename}&clipboard=true&mode=overwrite`;
    let btn = document.createElement("button");
    let aTag = document.createElement('a');
    aTag.setAttribute('href',obsidianLink);
    aTag.innerHTML = "Send to Obsidian";
    aTag.className = "aTag";
    btn.className = "sendBtn";
    btn.appendChild(aTag);
    return btn;
}

    //--- Get the Owner and Repo Names
    let basePath = "https://raw.githubusercontent.com/"
    let owner = location.href.split("://")[1].split("/")[1];
    let repo = location.href.split("://")[1].split("/")[2];

    //--- Get the repos branch name
    let spans = this.document.getElementsByTagName("span");
    let branch;
    for (var i = 0; i < spans.length; i++) {
        if (spans[i].className === "css-truncate-target") {
            branch = spans[i].innerHTML;
        }
    };

    //--- Get the Readme's Filename (needed for getting correct case)
    let anchors = this.document.getElementsByTagName("a");
    let fname;
    for (var i = 0; i < anchors.length; i++) {
        if (anchors[i].className === "Link--primary") {
            fname = anchors[i].innerHTML;
        }
    };

    //--- Get the Actual Markdown File Data
    let rawMD;
    await fetch(`https://raw.githubusercontent.com/${owner}/${repo}/${branch}/${fname}`)
      .then((response) => response.text())
      .then((data) => {rawMD = data})

    //--- Replace Relative Paths with Absolute Paths (for images)
    let rawMD1 = rawMD.replace(/img\s+src\s*=\s*"\.?\.?(\/.+)/gim, 'img src="'+basePath+owner+repo+'/'+branch+'/$1');
    rawMD = rawMD1.replace(/\(\.?\.?(\/.+[\.png|\.gif|\.jpeg|\.jpg]\))/gim, '('+basePath+owner+'/'+repo+'/'+branch+'/$1');

    // -----------------=== Define Note Contents ===------------------
    let content = `
---
tags: [github]
---

${rawMD}

`
    // ---------------------------------------------------------------

    // --- Create 'Send to Obsidian' Button ---
    let btn = addSendBtn(vault);
    $('[class="Box-title"]').append(btn).on("click", () => GM_setClipboard(content, "text"));
});
Thanks to Gahrae for the great article that prompted me to write this script!
Tip: If you would like to edit your scripts in VSCode or some other editor, see this Stackoverflow link for details on how to achieve this. It works great, and it is easier to code in VSCode rather than Tampermonkey’s built in editor.