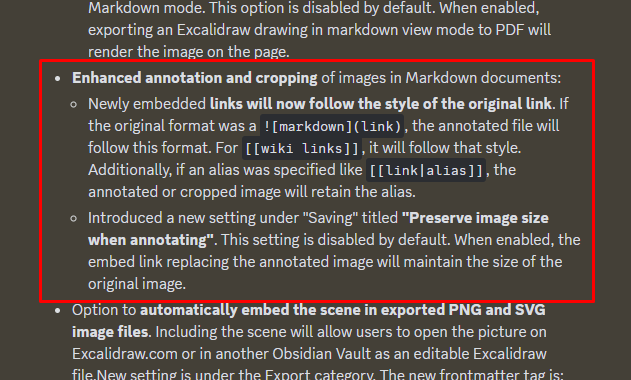
The today update to Excalidraw has added the Annotate image feature.
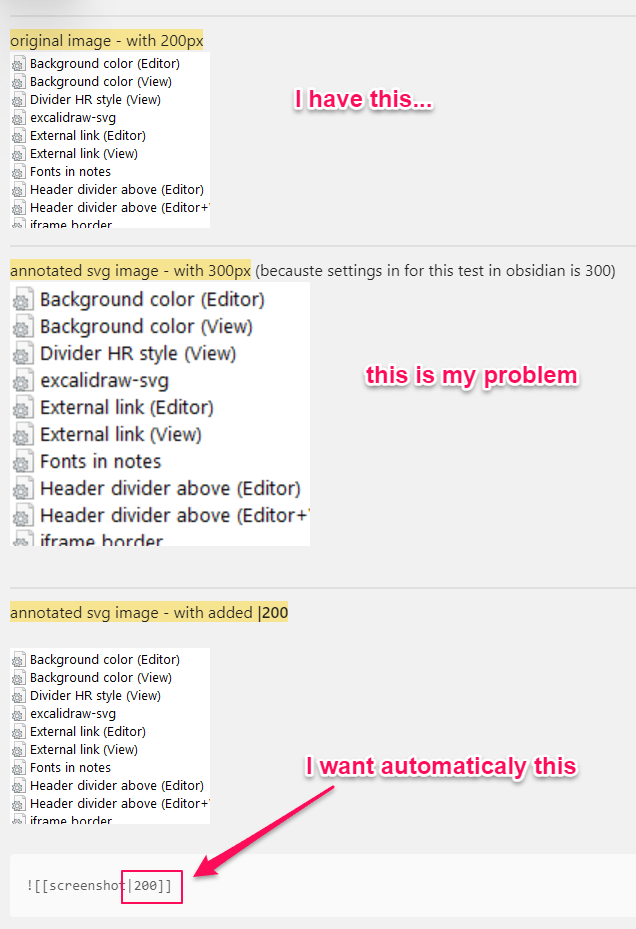
It has one beauty bug. After annotating, it replaces the original image in the annotation with an excalidraw drawing but with a preset width (for example 400px). So screenshots with text are blurry because it doesn’t match the resolution on the monitor.
Of course it is possible to manually resize this embed by adding the code |with-size, where with-size is the width of the original image.
Ideally, after annotation, this code would be inserted there automatically, but the author of the plugin can’t promise me now and advised this procedure:
You can automate this with Templater… of course I can understand, if you are new to Obsidian, that is easier said, than done… but on the up side, using Templater for such a small project is a great way to learn Obsidian Automation.
I would do the following: use tempalter to cature the image size then templater could call the Excalidraw annotation function once Excalidraw has dropped the link Templater can update the line with the exact size.
I absolutely can’t find how to do this. Can anyone give me some advice?
First of all, this feature seems pretty hot and new so I’d wait for some kinks ironed out by the developer.
Questions:
What size of pictures do you work with? I just tried a medium sized image in canvas, wrote on it, zoomed in and out on canvas and looked perfect.
How is preset width enforced and how would you get around it (bigger text)?
Are you using it with plain embedded images (in a note) or on canvas?
Can’t you set image width on the embed itself with Obsidian (probably doesn’t help, right).
As for the Templater thing, it sounds fairly niche and for me, an unwanted workaround.
Although I do know that Excalidraw images can be turned into markdown files so can be fiddled around with Templater – I just never tried. I do diagrams with PlantUML instead.
Well it’s hot news because I requested it this Thursday and within a couple of days the developer incorporated it.
I use screenshots using Lightshot or Snagit. So these are small images and I want to see them at the “same size” after pasting them into Obsidian in notes. I’m not interested in printing…
Of course I can work around this by manual editing. But I’m looking for a solution to speed it up as much as possible, because when editing manually I have to remember the width in pixels of the original image.
So, indeed, even if I had set 2000px for embed width in the settings, upon annotating, I saw the embedded fie (now with the new filename) shrunk in my live preview and in the developer console I still saw the embed at 400px.
Maybe one should have disabled and re-enabled Excalidraw to make the new settings be active? I don’t think so. This is some kind of bug or something.
I think the developer misunderstood you or wanted to give a too-professional answer or idea.
Then I also misunderstood you but not as much to think we’d need to write some javascript code (which I can’t, unfortunately; Templater was mentioned by the dev because one can write js in it not because Templater is a usual way of handling these things).
So I think a max-width CSS with all of
.excalidraw-svg {
    max-width: 2500px !important;
}
should suffice. Save it in the snippets folder and activate it.
Or: install zachatoo’s CSS Editor plugin, then create new CSS (give it a name), and bang, the css will be saved into your config folder and automatically activated.
I also tried changing the output to PNG in the settings but still saw the same thing in the console, so apparently it can be used to target any exc. embeds.
The |size solution was too obvious and I overlooked it. And I thought you had a problem seeing the annotated parts.
Is 200px a regular size you’d want? Because a simple search and replace can help – well, a Templater search and replace with regular expressions. It could even ask for user input of pixels. Not a big deal but you’d need to run an extra command and this is not a good solution (especially because the image reference can vary from annotated.
A better solution would be to use local CSS. E.g.:
Aha. I had an idea you want the method proposed by the developer, because he understood the problem better. Now I understand too. You’d want width: auto, which is the default way for images anyway but because Excalidraw is exchanging the image reference, you’d need the width of the original file and then you’d need to add that width back.
This currently surpasses my level of expertise, I’m afraid, but I contacted the developer about allowing annotated images to be auto width.
If there’s nothing coming out of it, I can still try with the script because I seem to have most ingredients but the most important part (waiting for the embedding back to finish with the link selection to be still active) eludes me. Also, reading the file system should work on mobile as well.
Okay, after an exchange with the developer, he had looked into it and said it was too convoluted currently to handle the auto width with so many settings on top of each other.
I had tried in the developer console and indeed, auto is not accepted or effective.
So it’s either using the snippet or heading to Embedding Excalidraw > Export Settings > Image Sizing in the settings and setting 100% there (auto is ineffective) and then following another piece of advice that was given to me:
You can create multiple Excalidraw templates. To keep it simple I would create 3: template-small, template-med, template-large.
Depending on how you annotate images, you may also want to add a smaller padding for these exports.
Create your css snippet based on your cssclasses
.img-small { width: 300px; }
.img-med { width: 700px; }
.img-large { width: 1000px; }
.img-xl { width: 100% }
Based on the image you annotate you can chose which template to apply.
You’ll set these in the markdown version of the embedding:
---
excalidraw-plugin: parsed
excalidraw-export-padding: 0
cssclasses
  - img-w300
---

# Text Elements
....
Templates can also be used in Excalidraw so one doesn’t need to specify the same things all over again.
That’s it out of me on this topic, I’m afraid. I’ve decided I’m not going to pursue the javascript solution. One would need to look through third party plugin’s codes and the developer console for properly targeting images or their cached versions because wanting to access the file system for dimensions of the image would be bad practice.
So you understand that you can do stuff for yourself but not share it on the forum for fear of using unruly scripts that cause vulneribilities, memory leaks, etc. Sorry.
Clearly not a problem. I guess it’s more complicated than I imagined. Because there’s one more thing that comes into tho. If I accidentally make an annotation next to the picture… then it doesn’t even match the image’s original dimension… I’ll deal with it for now by editing it manually.
My whole beef with the situation is that the auto value is the default value for embedding images in Obsidian (which I especially like when I can put in a tiny image of a picto- or ideogram inline with the rest of the text), but this default auto value cannot be set for Excalidraw’s embedded image. It’s always pixels or percentages, it seems like.
My last input on here is just a tip or two (nothing major):
If you usually do screenshots and maybe want to compress them to save space, you can use the Image Converter plugin which can do destructive and non-destructive resizing.
You will save space by using the former and converting to a jpg, where you can set the width size to a constant value (say 800px) and thus maintain consistency throughout your notes.
Then if you need to annotate any of the images in Excalidraw, you won’t need to do css snippets or any other setting apart from the 100% I mentioned above.
Another tip is to cut wide on the screen when making screenshots (from left edge to right edge on the screen or the usual active window of Firefox, etc.), rather than focusing on a smaller element that would look stupid when enlarged to a predefined width.
You can also cut a little lower or higher so that you can have some space to write something there with Excalidraw’s text feature.
It’s all just a matter of preference of course.