Creating the css

- To create a new callout type you need to create a css file and put it in your snippets folder.
- Put a name for your callout between the brackets after
data-callout="Your callout name goes here"
	.callout[data-callout="emoji"] {

	}
- We need to hide the icon and increase the title size. The title is where the emoji will be. If you want your emoji to be smaller just decrease the size here.
    --callout-icon: none;
    --callout-title-size: 55px;
- Then we need to change it so that the emoji goes in front of the the text
- To do that we need to set the display to flex and the direction to row.
	display: flex;
    flex-direction: row;
- I then fiddled with the margins and padding to have the layout look nicer.
--callout-padding: 0px;
--callout-content-padding: 0px;
.callout-title-inner{
        margin-top: 4px;
        margin-bottom: 4px;
        margin-right: 10px;
        margin-left: 4px;
    }
- Finally I changed the colors
- Note the color should be a variable, or it should be in rgb form. Like:
--callout-color: 0, 0, 0; - I haven’t found a way to change the border color, it seems like the border just uses a variation of the callout color all you can change is the opacity of the border.
- If you don’t have a color for the callout the border just turns black.
	--callout-color: var(--callout-quote);
    --callout-border-width: 3px;
    --callout-border-opacity: 10%;
- Here is what the final css of the emoji callout looks like.
.callout[data-callout="emoji"] {
    --callout-color: var(--callout-quote);
    --callout-border-width: 3px;
    --callout-border-opacity: 10%;
    --callout-icon: none;
    --callout-title-size: 55px;
    --callout-padding: 0px;
    --callout-radius: 16px;
    --callout-content-padding: 0px;

    display: flex;
    flex-direction: row;
    .callout-title-inner{
        margin-top: 4px;
        margin-bottom: 4px;
        margin-right: 10px;
        margin-left: 4px;
    }
}
And to use it you just put an emoji where the title would go. This is what the markdown looks like.
>[!emoji] 😄
>Here is the emoji callout
Creating the templater popup
Step One - Create the template file
Create a new Template in your templates folder. I called mine emoji picker.
Step Two - Write the javascript
Templater has a method that you can call you create a drop down selector.
- Open the function with
< % *and close with- % >These symbols mean that the system going to display the result right here, unlike the normal templater tags (< % and % >) which are telling the system to display a variable.``` - you need to call
tp.system.suggester. - The first parameter takes a list (the brackets ( [ ] ) are what indicates that it is a list.
- Put the items of your list in quotes and separate the items by commas.
- The first list is the items that that you see in the popup. Then second list the the values of that choice. So when you select “
 Happy” the result that you get from that selection is only the emoji
	<%*
		var result = await tp.system.suggester(
			["😄 Happy", "😤 Frustrated", "😭 Sad"],
			["😄", "😤", "😭"]
		);
	-%>
Step three - Display the callout
Now we need to write the callout in markdown and add the title or emoji will be the result that we got from our drop-down selection.
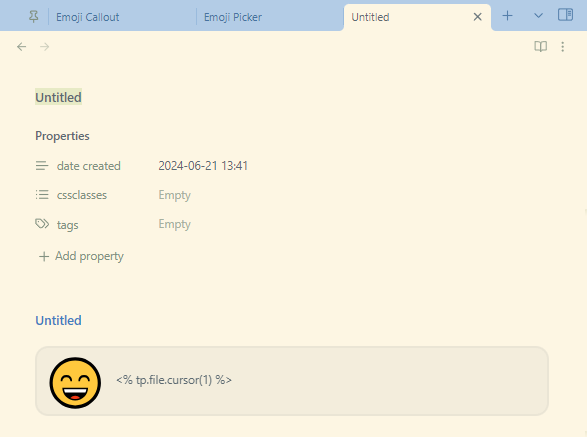
   >[!emoji] <%result%>
   ><%tp.file.cursor(1)%>
I added `` on the second line to indicate that that is where I want the cursor to be after inserting the template. That way you can immediately start writing inside the callout.
Here is the full markdown code of the emoji picker template
<%*
	var result = await tp.system.suggester(["😄 Happy", "😤 Frustrated", "😭 Sad"], ["😄", "😤", "😭"]);
-%>
>[!emoji] <%result%>
><%tp.file.cursor(1)%>
Step four - Test to make sure its working
Add the template to a page and see if it works
Step five - Add more emojis
After you’ve gotten the basics to work you can customize it to add the emoji’s that you want to the list. Just make sure that you have you display list and value list in the same order.
Assigning the template to a hotkey
Now that you’ve created your emoji picker you can now assign it to a hotkey.
- Go to the templater settings.
- In the settings there is a section called template hotkeys, click add new hotkey for template.
- Select the emoji picker template
- Click the plus button to configure the hotkey. That will take you to the hotkeys section where you can search for emoji picker and then set the hotkey you wish for it to have.
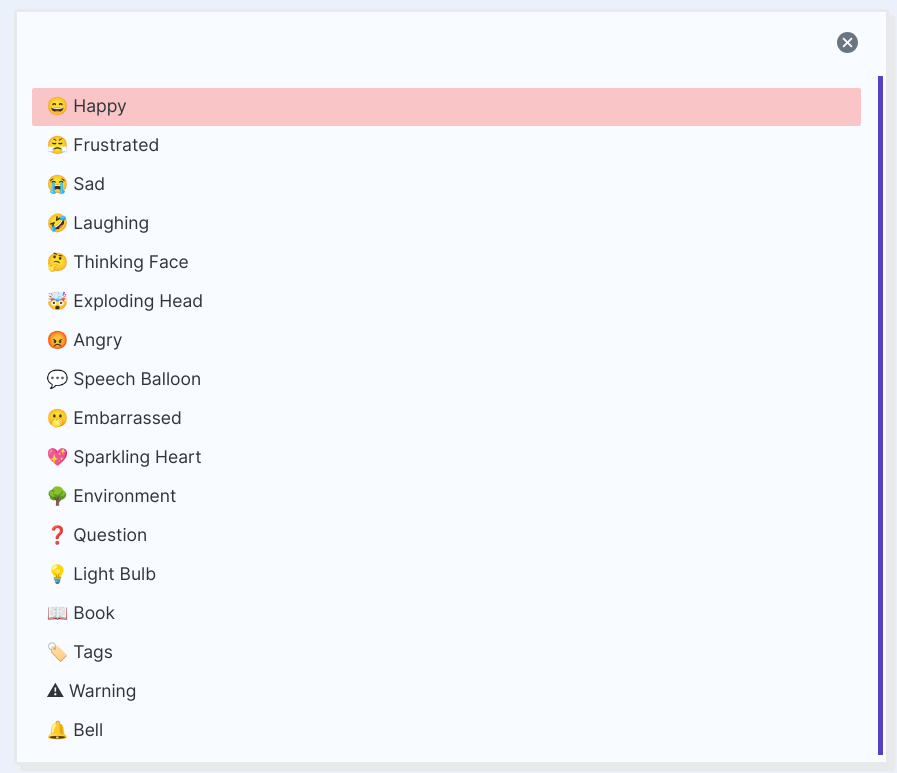
This is what the final popup looks like with the extra emojis that I’ve added.