This is a workfrow about setting up a smooth(ish) transition from getting a pdf into zotero (which is a reference manager), annotating it, extracting annotations (with or without color coding for that), pushing those into Obsidian using the @argentum’s mdnotes plugin - specifically, the latest alppha release at the time of this post: 0.2.0 alpha4 and have those readily usable with Michael Brenan’s Dataview plugin.
2023 Update: there is a new plugin, the Zotero Integration plugin, that works well and simplifies the transfer of highlights from zotero to obsidian. There are still differences in operation; I still use zotfile because (1) zotero pdf reader doesn’t offer as many annotation options and (2) ZI isn’t always accurate at extracting highlights from some pdfs.
If you still wish to use this workflow, most of it has not changed for Zotero 6; the only issue is that you will need to use the older version of zotfile - version 5.0.16 (available here) and disable updates on it.
Some Caveats:
- The mdnotes plugin I’m using is the current alpha build, that makes all of this really great. I am not sure how any of this will work for future versions of zotero. It does not work with earlier releases of mdnotes.
- I’m using a mac for this, and have not tested the workflow on windows.
- I’ve created a basic “Setting up Zotero” process, for those who want that. Feel free to skip anything irrelevant.
- I’m currently using Juris-M, which is based on zotero with additional zotero fields for legal referencing. Other than the additional legal information added on to cases in my library, everything else should translate to zotero. The version I’m on is Juris-M 5.0.93m18. I have not tried the latest beta-builds of zotero as of this date. For this post and to avoid confusion, I’m going to say ‘zotero’, which means ‘the Juris-M build of zotero’. I do use Zotero (5.0.96.1) for the main sections #1 and #2, and Juris-M for everything from #3 onward.
- I’m using a test-book item in zotero, with a lorem ipsum text randomly highlighted.
- I’ve included screenshots and descriptions of what’s happening right before the screenshot.
1. Setting up Zotero and the other add-ons
This is a list of one-time set-ups for this workflow in Zotero.
1.1 Zotero Installation
- Go to zotero.org.
- Download relevant installation file.
- Install zotero on your system.
- Get a zotero account.
- Open zotero. Once you open zotero, it should show you an Introduction pop-up. If you press Continue, it will take you to the plugin installation window. Here, it shows you the plugins available for the word processing applications you have (including Libre Office and MS Word). If you plan on using citations in any such program, select the appropriate plugins here and press “Continue”, which will install them.
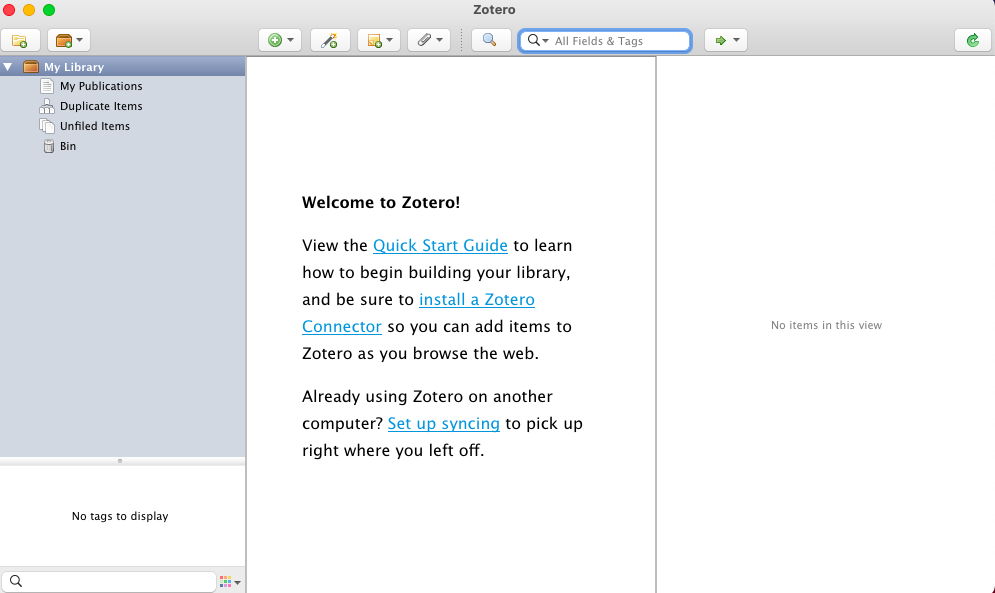
- Once this is done, it will take you to an empty-looking window with “My Library” at the top left. This is your library, and if this is your first time using zotero, it’s probably empty. (Screenshot 01)
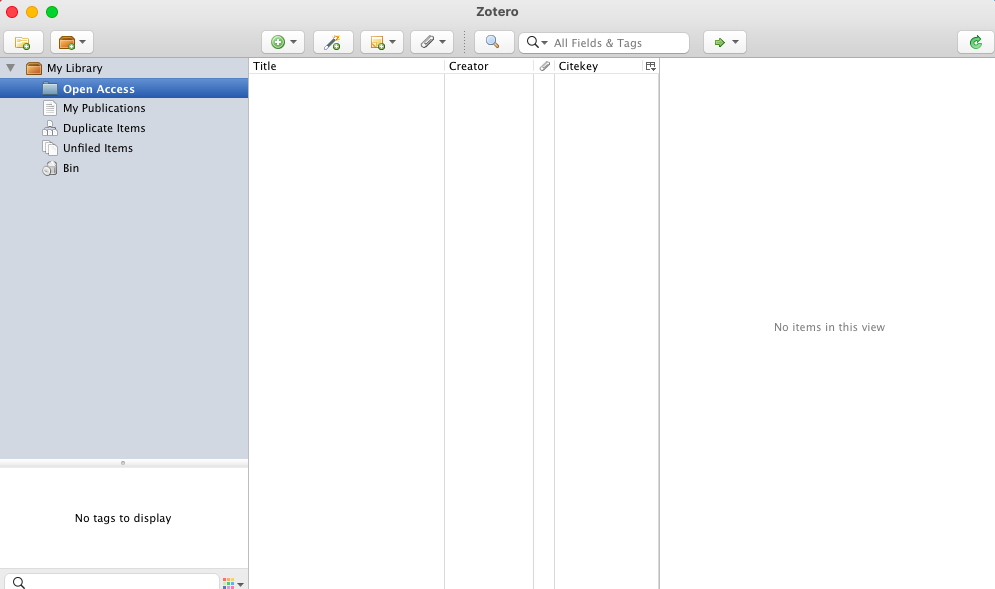
- Collections in Zotero look like sub-folders under “My Library” in the main zotero window, but function like tags, in that you can have the same item in more than one collection at the same time. You can create a new collection by selecting File → New Collection. Enter a name for your new collection (I enter “Open Access”). Press OK. It should show you the new collection under “My Library”. Screenshot 01-2 and 01-3).
01:
01-2

01-3
1.2 Zotero Sync
Before getting pdfs into zotero, you want to decide where you’d like to store these pdfs. If you’re not planning to use a zotero account to sync your library, then zotero will store your files locally on your computer at the default location. If you are planning on intensive use of zotero for academic citation management, it’s probably best to get an account. If you plan on not syncing your library to any cloud, skip this step.
Zotero offers 300 MB of free storage, and paid upgrades. Depending on your usage, this may or may not be enough. You can also choose to sync your library through a different cloud storage.
Steps.
- Open zotero
- Go to Preferences (Zotero → Preferences in Mac, Edit → Preferences on win)
- Go to the “Sync” tab.
- Input your zotero username and password, if you already have an account. Select “Create an account” if you didn’t do that in 1.1 (Screenshot 02)
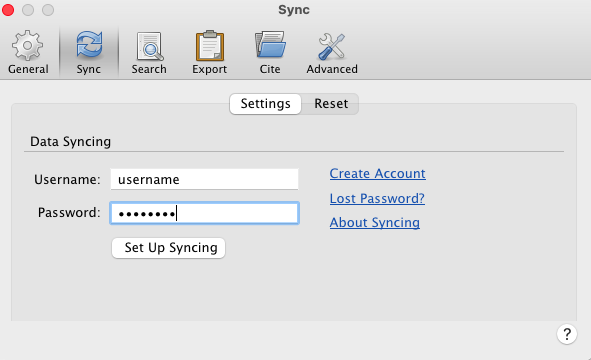
- Once you have an account, if you don’t plan on using zotero sync, unselect “Sync full-text context” as seen in the screenshot.
- You can use a webdav account for syncing instead, by choosing the “WebDAV” option in “Sync attachment files in My Library using” option.
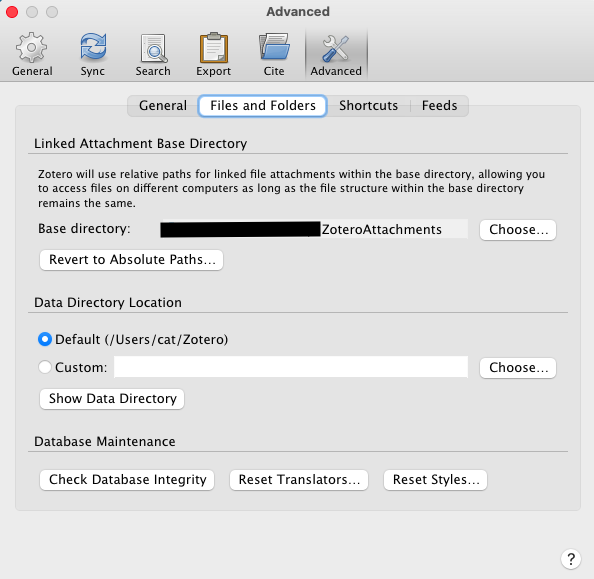
If you’re not planning on using zotero file storage but want to use another cloud that isn’t WebDAV, go to the “Advanced” Tab, and then to the “Files and Folders” subtab (screenshot 04).
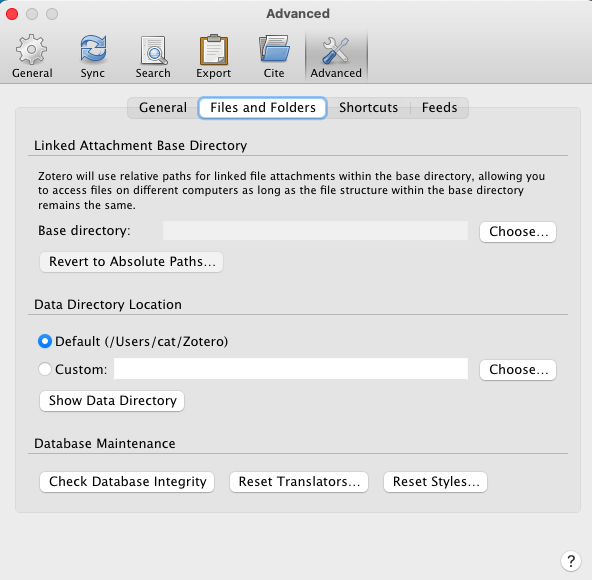
Zotero allows you to link files into your library (instead of attaching them) and uses the same cloud folder across different computers as long as their path to the “Base directory”. Here’s how to set that up:
- Select a base directory for your library under “Linked Attachment Base Directory”. This is where you want to store all your Zotero attachments. (eg. I created a folder in my locally-synced-cloud, and gave it a name, “ZoteroAttachments”) (Screenshot 05)
1.3 Install the Browser Plugin
Steps
- Install the zotero plugin on your preferred browser. For this, I’m going with Chrome.
- Go to zotero.org/download
- Select “Install Chrome Connector”, which should take you to the connector on the Chrome web store.
- Select “Add To Chrome” → “Add Extension”.
- The plugin should install, and then show you a pop-up that tells you how to use it.
- Once installed, click the menu button for the plugin and select Options.
- If you’re using sync, select the “Authorize” button under “Save to Zotero.org” and log in to your zotero account when prompted. Once Logged in, accept defaults or change the key to your preference.
- The default settings under “Save to Zotero.org” should have “Automatically take Snapshots…” and “Automatically download associated PDFs…” both enabled. I don’t use snapshots, so I have disabled that in mine, but that’s my preference. The defaults are usually fine here.
1.4 Install Zotfile; Install Mdnotes and Better Bibtex for steps in No. 3 onward.
Here are the links to Zotfile, Zotero-mdnotes, and Better BibTex.
Steps:
- Save the .xpi files from the installation links onto your computer.
- In Zotero, go to Tools → Add-Ons
- Click on the settings button at the top-right corner, and select “Install Add-on From File” (Screenshot 06)
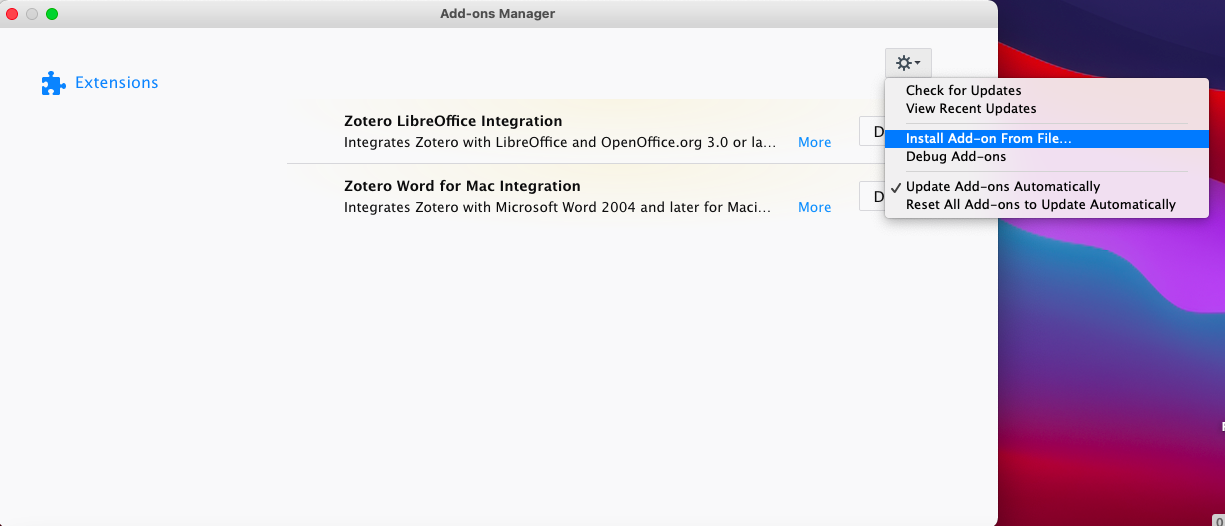
- Select the downloaded .xpi files and then click Install.
- Restart Zotero when prompted.
1.5 Zotfile and Bibtex: Basic Preferences
Zotfile can manage your pdfs, rename them, extract annotations and store them wherever you want it to do that.
Zotero, Zotfile, and mdnotes also have hidden preferences, which I edit in part 3 of this workflow, with examples of different outputs for the various settings.
1.5.1 Zotfile Preferences
Steps for setting up file organisation if you’re using a cloud to link files into zotero
- Go to Zotero → Tools → Zotfile Preferences
- In general settings, you can tell zotfile where to store your documents. For this, in “Location of Files”, choose Custom Location, and choose the folder you selected in 1.2 (in my case, “ZoteroAttachments”)
- You can choose to have zotfile sub-categorise your files in this folder, using these wildcards. Many people choose to categorise by Author (%a) or year (%y).
- I prefer organising my files by subject, so I pick %c, meaning collection. You can also combine different wildcards, like so: “/%c/%a” (Screenshot 07). The wildcards will create folders with the entirety of the field referred to. In my case, it will create a folder with the name of the collection in Storage (/ZoteroAttachments/CollectionName)

Steps for setting up zotfile renaming
- Go to Zotero → Tools → Zotfile Preferences
- Under the Renaming Rules Tab, using these wildcards again, decide how you want to name your files. This depends on what works best for you. The default settings can be fine if you like that. I use: “{%a} {(%y)} {%t}”, because I like the way that is visualised. (see screenshot 08)

- Next, go to advanced settings, and under “Other Advanced Settings”, select the “Always rename” option for “Automatically rename new attaktments”. Disable “Ask user when attaching new files”. (Screenshot 09).
- Close Preferences.

2. Get References and PDF papers into Zotero, Extracting Annotations (basic)
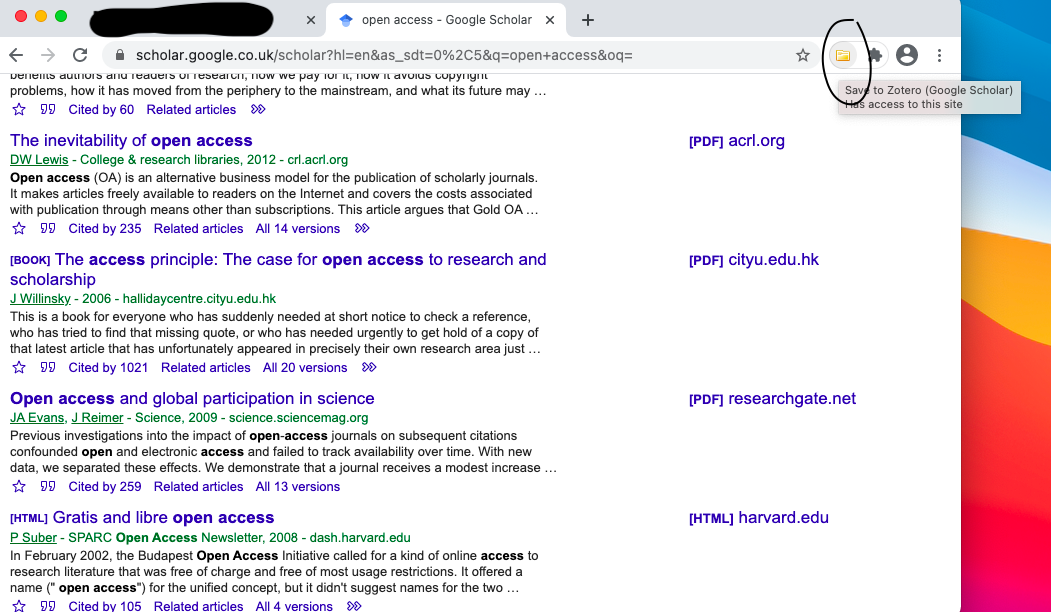
Zotero has browser plugins that allow you to directly add items to zotero. This works well with most journal databases (which, if accessible, sometimes allow you to download the pdf directly through the plugin). It also works well with google scholar, which I’m using for this demo.
For this, I’ve picked a random search for “open access” in google scholar, picking one of the results that gave me access to the pdf (Open Access and global participation in science by James A Evans et al, Science, 20 Feb 2009: Vol. 323, Issue 5917, pp. 1025, DOI: 10.1126/science.1154562).
Steps to get reference and pdf into zotero:
-
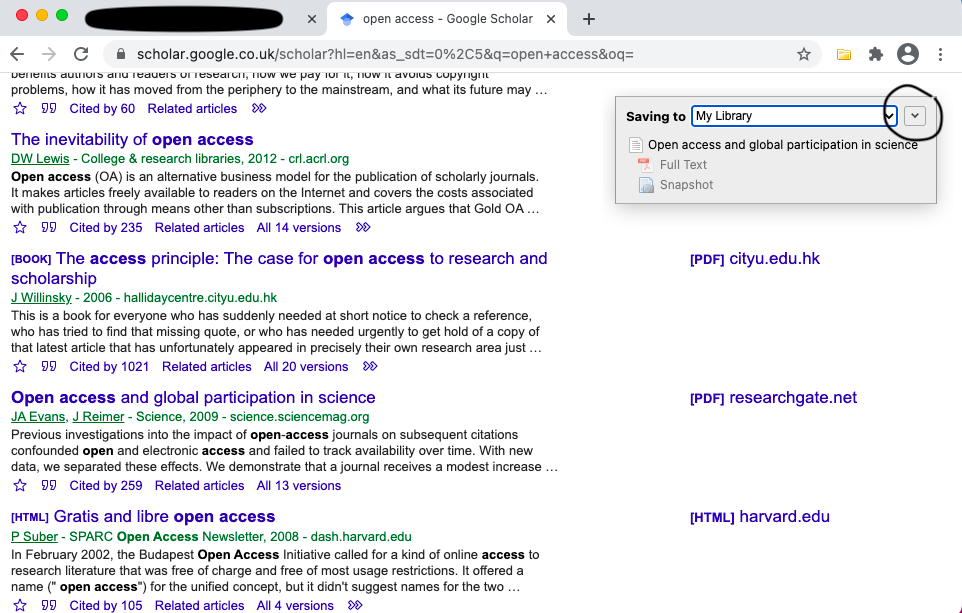
To use the zotero chrome connector, from the google scholar search page, click on the zotero plugin (it should look like a folder) (Screenshot 10)
-
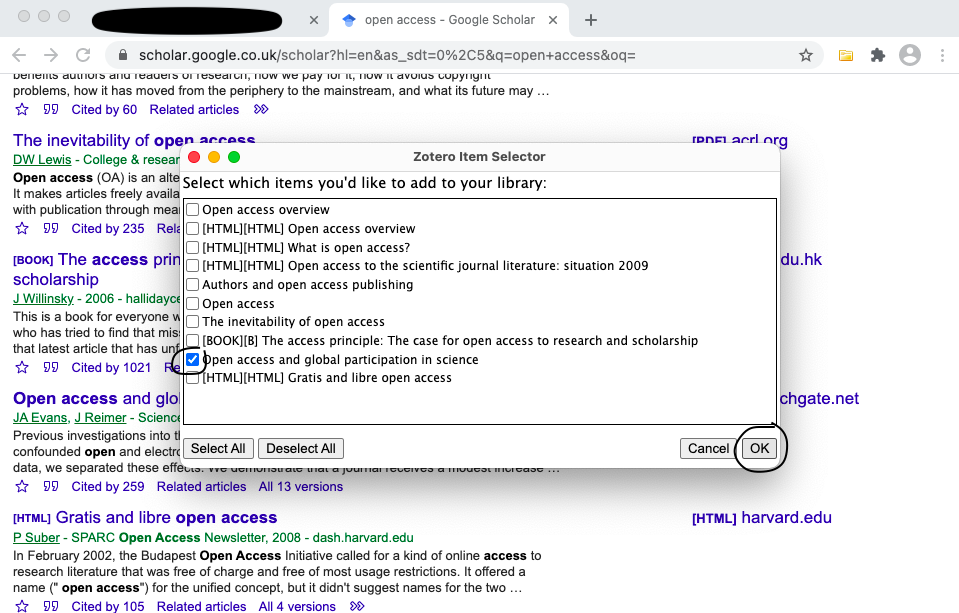
Once you click on it, it should open a po-pup that lists all the results on the page as selectable items.
-
Select the one(s) you want. Then select “OK” (Screenshot 11)
-
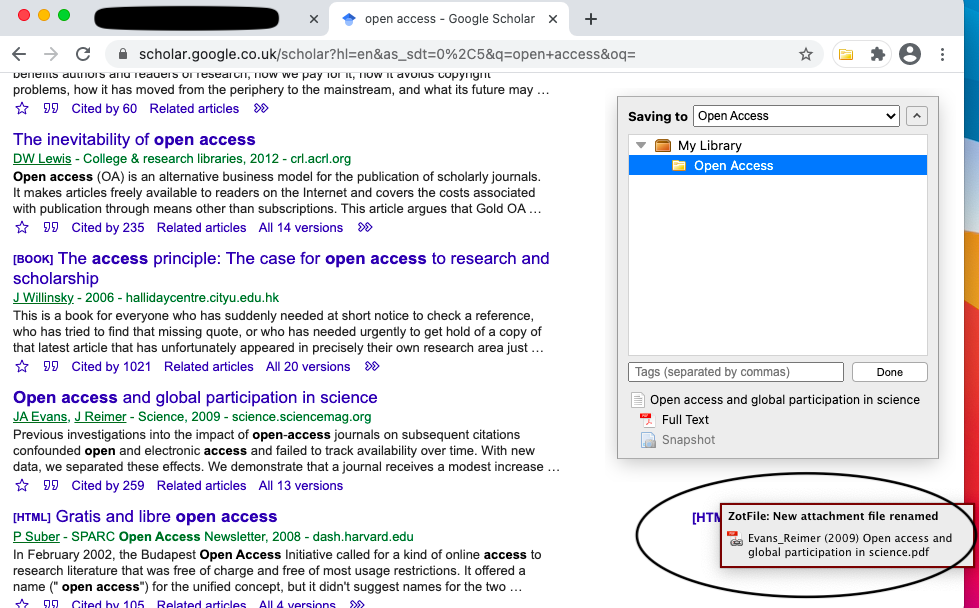
The plugin shows a pop-up saying that it is saving to My Library, with the name of the paper below that. It should also show a semi-transparent pdf icen with “Full Text” on it. This becomes opaque if zotero can access the file (which it can, in this case). If you click on the arrow on the right of “My Library”, you can select a different collection for the reference and the file. I select the “Open Access” Collection (Screenshot 12).
-
Once Zotero has the PDF, zotfile renames it and transfers it to the folder you specified in zotfile settings. You get a pop-up confirming that zotfile has renamed the pdf (Screenshot 14).
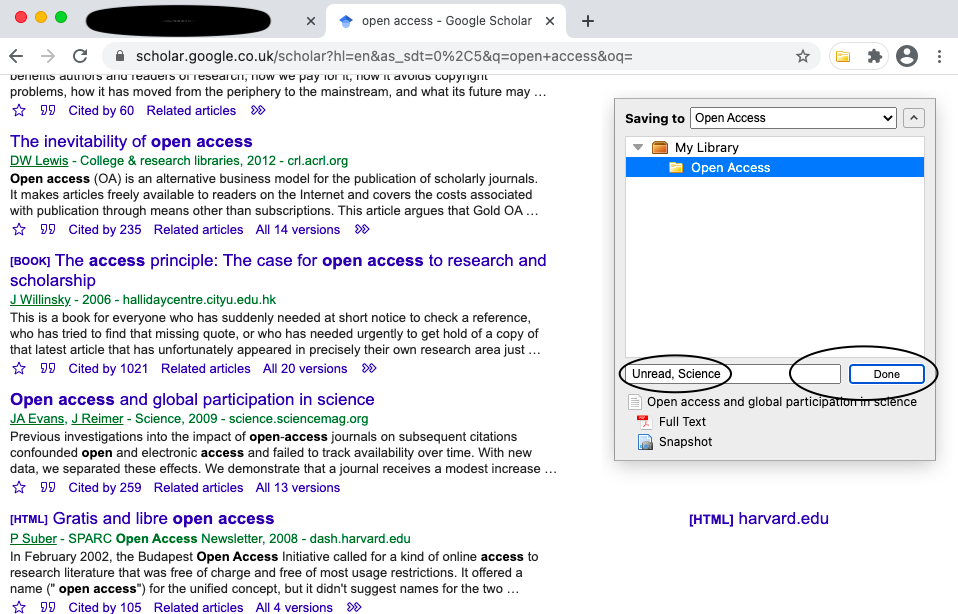
- You can also add Tags, Clicking on done. Here, I’ve added two tags, Unread and Science (Screenshot 15).
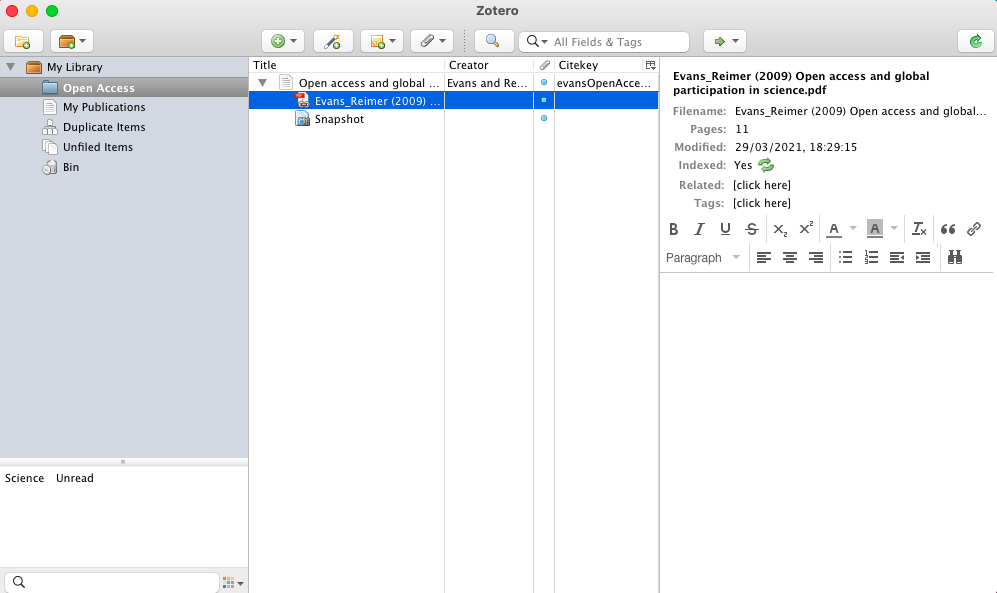
- When you go to zotero, you can see the reference you’ve added, along with the snapshot and the link to the file (which is the pdf of the paper that was downloaded with the chrome plugin) (Screenshot 16)
-
This PDF can be annotated in whatever pdf reader you choose (This does not include the new zotero pdf reader beta tool).
-
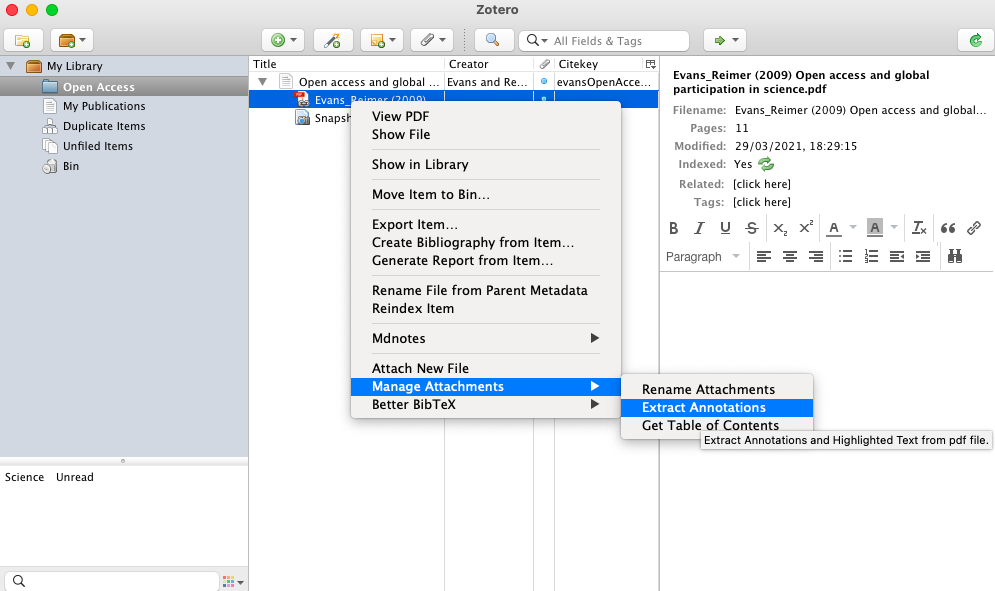
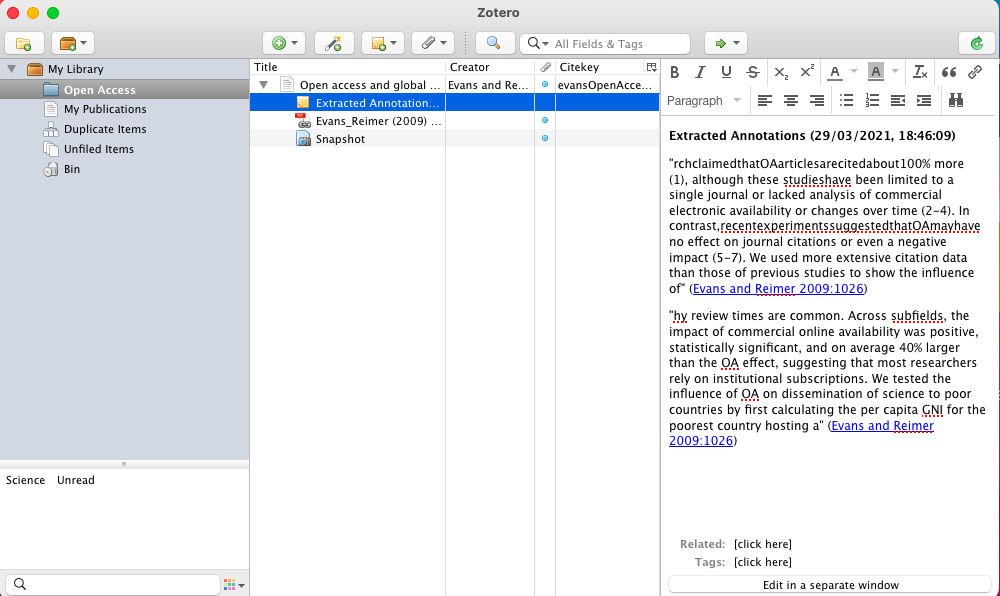
For those who do not care about formatting annotations, Zotfile allows you to extract any annotations you’ve made on the PDF file. simply right-click on the pdf file in Zotero, hover on “Manage Attachments”, and Select “Extract Annotations” (Screenshot 17). This should create a new note for the Reference with any highlights you made in the PDF extracted as text into the note. (Screenshot 18)
Screenshots 17 and 18:
3. Formatting Extracted Annotations for mdnotes and dataview
(I’m using Juris-M from here on, but everything I do here should work the same way on Zotero).
For those who do want to format annotations, Zotfile allows a number of edits to give you a lot of options. I’ll go through some of them here. This requires some comfort with fiddling with and editing the configuration files (or “hidden preferences”) in zotero. This assumes that you’re comfortable enough with step 9 in No. 2. I’m also not going to give screenshots for steps after this point, and instead reserving screenshots for displaying the export format.
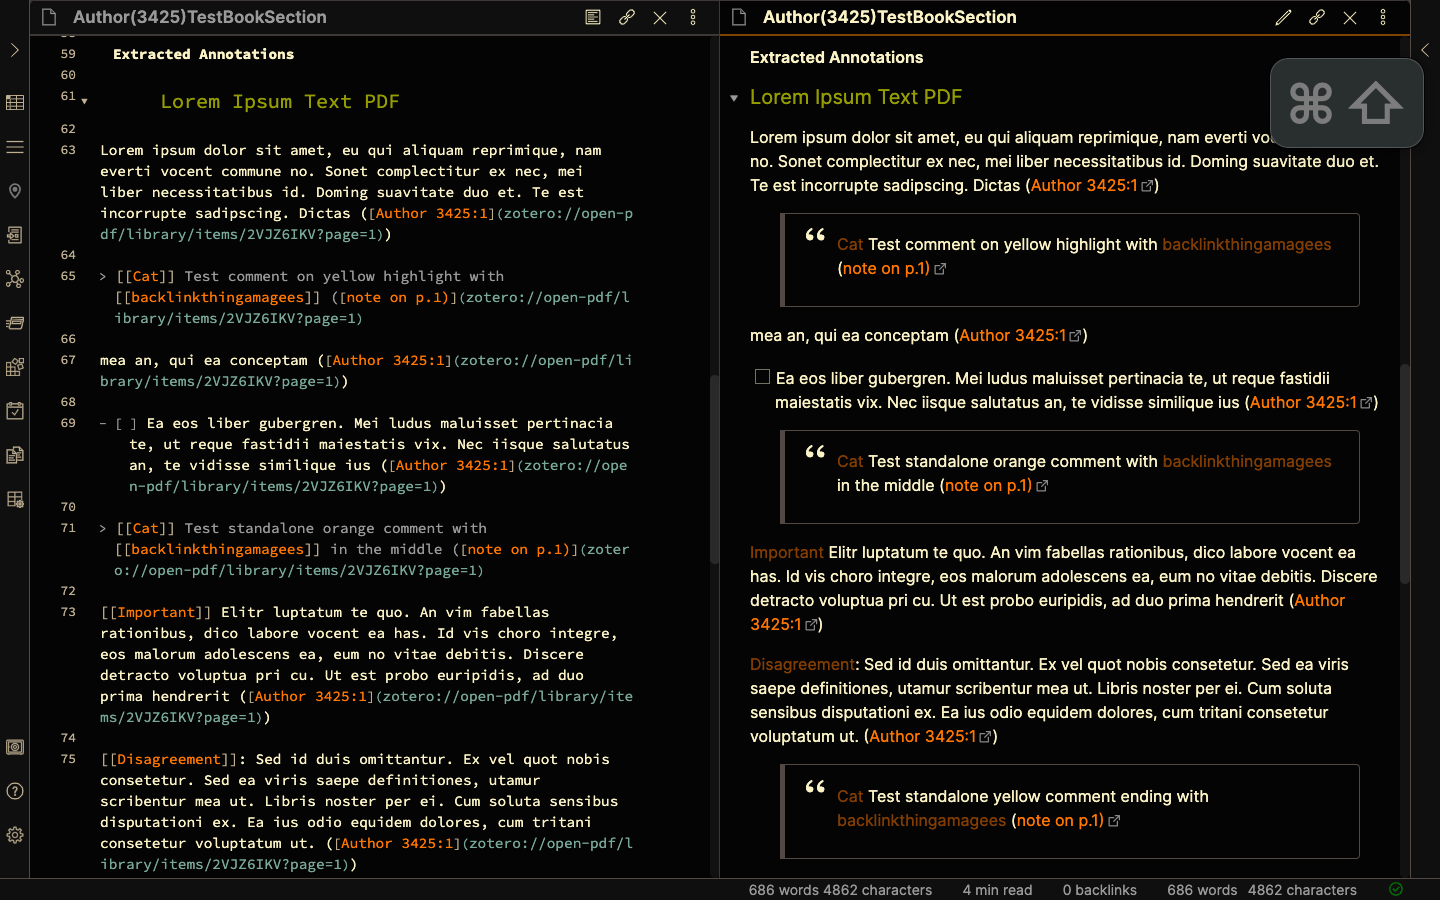
Mdnotes has some different templates for the export; The documentation for that is here. Because This workflow involves changing the default and hidden settings for both zotfile and mdnotes, I’m first going to go through my edits in the mdnotes template and then go through the zotfile formatting, so I can display the output in obsidian for the different formats after having edited the mdnotes template
3.1 Mdnotes default template:
The mdnotes plugin comes with a default template, saved in a .md file. You can find this file by checking Tools → Mdnotes Preferences. In the “Export Preferences” tab, the last section shows you the Template Folder path. There, the default template is called “Mdnotes Default Template.md”, and this is the file that I will be using.
In mdnotes preferences, my “Export Preferences” settings are:
- enable “Use the item’s citekey as title” (this uses the Better BibTex citekey as the title of the .md export. That can be edited by going to Zotero → Preferences, to the “Better BibTex” tab, to the Citation keys sub-tab, and editing the “Citation key format” option. Details for formatting that are at this link. My own format reads: “[auth]([year])[shorttitle3_3]”)
- “Single file” for File organisation. (I prefer having all my notes on a particular reference in one single file in zotero. Choosing split files exports separate .md files for each note in the reference and a separate metadata note for the reference itself.)
- A Folder in my Obsidian Vault for the Export Directory (Pick whatever folder works for your organisation of reference notes)
- “Attach file links to zotero” is enabled
Here’s what the default mdnotes template looks like:
{{title}}

![[%(metadataFileName)#Metadata]]

Other files:
{{mdnotesFileName}}
{{metadataFileName}}

##  Zotero links
{{localLibrary}}
{{cloudLibrary}}

## Notes
This is the template that’s used when you use mdnotes to “Create full export note”. Other export formats are also available, if you want to export individual notes separately into markdown format for obsidian to read.
This includes {{placeholders}} and %(wildcards). Placeholders are the terms within curly brackets, like so: {{placeholder}}, and can be defined in the hidden preferences. Wildcards are the terms in regular brackets following a percentage symbol, like so: %(wildcard). Mdnotes has an option to “skip” placeholders that don’t exist, while this cannot be done for wildcards. If mdnotes encounters a wildcard that doesn’t exist, it exports the term “undefined” in its place. So for this workflow to be robust in exporting different kinds of references, we want to try to use placeholders instead of wildcards. Mdnotes can read custom placeholders, as long as they are defined with existing zotero fields.
3.1.1 Adding and Editing Mdnotes Placeholders
Update: Since first writing this post, Dataview has been updated to include inline metadata, which works significantly better than plain YAML because it allows for the use of backlinks to other pages in your obsidian vault. While the process remains the same, there are some updates to the syntax. I’m changing this section to use inline tags, along with yaml tags for the alias, which still needs to be in YAML format, so you have samples of both. YAML placeholders in this section generally have the placeholder format {{yamlplaceholder}}, whereas the inline ones are just {{placeholder}}. I had to remove the old tags due to post-length limits.
First, we want to create placeholders to add to the YAML Metadata that the Dataview plugin in Obsidian can read. For this, we create custom placeholders that are formatted according to the YAML-dataview requirements, meaning strings need to be in quotes, anything with multiple references (such as a book with more than one author) needs to be formatted with newline bullets for each such item. I have a set of custom placeholders and formats here that can be used.
Steps to add a new Mdnotes Placeholder
- Go to Zotero → Preferences → Advanced (subtab) → click on “Config Editor”.
- Once inside, search for “mdnotes” (without quotes).
- This should show a bunch of settings, listed with “Preference Name”, “Status”, “Type”, and “Value”.
- To add a new placeholder, right-click on any preference. Hover over “New”, and Select the option “String”
- It opens a pop-up, “New String Value”, asking you to enter the preference name.
- Enter
extensions.mdnotes.placeholder.yamlauthorlist(without the backticks, if they show up when you’re copy-pasting). This creates a new placeholder, {{yamlauthorlist}}. Press OK. - Next, it asks you to enter string value.
- Enter
{"content":"Authors: \n- \"{{field_contents}}\"","zotero_field":"author","link_style":"no-links","list_separator": "\"\n- \""}(again without the backticks). This points to the “author” field in zotero, and formats the output to first Tag the output with “Authors:”, and then have the authors each listed in new lines with a ‘-’ bullet and include quotation marks for all the Authors exported, without links on them. - Repeat the process from 4 to 8 for each new placeholder you want to define.
Here are some of my placeholders, I’ve listed them in this format:
- {{placeholder}} (What the placeholder does)–> The term in {{}} is the name of the placeholder to be used in the final template
Preference name→ Use this in Step 6 above.Value→ Use this in Step 8 above.
Placeholders:
- {{DOI}} (outputs the DOI)
extensions.mdnotes.placeholder.DOI{"content":"\nDOI:: {{field_contents}}", "field_contents": "{{content}}", "link_style": "no-links"}
.
- {{author}} (outputs list of author in wiki link style)
extensions.mdnotes.placeholder.author{"content":"Authors:: {{field_contents}}", "link_style": "wiki", "list_separator": ", "}
.
- {{bookTitle}} (gives the title of the book)
extensions.mdnotes.placeholder.bookTitle{"content":"Book:: \"{{field_contents}}\"","zotero_field":"bookTitle","link_style":"no-links"}
.
- {{book}} (outputs name of book, if edited volume)
extensions.mdnotes.placeholder.book{"content":"\nBook:: \"{{field_contents}}\"","zotero_field":"book","link_style":"no-links"}
.
- {{date}} (outputs the date of the item)
extensions.mdnotes.placeholder.date{"content":"Year:: {{field_contents}}","zotero_field":"date","link_style":"wiki"}
.
- {{collections}} (outputs collections as subjects)
extensions.mdnotes.placeholder.collections{"content":"\nSubjects:: {{field_contents}}", "field_contents": "{{content}}", "link_style": "wiki", "list_separator": ", "}
.
- {{tags}} (outputs tags as wikilists)
extensions.mdnotes.placeholder.tags{"content":"{{field_contents}}", "field_contents": "{{content}}", "link_style": "wiki", "list_separator": ", "}
(note: tags does not have a metadata field of its own and uses the field of collections. this is because dataview does not accept values of the first field entry of inline fields if there is more than one entry made, the latter field entries overwrite the previous ones. Since my collection and tag fields in zotero are both used to categorise subjects, I club them in the mdnotes template format).
- {{editor}} (outputs the list of editors)
extensions.mdnotes.placeholder.editor{"content":"\nEditors:: {{field_contents}}", "link_style": "wiki", "list_separator": ", "}
.
- {{itemType}} (outputs the item type)
extensions.mdnotes.placeholder.itemType{"content":"Item_Type:: {{field_contents}}","zotero_field":"itemType","link_style":"wiki","list_separator": ", "}
.
- {{yamlbooktitle}} (Outputs the title of the book)
extensions.mdnotes.placeholder.yamlbooktitle{"content":"BookTitle: \"{{field_contents}}\"","zotero_field":"bookTitle","link_style":"no-links"}
.
- {{yamltitle}} (outputs the title of the reference)
extensions.mdnotes.placeholder.yamltitle{"content":"{{field_contents}}","zotero_field":"title","link_style":"no-links"}
.
MDnotes default template:
---
aliases: ["{{yamltitle}}"]
Title: "{{yamltitle}}"
{{yamlbooktitle}}
---

# {{yamltitle}}

{{abstractNote}}

### Metadata
#zotero  #literature-notes  #reference

{{itemType}}
{{bookTitle}}
{{author}}
{{date}}
{{DOI}}
{{collections}}, {{tags}}
{{book}}
{{editor}}

#### Links
{{pdfAttachments}}

#####  Zotero links
{{localLibrary}}
{{cloudLibrary}}
3.2 Formatting Extraction of Notes:
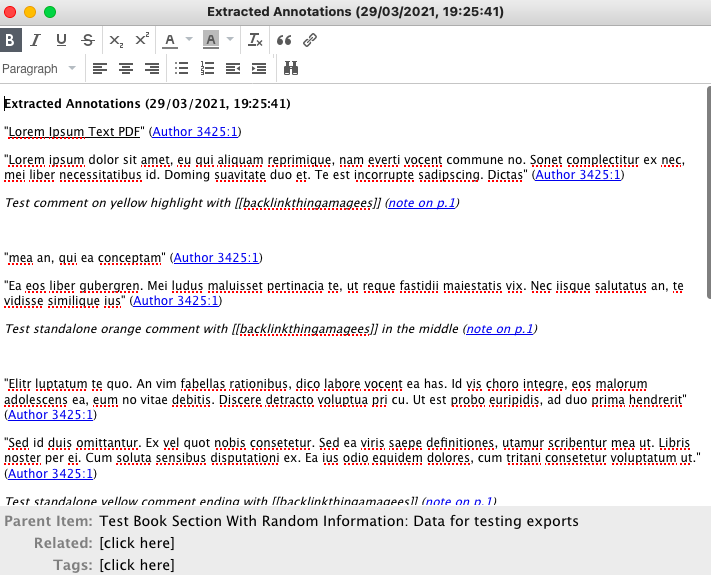
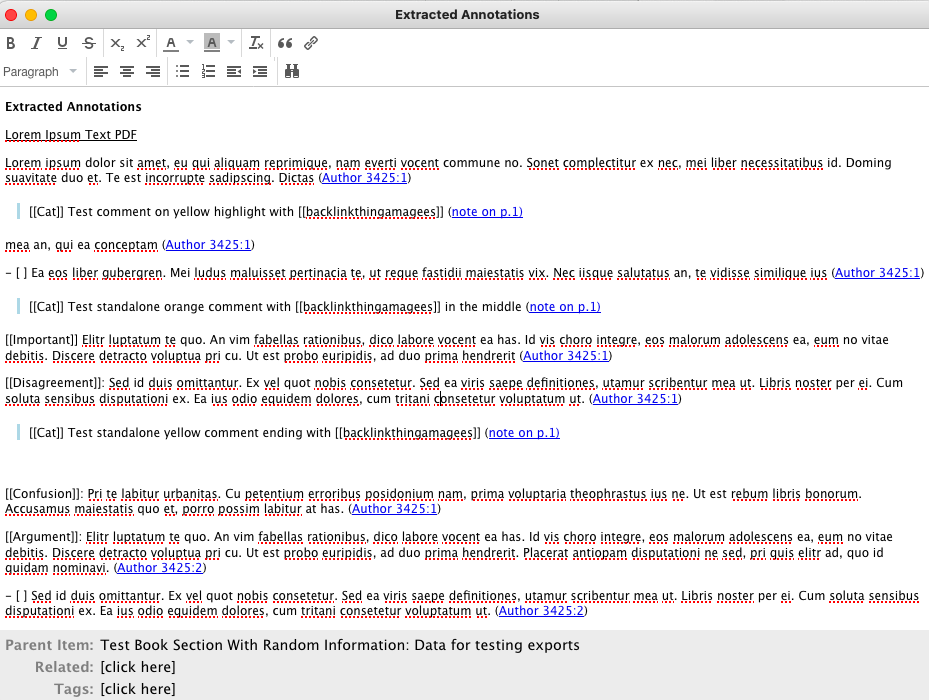
For this section, I’m going to describe zotfile hidden preferences for formatting, what they do to the zotfile Extract, and give you screenshots of the zotfile export and the corresponding obsidian export. I’ve created a sample reference item (A book section) for this, with Lorem Ipsum text as the attached PDF file. It has some annotations and highlights of different colors. I’m going to go through a few iterations of formats and give screenshots of the mdnotes output in Obsidian, along with references about what the setting does. You can use the settings for whatever format fits your needs.
I start with the default settings and add additional formats in steps so it’s easy to pick the effects you do want, and notice what’s happening with each one. I assume for this that you’re comfortable with using the config editor (described in 3.1.1 above).
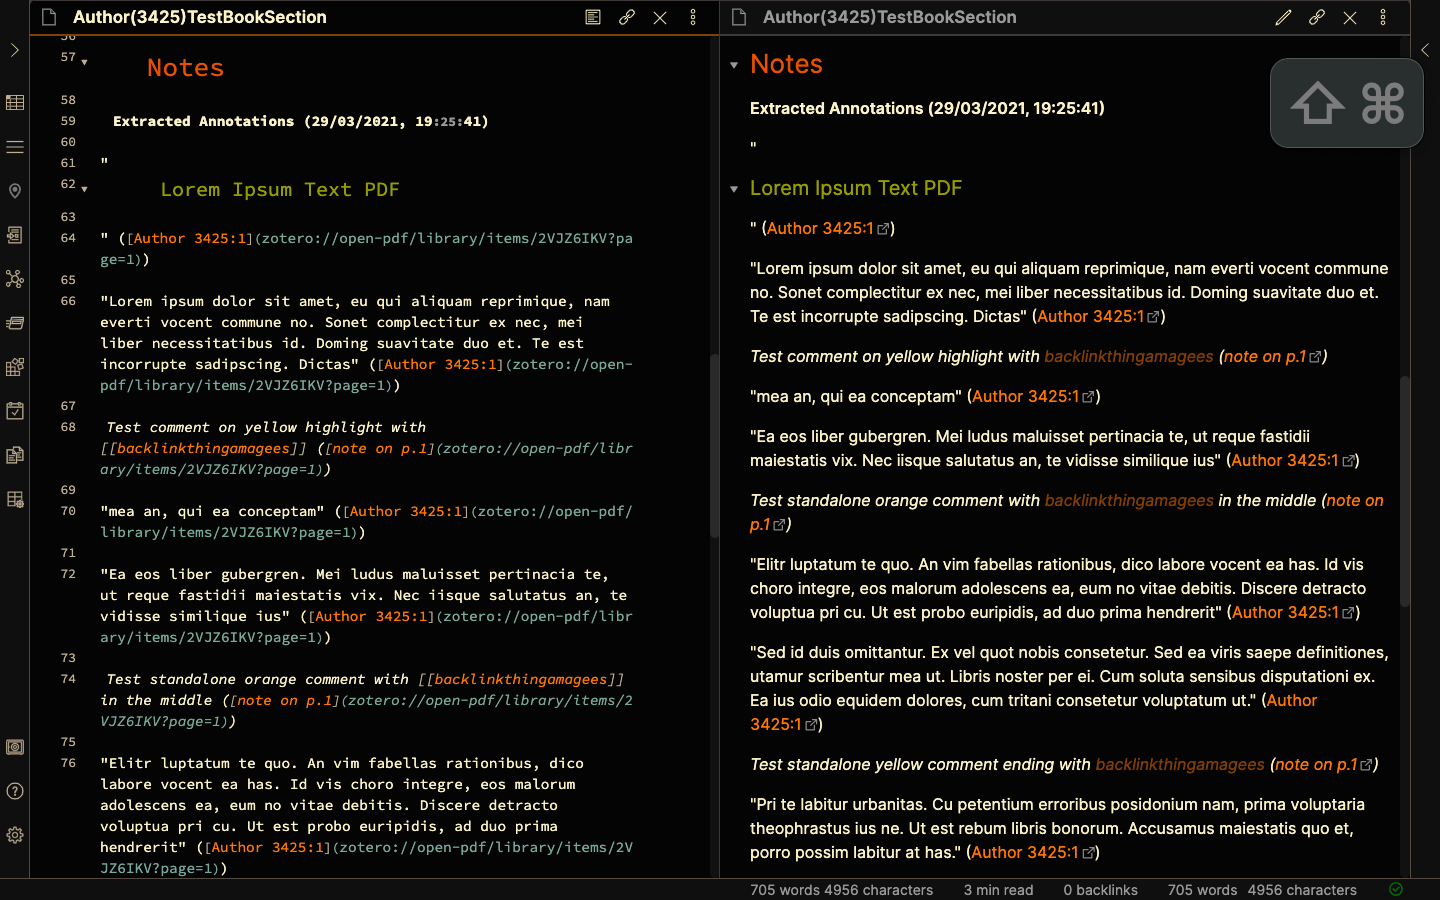
Each of these requires you to extract annotations using zotfile after adding the formatting edits in the config editor, and then exporting the whole item using mdnotes (right click on parent item → Mdnotes → Create full export note) to get the formatted output in Obsidian.
3.2.1 Default Zotfile Extraction
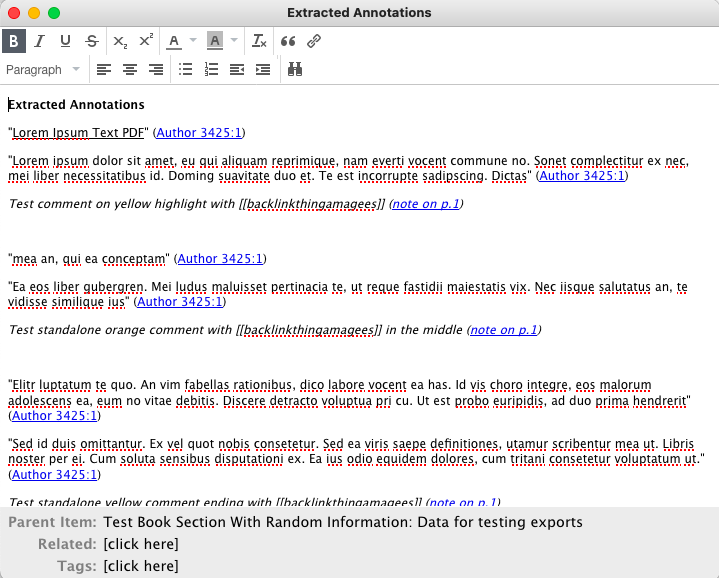
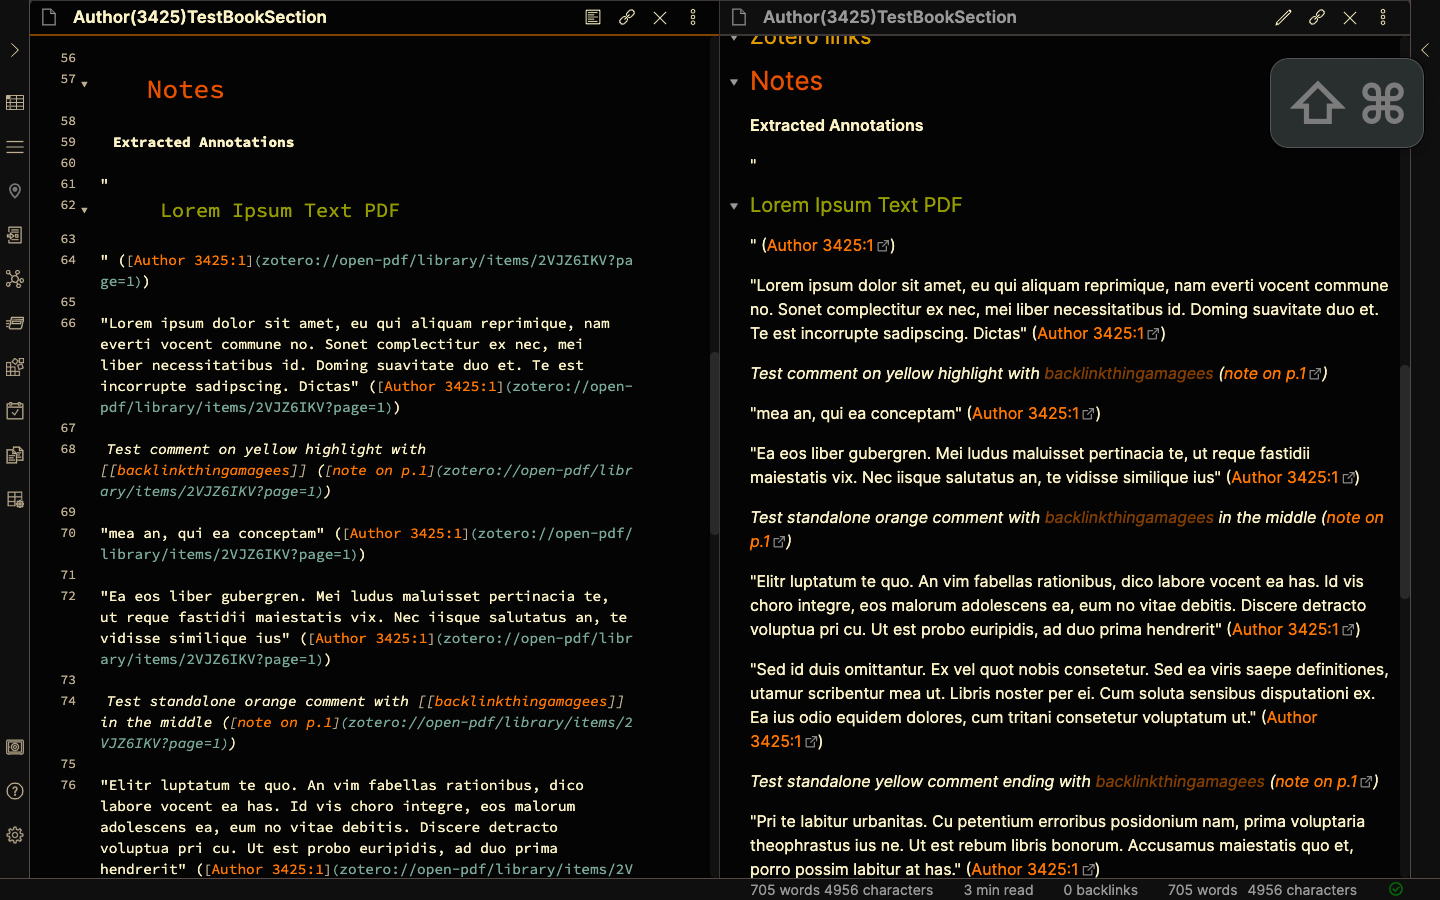
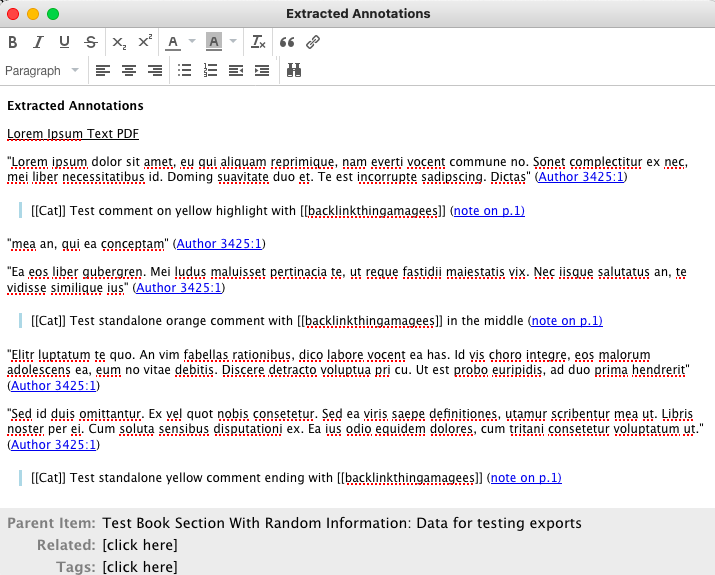
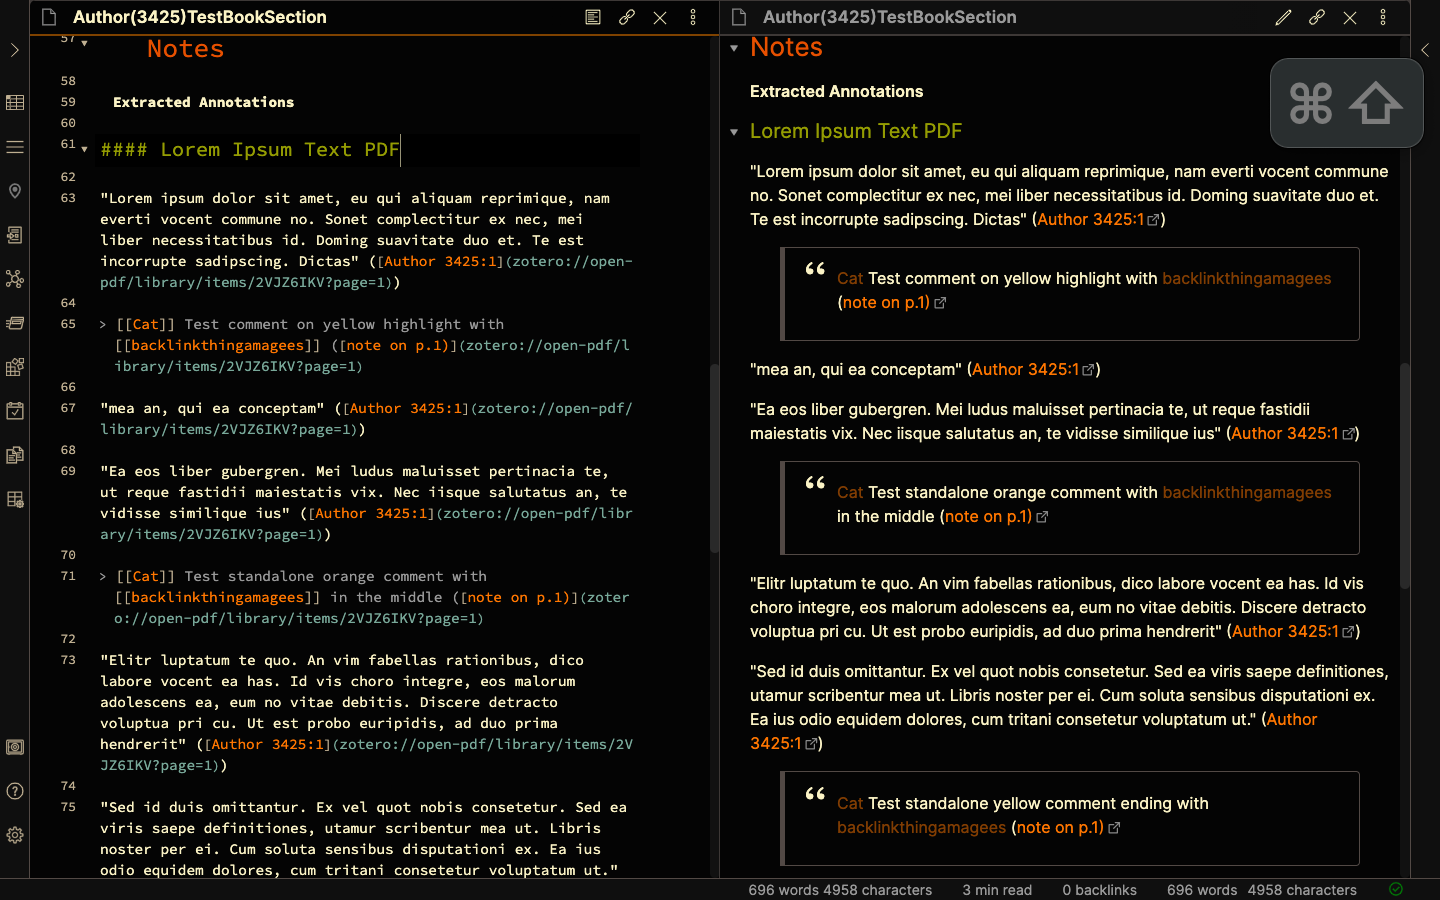
By default, Zotfile extraction of Annotations gives Highlights as text in quotes (“Lorem ipsum dolor sit amet”), Annotated comments as italicised text (Test comment on yellow highlight with [[backlinkthingamagees]]), and Underlined annotations as Underlined text in quotes (“Lorem Ipsum Text PDF”). Each of these is followed by a link that opens the page at which the annotation is made in your default PDF viewer. (Screenshots 20, 21)
3.2.2 Changing the Note Title
In zotero’s config editor, the setting extensions.zotfile.pdfExtraction.formatNoteTitle Can be edited to change the Title of the Extracted Note.
The default is <p><b>%(title) (%(date))</b><p>. Because I’m not interested in keeping the date, I change it to <p><b>%(title) </b><p>.
Output in Screenshots 22, 23.
3.2.3 Editing the Annotated Comments
I want to visually separate out my annotated comments from the parts of the main text that are highlighted. I also want to add a tag to my name for searchability.
This requires editing the extensions.zotfile.pdfExtraction.formatAnnotationNote preference.
The default is <p><i>%(content) (<a href="%(uri)">note on p.%(page)</a>)</i></p><br>
Adding Blockquotes
I change it to <blockquote><p> [[%(label)]] %(content) (<a href="%(uri)">note on p.%(page)) </blockquote><br></p>
This adds a blockquote to my annotations; that gives a visual break to emphasise that these are separate from the rest of the text when I review the reference notes, and I know that I wrote them. %(label) extracts the name of the author from the PDF reader used for the annotations. the [] tags it, so it’s backlinked to the name in Obsidian for easy reference.
Output in screenshots 24, 25.
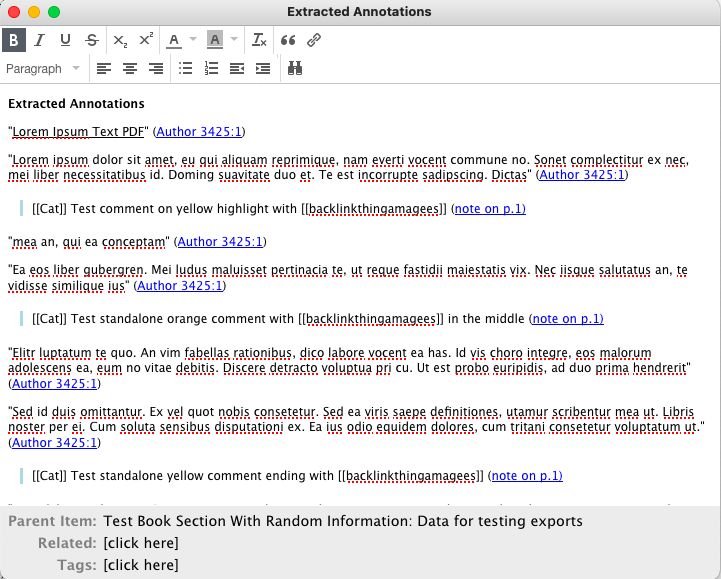
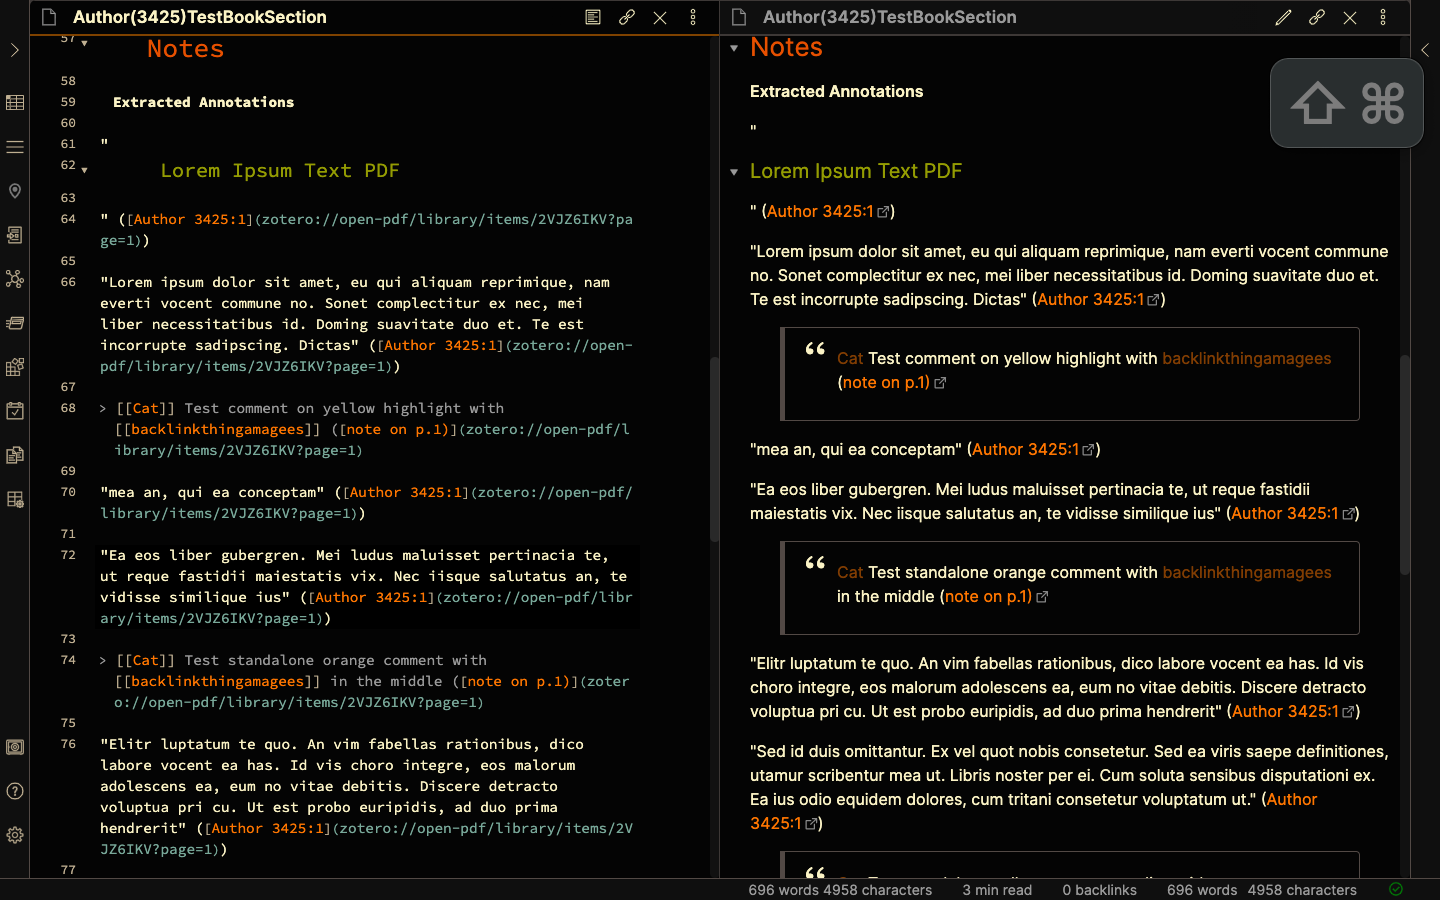
(Side note - you might prefer to put highlights in blockquotes, but since this is a reference note, I assume that the default is a quote, and try to emphasise my thoughts on the note with the blockquote, since that is what I need to pay attention to while reviewing).
3.2.4 Changing Underlines
Mdnotes converts underlines to markdown headers. This makes sectioning in the annotations easy - Underlining headers in the PDF makes them sections. To facilitate this, I edit the underline to remove quotation marks and the citation link.
The underlining can be edited in extensions.zotfile.pdfExtraction.formatAnnotationUnderline
The default value is <p>"<u>%(content)</u>" (%(cite))</p>.
I edit that to <p><u>%(content)</u><br></p>
Output in screenshots 26, 27.
3.2.5 Highlight Colors
Zotfile can extract the Highlighted text according to color. It can also separate out the annotations into separate notes according to the color of the highlight. This is controlled in the preference
extensions.zotfile.pdfExtraction.colorAnnotations. This is a boolean preference, the default value is “false”. Doulble clicking it changes it to “true”.
If you want separate notes for each color, double click on the boolean preference extensions.zotfile.pdfExtraction.colorNotes. The default value is false. Changing it to true makes zotfile extract highlights into different notes, grouped by the color of the highlight. For the screenshots, I’m keeping this value as “false”, so you can see the different colors within the same screenshot.
Output in screenshots 28, 29.
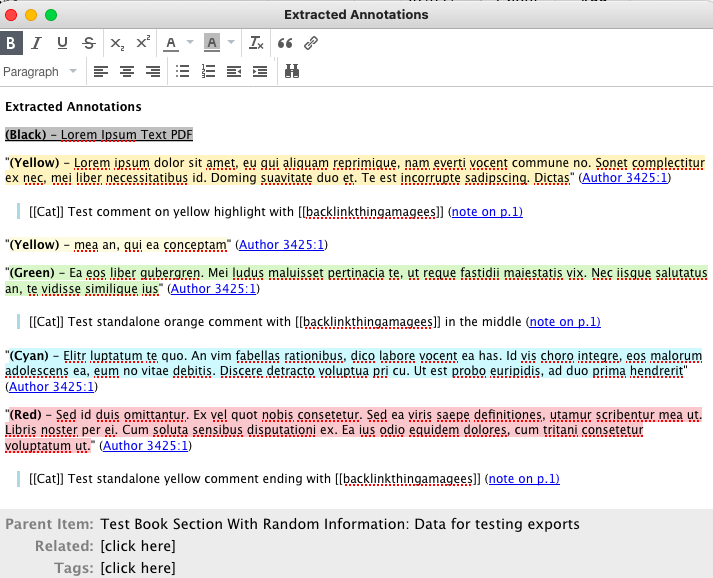
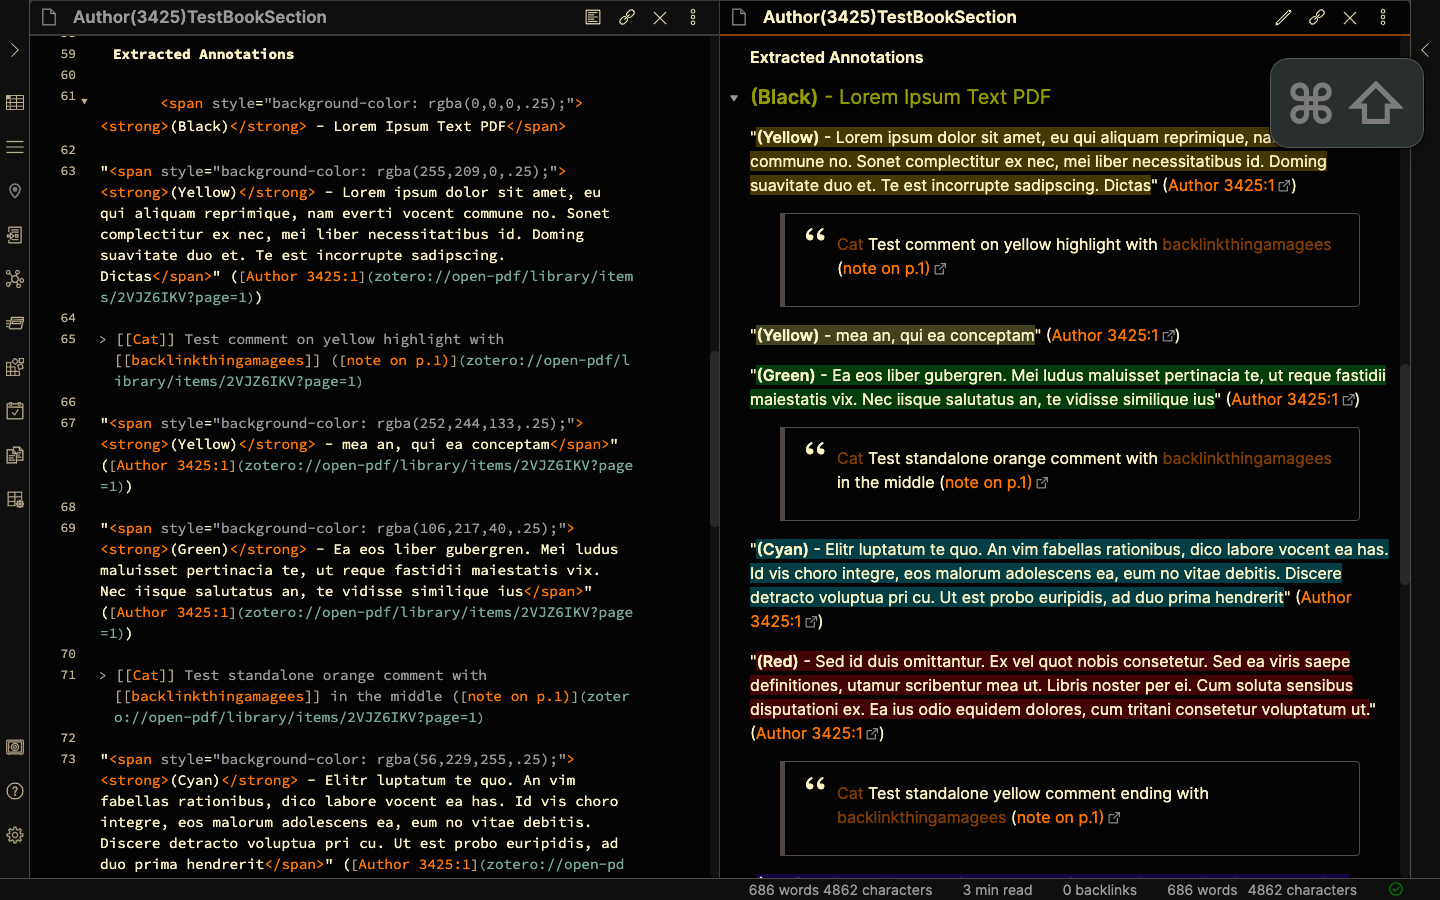
3.2.6 Editing the color title output
Now, the reason that I use colored highlights is to visually separate out what I’m thinking when I annotate a document. Yellows are default highlights, Cyans are things that the author says that I think are important for things I’m working on, reds are things that I disagree with the author of the paper on, greens are references I want to follow up and read, Magentas are places where the author critiques someone else.
Having the extracted tags name the color before each annotation does not help me much. Zotfile lets me edit the color categories, so I can tag it with whatever I actually want it to say.
This is in the preference extensions.zotfile.pdfExtraction.colorCategories. The default value is a string of colors and hex codes: {"Black": "#000000", "White": "#FFFFFF", "Gray": "#808080", "Red": "#FF0000", "Orange": "#FFA500", "Yellow": "#FFFF00", "Green": "#00FF00", "Cyan": "#00FFFF", "Blue": "#0000FF", "Magenta": "#FF00FF"}. The color names refer to a range of RGB points that will be read as that particular color category, the hexcode is the category name that zotfile can use instead. I edit this preference to read {"Black": "", "White": "", "Gray": "[[Argument]]:", "Red": "[[Disagreement]]:", "Orange": "[[Idea]]", "Yellow": "", "Green": "- [ ] ", "Cyan": "[[Important]]", "Blue": "[[Confusion]]:", "Magenta": "[[Critique]]:"}
to correspond with the labels I want it to use. I put some of these in backlinks for Obsidian.
For the green tag, I edit the hex code to use a “task” tag, which Dataview can extract.
This is insufficient for getting the output I want, however, which is for the color names to be replaced with the custom tags.
That setting is in extensions.zotfile.pdfExtraction.formatAnnotationHighlight
the default value for this is <p>"%(content)" (%(cite))</p>
I change that to <p>%(color_category) %(content) (%(cite)) <br></p>
Which tells zotfile to use the custom color tags.
Output in screenshots 30, 31.


Removing the colors, retaining colortags
Because of the excessive html text that now gets exported, I prefer not to have colored highlights in my extracted annotations. I can retain the custom color tags and remove the highlights by setting extensions.zotfile.pdfExtraction.colorAnnotations to “false” once again, while retaining the %(color_categories) wildcard in the highlight extraction.
Output in screenshots 32, 33.
Dataview
Once in obsidian, the Dataview plugin can extract and output your references based on different conditions.
In reference to my “green” color tag replacement above, one thing I like to have is an automated reading list, sorted by the book/paper I got the reference from. For this, I use
```dataview
task from #zotero
For this output, I’m restricting it to the fake tag I created (#authorref) to keep it to the fake reference note. (I usually use #zotero, which lists my reading list from all exported literature notes)
```dataview
task from #authorref
Output in screenshot 34.

Other Dataview queries and the general format for Dataview can be seen at this link.


 I think it was something due to colors being a bit incompatible with exporting the highlights(?) despite changes to the config file for zotero colors that is.