So, about Git on Mac…
To my knowledge, macOS comes with Git preinstalled. I have installed a newer version through Homebrew, but I think the preinstalled version works just fine for most users who want to use the Obsidian Git plugin.
→ It turns out that macOS does not come with Git preinstalled. If you follow the steps I describe next, it might say something about installing the XCode Command Line Developer Tools. Git should be a part of this. You can also run xcode-select --install to install them. Other options are Homebrew, like I mentioned, or see this page for more installation options.
With that in mind, you can just follow the linked guide and skip the software installation step.
You can confirm this by opening the application called ‘Terminal’ and type the word git, followed by an enter. You will see something like the screenshot with the black background in the guide:
$ git
usage: git [--version] [--help] [-C <path>] [-c <name>=<value>]
           [--exec-path[=<path>]] [--html-path] [--man-path] [--info-path]
           [-p | --paginate | -P | --no-pager] [--no-replace-objects] [--bare]
           [--git-dir=<path>] [--work-tree=<path>] [--namespace=<name>]
           <command> [<args>]
[...]
A few remarks:
-
you don’t actually need an account on Github to use Git. As the name suggests: Github is a hub for those who use Git. You can use other hubs (like Gitlab) or none at all. Github is a nice service though, I use it too.
-
If you want your Vault to be private, create a private repo on Github. If you don’t, everyone can read your Vault on the Github site.
-
Under the software installation step there is also a link to install Github desktop. This is a nice program for beginners with Git, and there is a Mac version too, so while you can skip the installation of Git itself, this Github Desktop program is still a nice one to have.
-
There is this step that says
git config --global credential.helper wincred, and that will probaby not work for Mac. I myself use SSH keys, see this guide by Github, which can be a bit advanced, and uses the Terminal again.
(There is also this guide specific to Github Desktop, but I think that will authenticate GhDesktop and not Git Obsidian.) -
There is a step about viewing hidden files, but I don’t know if that’s really a prerequisite? On Mac, I always hide and show files by changing the
trueandfalsein the following Terminal command (which I have aliased):
defaults write com.apple.finder AppleShowAllFiles -bool true && killall Finder -
The guide mentions trying to copy the
.gitfolder into your Vault. This is a nice way to avoid the Terminal, but it makes me lose track of what’s going on. I would just usegit initwhen I’m in the Vault in the terminal. (See below)
So, yes, I’m not smart enough to translate all this back to a non-terminal using guide, sorry about that. On Mac, for a new or existing Vault, I would do the following:
-
Open the Terminal application. This is a preinstalled standard Mac app, which is probably easiest to find by using Spotlight and searching for Terminal. It looks like a black box with
>_on it. -
Type
gitand hit enter to make sure macOS indeed came with git.I would be surprised if it didn’t tho.See notes above. -
Go to your Vault in Finder and press
Cmd+Ion any of the files. This will give info about the file (hence the I) and will show ‘Where’ under ‘General’. For my Vault, it shows:
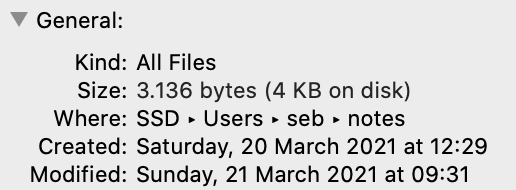
If you copy that part with SSD, it will paste like this:/Users/seb/notes. That’s the location of you Vault you need. -
Go to the Terminal again and type
cd /Users/seb/notes(with your own Vault path). You are now in your Vault in the Terminal. If you run the commandlsyou will see all your files and/or folders. -
Now that you’re in your Vault, you can type
git init. This will create a Git Repository inside your Vault. (Technically, this means it did put a.gitfolder inside of your Vault. Obsidian ignores this folder. It does nothing to your actual files.)
From here, you can just use Github Desktop by pointing it to your Vault (‘add existing repository’). If you add the repository on Github too, you can coose ‘New’ and then leave all checkmarks unchecked under ‘Initialize this repository with’. It will then give you the following commands under ’ …or push an existing repository from the command line’:
git remote add origin [email protected]:sebsel/test.git
git branch -M main
git push -u origin main
Especially the first line is important, because the Git Obsidian plugin and the Github Desktop app can manage the rest. Also note that the example uses main as branch name, but depending on your version of Git this might still be master for you.
Again, if that does not work (of if it’s asking for login) you might want to look into this guide by Github for adding SSH keys.
Hope this helps, even though it contains a lot of Terminal commands!
Edit: turns out Git is not installed by default on macOS, so I changed the text to reflect that.