To achieve this one should change the query to something like:
```dataview
TABLE WITHOUT ID
tmp[0] as Thingy,
"<span class='" + cellClass + "'>" + tmp[1] + "</span>" as Deadline
FLATTEN list(
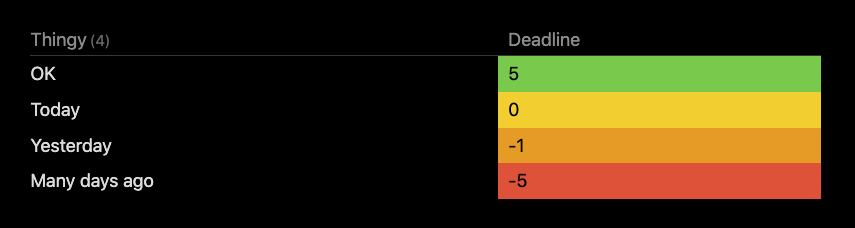
[ "OK", 5 ],
[ "Today", 0 ],
[ "Yesterday", -1 ],
[ "Many days ago", -5 ]
) as tmp
FLATTEN
choice(tmp[1] > 0, "cellOK",
choice(tmp[1] = 0, "cellWARN",
choice(tmp[1] = -1, "cellLATE",
choice(tmp[1] < -1, "cellVERYLATE", "")))) as cellClass
WHERE file.name = this.file.name
```
And then install some CSS-snippet like the following into vault/.obsidian/snippets/cellColors.css, and then go to Settings > Appearance > CSS Snippets and enable the “cellColors.css”:
.markdown-rendered .dataview td:has(.cellOK) {
  background-color: var(--color-green);
  color: black;
}

.markdown-rendered .dataview td:has( .cellWARN ) {
  background-color: var(--color-yellow);
  color: black;
}
.markdown-rendered .dataview td:has( .cellLATE ) {
  background-color: var(--color-orange);
  color: black;
}
.markdown-rendered .dataview td:has( .cellVERYLATE ) {
  background-color: var(--color-red);
  color: black;
}
I’m not the best in color stuff, but using the Minimal theme, and the code above, my list now shows up as:
Note that this trick of doing td:has(.className) is a universal trick where we now can target a higher level element, whilst using a lower element to select the former. Thusly, we can change table rows and/or cells, using some marker within the cell. This does require for a recent installer version above 1.0.0…